Een van de meest dynamische manieren om impact toe te voegen en het verstrijken van de tijd direct in video's over te brengen, is door timelapses te maken. In deze tutorial verkennen we de belangrijkste keuzes die je hebt voor het maken en bewerken van timelapse-video's om ervoor te zorgen dat ze een professionele, visuele impact hebben.
Wat je leert
- De keuze tussen het maken van foto's of video's
- De berekeningen die nodig zijn voor het maken van time-lapses
- Waarom de snelheid van je onderwerp zo belangrijk is
- Beste tips voor het maken van time-lapses
- Waarom de kwaliteit van beeldmateriaal zo belangrijk is
- De voordelen van stills voor timelapses
- Standaardvideoclips veranderen in timelapses
Wat je nodig hebt
- Een camera met idealiter ten minste 1080p, zo niet 4K-opnamemogelijkheden
- Een camera met handmatige bediening van alle belichtingsinstellingen
- Een betrouwbare camera-ondersteuning die stil blijft staan
- Een rekenmachine om de vereiste opname-instellingen te berekenen
- Een computer met professionele beeld- en/of videobewerkingssoftware
Time-lapses zijn een geweldige creatieve manier om het verstrijken van de tijd in video's weer te geven, zoals van dag naar nacht, of om veranderingen vast te leggen, zoals in- en uitgaande getijden of een bloem die langzaam opengaat in het zonlicht. Ze worden vaak creatief gebruikt in tv en films.
De Amerikaanse detectiveserie 'Rizzoli &Isles' gebruikt bijvoorbeeld vaak korte timelapse-sequenties om het verstrijken van de ene dag, door de nacht, naar de volgende dag aan te duiden, terwijl de serie 'House of Cards' timelapses gebruikt in de aftitelingsreeks.
P>Maar hoe moet je timelapses maken en met welke beste tips en technieken kun je ze meer impact geven?
Stills v timelapse-filmmodi:hoe te kiezen
Van oudsher worden timelapses gemaakt door een reeks stilstaande beelden op een camera te maken – vaak via een ingebouwde intervalmeter – en deze vervolgens samen te bewerken tot een stuk timelapse-opnamen. Dit geeft u controle over al uw stilstaande beeldbestanden, maar kan tijdrovend zijn als u eraan moet werken en ze moet bewerken voordat u de definitieve timelapse maakt.
Een alternatieve optie die in sommige huidige camera's te zien is, is een speciale timelapse-filmfunctie/modus die foto's automatisch kan samenvoegen tot een timelapse-film.
Camera's met ingebouwde timelapse-filmmodi zijn de Canon EOS 5D Mark IV en EOS 80D DSLR's, de Panasonic S1R en S1 full-frame camera's, de Nikon D850 DSLR en vele anderen.
- Nikon D850 timelapse-zelfstudie:de modi Intervalopnamen en Timelapse-films instellen
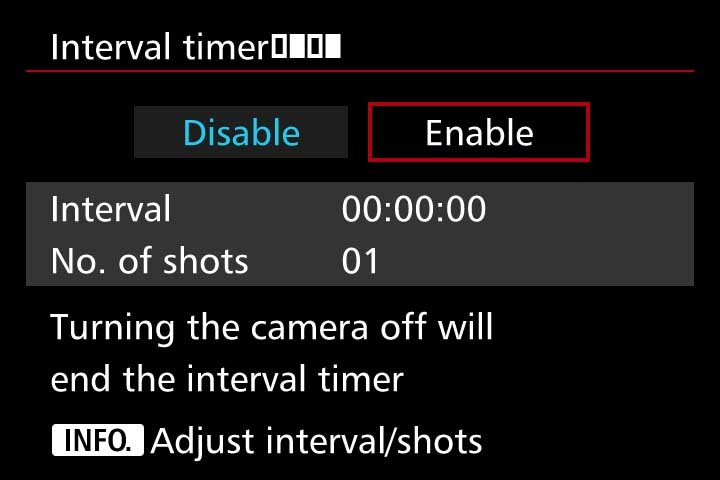
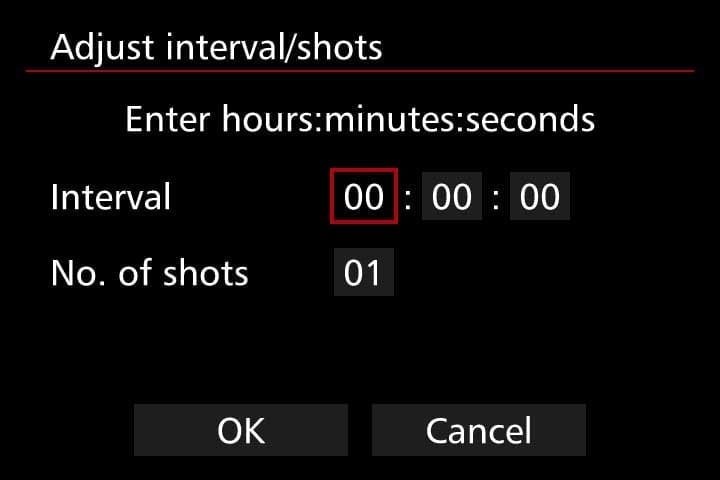
Bij camera's met ingebouwde timelapse-filmmodi hoeft u alleen maar parameters in te stellen voor de intervallen tussen elke opname, het aantal beschikbare opnamen (het maximaal beschikbare aantal verschilt afhankelijk van de camera) en hoe lang u de uiteindelijke opname wilt hebben. met andere woorden de afspeeltijd.
De timelapse-filmmodus verwerkt deze tot een volledige film en slaat het resultaat op als videobestand. The down side with this mode is it doesn’t save images as separate files during recording so you have no control over editing individual images.
There are also timelapse specific outdoor cameras such as the Brinno TLC200, which simply requires you to turn it on, set your interval, pick your subject, record and then replay your timelapse videos in-camera.

7 key tips for timelapse videos
There are certain technical considerations and parameters that you need to remember for shooting timelapses:
- As you’re creating a video, for every one second of video you’ll need to capture between 24 and 30 frames. For example, if you’re shooting 12 hours of timelapse and you take a still every minute you’ll end up with 720 still images and, at 24fps, you’ll get a 30 second timelapse. It’s best to plan how long you’d like your final timelapse clip to be and then you can do the maths to work out how best to shoot it.
- You must always consider the speed of your subject when deciding on the intervals between each shot. For fast moving subjects, such as cars or people, this will probably be well under one second whilst documenting a slowly changing landscape may only require a few shots, or a few dozen shots, per day.
- Always do a series of test shots to see if your framing, exposure settings and the chosen intervals between each still image will work. I would recommend setting exposure manually, or at least using aperture priority, so you can guarantee that you retain full control of exactly what the camera will shoot when you are not behind the lens. Relying on any auto settings can cause unwanted things, like flicker, in your final timelapse footage.
- Decide on whether to shoot your stills as JPEGs or as RAW files. If you’re planning a 1080p HD movie JPEGS should be of sufficient quality but if you want your timelapse edit to be any quality above 1080p then shooting RAW files is the best option. Shooting RAW will also give you the flexibility to edit the colours in post or to zoom in or crop on the original image files. This is simply because RAW image files ‘hold’ more information and thus will give you more flexibility at the editing stage.
- If your camera gives you the option to select a 16:9 shooting ratio it’s probably best to do so – this is the traditional cinema ratio, so the result will look more natural in a movie edit.
- A steady camera is essential for timelapses, so always use a tripod. Check to make sure it is level before setting your camera to shoot so you avoid having to straighten out any footage in post-production.
- If your camera doesn’t have an intervalometer or a built-in timelapse video function you should consider using an external remote controller for your camera or even an interval shooting app. There are a few apps available for cameras and smartphones, so just check which one is compatible with your camera or phone. Examples of such apps include Framelapse, Lapse It, Hyperlapse and iMotion.
Quality of footage &exposure length
As mentioned earlier many modern cameras offer timelapse shooting functions but, up until a couple of years ago, the downside of this was that their maximum footage resolution is just 1080p. You must decide on the quality of final footage you want before choosing such a mode or opting to shoot higher res stills and edit them together in post.
The other factor to weight up when considering to shoot stills or video for timelapses is that stills will offer you the flexibility to play with exposure times. As mentioned, shooting video means you must shoot at least 24 frames per second, so no exposure can be longer than 1/24th of a second.
In contrast shooting stills gives the flexibility to shoot longer exposures and, as a direct result, you’ll potentially get timelapses with much more impact, such as star trails or car headlights at night.
How to change standard video clips to timelapses
Whilst the advice and tips mentioned earlier in this blog are the ‘traditional’ ways of shooting timelapses, there is another way… converting standard video clips into a timelapse. Many desktop video-editing suites will allow you to convert a standard clip into a timelapse movie.
For example, in Adobe Premiere Pro, you can adjust the frame rate of a standard video clip in a way that does so by ‘posterizing’ or separating the frames. So, you could adjust a 24fps video to, say, 1fps, which will give a more ‘jumpy’ effect.
You then need to adjust the clip speed/duration (say 800%) of each frame upwards so as to alter the time between each frame, in this case eight times faster. You can experiment with the speed so you get the best look out of your clip. This speed adjustment will result in a sort of stop-motion or timelapse/hyperlapse effect.
If you decide to try this route it’s best to work with clips of around one minute in length and upwards so that you have more information to work with, otherwise you could end up with a very short timelapse clip.

Keep experimenting
Like many choices when shooting video footage you have to marry up the practical side of camera settings and what you want the creative, final result to be. If you’re a newcomer to shooting timelapses it’s perhaps best to start simple and shoot a flower opening. You can then expand this to day to night timelapses and those of moving subjects.
Whatever option you choose for shooting timelapses if you follow the tips outlined above and choose a great subject you should, hopefully, end up with a great piece of timelapse footage. Keep experimenting with different subjects, different lighting situations and different camera settings and you should quickly end up with some timelapses with that are full of visual impact and tell a story.
