DaVinci Resolve 17 is professionele en logische videobewerkingssoftware, die veel gespecialiseerde programma's omvat die geschikt zijn voor het weergeven van postproductie, zoals bewerken, afstemmen en tonen, en die de meeste video-editors gemak biedt.
Inhoudsopgave
DaVinci Resolve 17 is een videobewerkingsprogramma dat bekend staat om zijn volledige kleurcorrectiefunctie van de filmindustrie. In het begin was DaVinci Resolve, als commerciële software, erg duur tot $ 250.000. Na de financiële crisis werd DaVinci Resolve overgenomen door een bedrijf genaamd Blackmagic Design. Vervolgens werden enkele innovaties geïmplementeerd en uiteindelijk wordt het op magische wijze gratis. Tegenwoordig is de nieuwste versie van DaVinci Resolve 17 erg populair in Hollywood. Het is gemeld dat de Avengers:Infinity War , Alita:Battle Angel , Godzilla tegen Kong , en andere bekende meesterwerken uit Hollywood-films maken allemaal gebruik van DaVinci Resolve.
Ondertussen kan DaVinci Resolve 17 ook drie platforms omvatten:Mac, Windows en Linux, wat video-editors veel gemak kan bieden. Hierdoor is de video-editor niet beperkt tot één apparaat om te bedienen en is het een uitstekend alternatief voor Windows Movie Maker.
Aangezien DaVinci Resolve 17 zo professioneel is, betekent dit natuurlijk dat deze software relatief moeilijk te leren is. Maar voor beginners is het nog steeds snel om gemakkelijk aan de slag te gaan, en het is een ideale optie voor YouTube-videomakers. U kunt enkele van de bedieningsvaardigheden beheersen die gewoonlijk nodig zijn door een paar uur te besteden. Als je iets professioneler wilt weten, kost het je veel tijd om te studeren.
Wanneer u de DaVinci Resolve 17 opent, ziet u veel foto's van wijzigingen op de laadpagina, die zijn aangebracht door DaVinci Resolve 17
Meer recente recensies : Filmora-recensie, Pinnacle Studio Ultimate-recensie, VideoStudio Ultimate-recensie
Davinci Opstartscherm oplossen
Een snelle blik op ons oordeel
...Hoewel het veel professionele functies bevat, wordt het nog steeds voortdurend bijgewerkt en verbeterd om aan meer behoeften van video-editors te voldoen. Bovendien proberen ze veel functies te vereenvoudigen zodat beginners sneller aan de slag kunnen…
Voor- en nadelen
DaVinci Resolve is een eenvoudig maar ook complex videobewerkingsprogramma. Hiermee kunt u in korte tijd een videobewerkingsbewerking voltooien en moet u ook veel tijd besteden aan het leren van deze zeer gespecialiseerde functies.
PRO'S
NADELEN
Prijzen
DaVinci Resolve 17 komt in twee versies. De eerste is de gratis versie, die 90% van de functies van de betaalde versie bevat. En de betaalde versie - studioversie ($ 295,00 voor permanente versie). Voor de meeste mensen kan de reguliere versie echter al aan al uw behoeften voldoen.
Ga naar de officiële website om de DaVinci Resolve 17 te downloaden. U kunt deze openen via deze link:http://www.blackmagicdesign.com/products/davinciresolve/
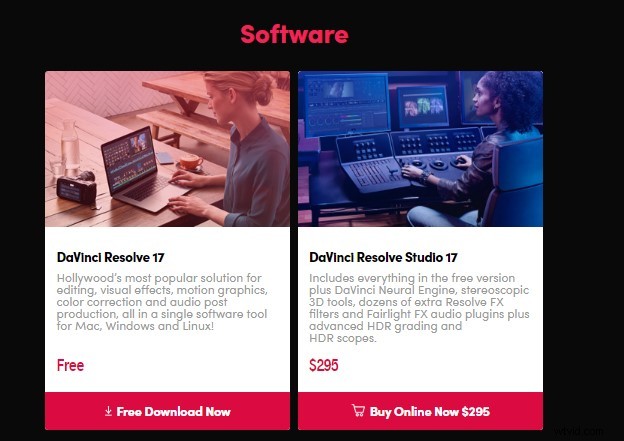
Davinci Prijzen oplossen
Basisinstellingen
Nadat u de hoofdpagina van DaVinci Resolve 17 hebt geopend, klikt u op het softwarelogo van DaVinci Resolve in de rechterbovenhoek, zoekt u de voorkeur en selecteert u Gebruiker. Vervolgens kunt u de taal instellen, opslaan, afspelen, bewerken enzovoort. Het wordt aangeraden om de opties voor real-time opslaan en projectback-up uit te checken op de pagina Projecten opslaan en laden om te voorkomen dat de huidige voortgang op tijd wordt opgeslagen wanneer de computer crasht. Dit is ook een groot voordeel van DaVinci Resolve 17.
Basisinstellingen kunnen uw efficiëntie tot op zekere hoogte verbeteren, en u kunt deze software beter begrijpen en leren in de taal waarin u goed bent.
Sommige gebruikers vinden het afspelen van DaVinci Resolve 17 mogelijk vertraagd of stotterend, de snelle oplossing ligt in de basisinstellingen.
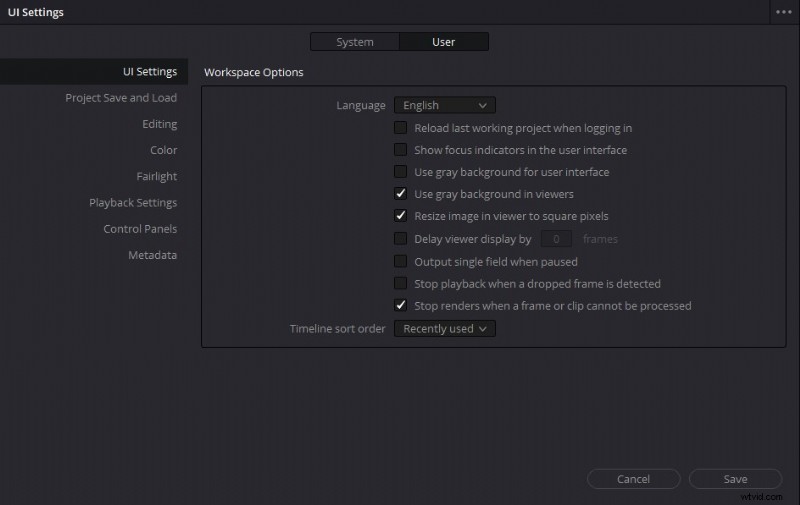
Davinci Resolve-instellingen
Hoofdinterface
Er zijn zeven panelen aan de onderkant van de hoofdinterface van DaVinci Resolve 17, die overeenkomen met zeven verschillende stadia van creatie:Media, Cut, Edit, Fusion, Color, Fairlight en Deliver.
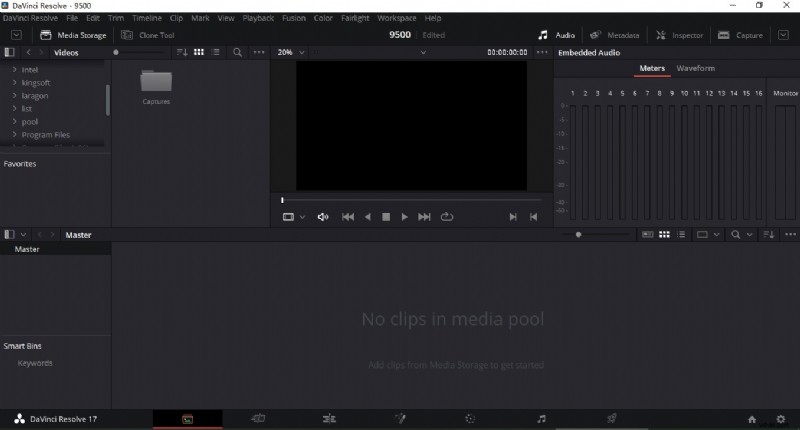
Davinci Resolve-interface
Media
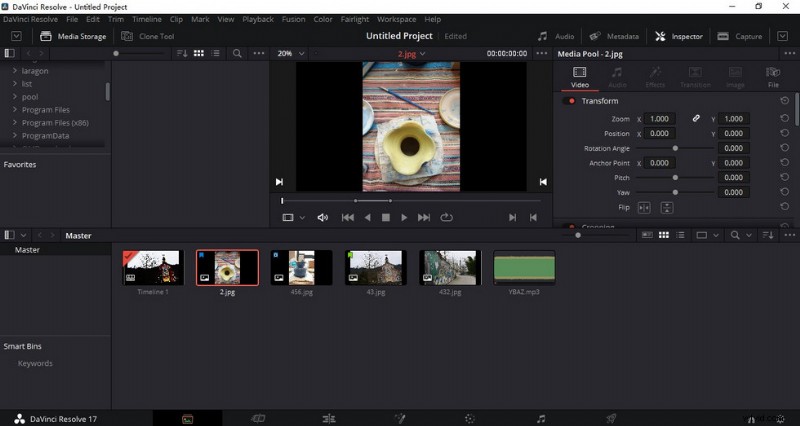
Het Media-paneel van DaVinci Resolve wordt voornamelijk gebruikt om bewerkingsmateriaal te classificeren en op te slaan. Het is verdeeld in vier blokken:mediabrowser, materiaalmonitor, mediapool en materiaalgegevens.
Op de mediapagina kun je materiaal importeren. Meestal moet u de map zoeken waar het materiaal zich in de mediabrowser bevindt. Nadat je het hebt gevonden, kun je het controleren op de materiaalmonitor. Tegelijkertijd kunt u de materiaalgegevens in de juiste interface controleren en deze vervolgens naar de mediapool slepen om te wachten op bewerking. Natuurlijk kunt u ook bestanden direct vanuit de map naar de mediapool slepen voor gebruik. Maar deze methode wordt niet bijzonder aanbevolen. Het is onmogelijk om de materialen op deze manier te classificeren. Als je eenmaal te veel en diverse materialen gebruikt, zal deze manier je in de war brengen. Daarom moeten we tijdens het bewerken aandacht besteden aan het samenvatten van de materialen en niet alle materialen op elkaar stapelen, wat een enorm project zal zijn als je eindelijk een stuk materiaal moet vinden dat je wilt.
In de linkermarge kunt u nieuwe mappen aanmaken en al uw materialen in deze mappen in categorieën opslaan.
Davinci Resolve Mediapaneel
Een probleem waar bij het importeren veel aandacht aan moet worden besteed, is dat u de framesnelheid van het project na het geïmporteerde materiaal niet kunt wijzigen. Daarom moet u het instellen op een geschikte framesnelheid voordat u het in een vroeg stadium importeert (klik op bestand-projectinstellingen-hoofdinstellingen-tijdlijn framesnelheid), anders zal het gemakkelijk leiden tot het overslaan van frames of het vastlopen van de latere video.
Bewerken
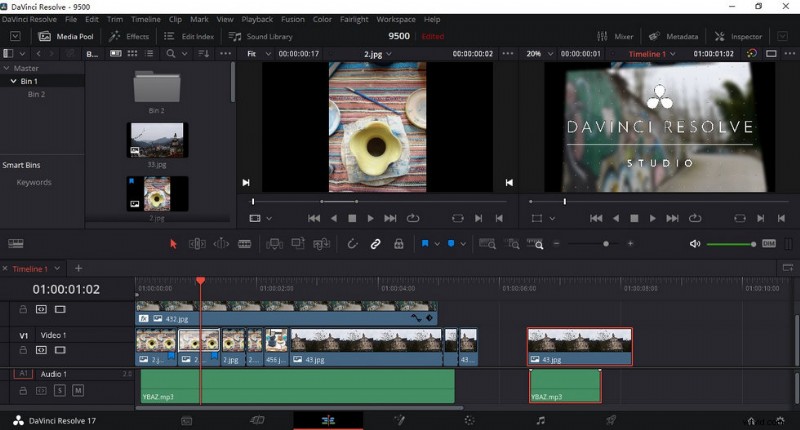
Na het importeren van het materiaal kun je de video bewerken. Dan kom je in het paneel Bewerken. Eerst moet je het materiaal zeven. Dubbelklik op het materiaal om het weer te geven in de materiaalmonitor en gebruik vervolgens "I" en "O" als toegangspunten om het materiaal te onderscheppen. Nadat je het materiaal hebt geselecteerd, sleep je het naar de tijdlijn voor patchwork en montage. Hier zijn er drie verschillende instellingen voor materiaalweergave in de mediapool van DaVinci Resolve 17, die u naar eigen voorkeur kunt kiezen.
Er zijn veel verschillende pictogrammen boven de mediapool. De functie van de eerste muisknop is hetzelfde als die van andere videobewerkingssoftware. Het wordt gebruikt om de video te slepen en neer te zetten om deze langer of korter te maken. De tweede is de trimbewerkingsmodus. Wanneer je in deze modus een bepaald materiaal naar het midden sleept, zal het materiaal achter het materiaal ook meebewegen. This can save the previous deletion step under the mouse button function.
This mode is very suitable for fine-tuning the specific content of each piece of material during fine cutting. The next function is dynamic trimming mode, which allows you to observe the connection between two clipping points during playback. However, this function will not be used frequently. The knife function, as its name implies, can divide the video into two parts. Of course, Davinci Resolve can be excessive for basic video editing needs like trimming videos, in that case, our guide on how to trim videos for free can definitely help.
The next three functions are used to insert material. You can choose to insert the newly added material between existing material segments, cover the current material segment or directly replace the currently selected material segment. Activating the magnet function, you will find that when you drag the new material into another material, it can automatically be absorbed to the end of the previous material without having to be accurate to each frame manually. This effect can greatly save your time editing. The audio-video link effect is used to bind your video and audio together, which is very useful. In this screen, you can easily do voiceover to videos as well.
After activating this effect, as long as you drag your video, its corresponding audio will also move with it. This can effectively avoid the dislocation of your video and audio, leading to the whole video chaos. But if you accidentally drag the video in the early stage and forget to use this function, and you want to get the audio back later. Then you can select the audio material and press F to reopen the material monitor. DaVinci Resolve 17 will automatically locate the position of the clip for you. You only need to drag the audio into the video separately, and then select these two pieces of material to connect manually. The last position lock button is to fix a picture in a specific position.
It’s worth mentioning that, as Davinci Resolve 17 is such professional, certain video effects and functionalities like video transitions and chroma key are hard to achieve with Davinci Resolve.
Davinci Resolve Tracks
DaVinci Resolve 17 can support more than 2000 tracks.
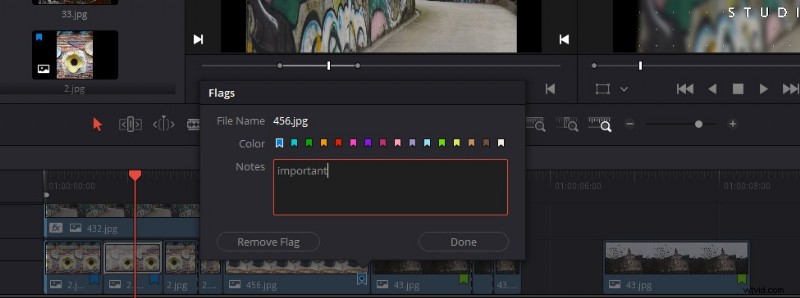
It is worth mentioning the two blue buttons beside. Although they are all used for marking, they are different. The first blue button is used to mark the whole original material. Even if you do some cutting or other operations on it later, the mark will always be there. This mark can be selected in different colors, which means that you can use it to distinguish different types of materials. The second mark button is mainly used to mark the timeline. Double-click this tag, you can freely add notes or keywords for later searching for fragments.
Davinci Resolve Mark
The mark function is especially useful in teamwork.
In this Media panel interface of DaVinci Resolve 17, Effects, Edit Index, Sound Library, and other special settings are shown in the upper left corner. You can drag the video or audio effect you like to add. After adding the effect, we can click the Effect Inspector button in the upper right corner to adjust the specific parameters, zoom in/out videos, rotate videos, and other functions of the material.
Cut
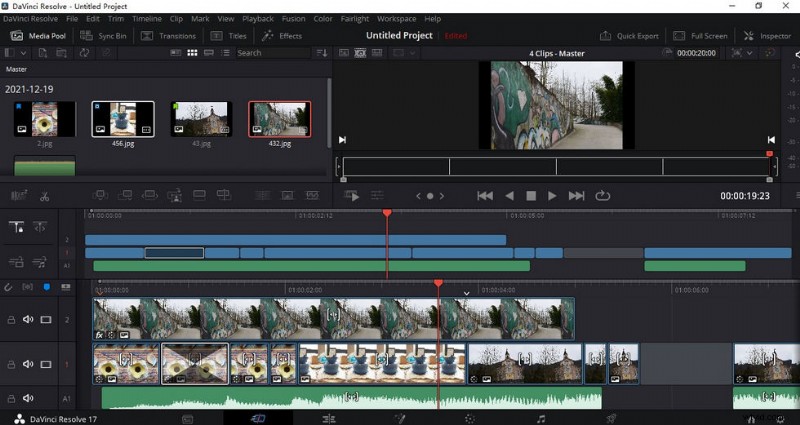
Having said that, do you wonder what is the difference between the Cut panel of DaVinci Resolve 17 mentioned above and this Edit panel? Click into the Cut panel, you will find that it is similar to the Edit panel. It just combines the material with the timeline monitor and adds a timeline overview, which is more suitable for rough video editing or time-sensitive content editing. At the same time, when you are familiar with editing operations, this interface will omit many repetitive operations and speed up the pace of previewing your material, which will greatly improve your efficiency. In this interface, you can even export it without going to the Export panel. You can finish your creation directly to click the Quick Export button.
Davinci Resolve Cut
Click on the sleepy icon in the middle left of the Cut Panel, and it will prompt you where your video is boring and why, and you can make appropriate adjustments according to it.
How does it do fast editing? In the upper-middle position of the Cut panel, you will find a button like film-the Source Tape button. After clicking, you will find that all the materials will be presented one by one in the monitor window in chronological order. At this time, you only need to press the “L” key on the keyboard, and these materials will start to play automatically. If you want to intercept a piece of material, you only need to press “I” to mark a starting point, and press “O” at the end to indicate the end of the intercepted piece. Then use F9 to place this clip on the timeline. Also, press the “L” again at normal speed to play at double speed. So this means that you can complete the whole editing process on the keyboard without using a mouse at all.
Fusion
DaVinci Resolve’s Fusion panel is mainly used for animation. Firstly, this panel is separate software, which has been continuously improved and upgraded to be merged into DaVinci Resolve 17. Here you can use a variety of 2D and 3D tools to create visual effects and dynamic graphics. There are also 27 new special effects, including noise reduction, lens blur, and image restoration.
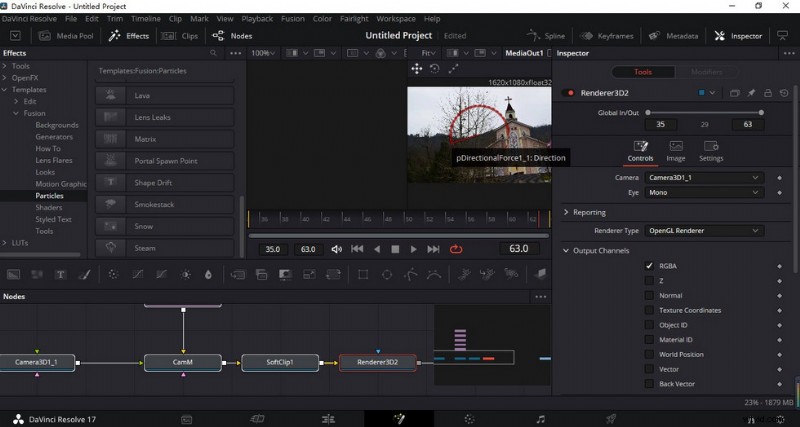
Davinci Resolve Fusion
Fusion is difficult for beginners, so it is recommended to search for related tutorials on the official website or YouTube for learning.
Color
After you have finished editing the video, DaVinci Resolve’s color matching function supports you to color every shot. The panel in the upper right corner is a node switch, which is the core logic of DaVinci Resolve color matching. OpenFX is a special effects library for color matching. Here you can polish your video, darken it, remove haze, change the color space, blur it, etc.
Lightbox is used to preview all your shots. Click the Color Control at the top to quickly match the colors between different shots according to the intuitive feeling of thumbnails. First, you can set Shadow, Midtone, Highlights, and Offset for each shot. There are three ways to adjust these parameters. First, drag the white dot on each circle directly. The second is to adjust the parameters by moving the mouse left and right. The last one is to input parameters directly. But it requires you to have a professional knowledge of these color parameters.
On the right is RGB Mixer, that is, the channel mixer. It controls the number of red, green, and blue channels in the main picture. This function is relatively professional which will be difficult for freshmen. It requires you to know something about color science.
Next, there is the color matching node. DaVinci Resolve 17 has two main nodes. The first is a serial node. This means that the adjustments made by each node will be copied and pasted directly into the next node. For example, if you adjust its exposure at the first node and adjust its saturation at the second node, then the third node will show the effect of simultaneous adjustment of exposure and saturation.
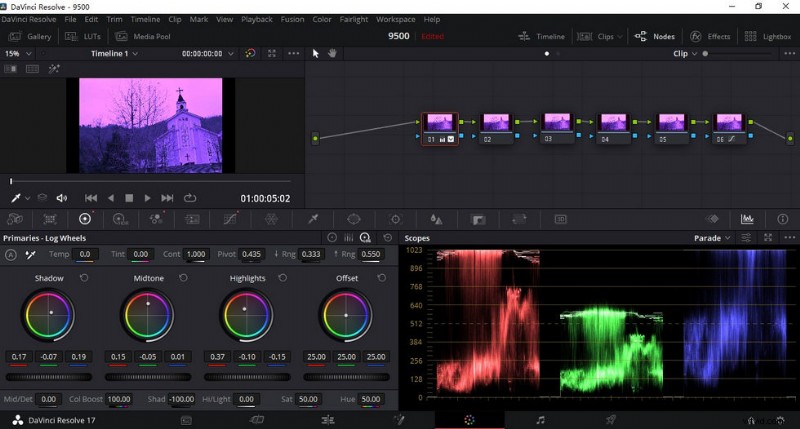
Davinci Resolve Serial Node
Many functions have been added to DaVinci Resolve 17 color management, which can help you to simplify your workflow and improve your image quality.
The second node is the parallel node. You can add it by clicking Right-click -Add Node-Add Layer or using the shortcut key Alt+P directly. The logic of this node is that the influence of each node in parallel.
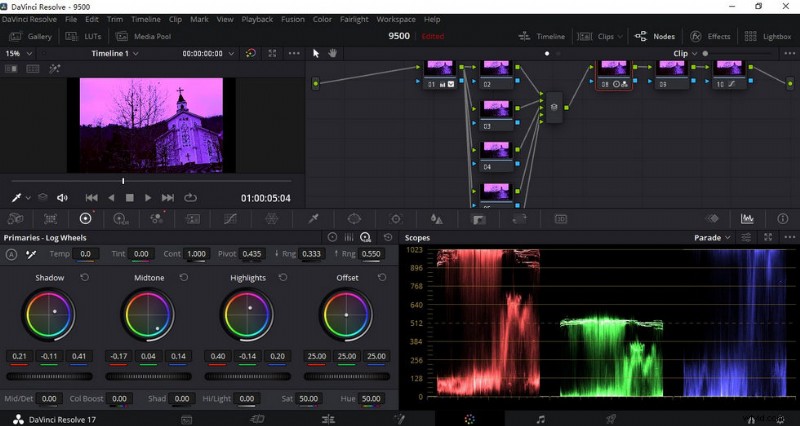
Davinci Resolve Parallel Node
In addition, you can also decrease the noise in your video in this interface. Make your video cleaner. Finally, I’d like to introduce a commonly used function, that is, the gradient function. Usually, it will be used for secondary toning of the sky to make the sky bluer.
Fairlight
DaVinci Resolve 17 supports editing the audio in the video separately. On this panel, you can adjust the sound effects of your audio, store commonly used background music, make mixing, dynamic audio tracks, and other operations. Another powerful function is the later dubbing, which can record in real-time. This is often used in the post-production of movies and TV plays.
Davinci Resolve Fairlight
Audio is a vital part, and a clear voice can better express what you want to convey.
Deliver
When finishing your video, you can go directly to the Deliver panel. Format, resolution, quality, and keyframes can be set by yourself when exporting. After exporting, you can not only get a video but also get a recipe. This allows you to leave the bottom so that you can make changes on this basis next time, thus increasing the efficiency.
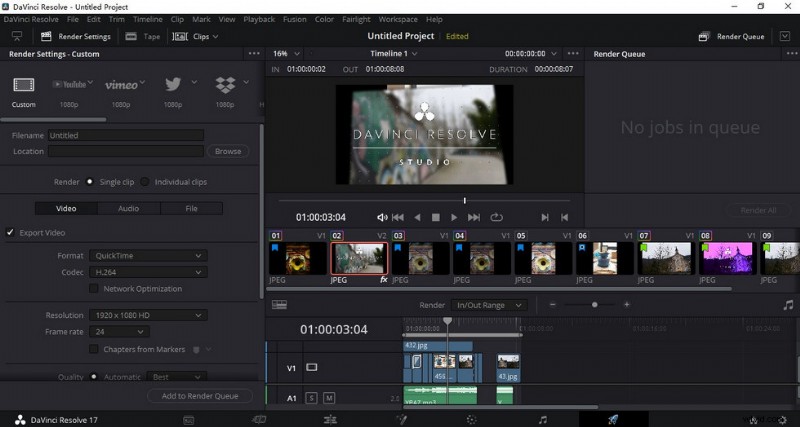
Davinci Resolve Deliver
If the file you edited is large, it may take some time to complete the export, please be patient.
Find trouble exporting DaVinci Resolve to MP4? Please see our guide on how to export DaVinci Resolve.
Is it Worth Downloading or Buying?
DaVinci Resolve 17 is a kind of very powerful video editing software. Even though it has covered many professional functions, it is still constantly updated and improved to meet more needs of video editors. Additionally, they are trying to simplify many functions for beginners to get started more quickly. Now, novices need to spend a lot of time and energy studying this software if they want to operate it skillfully. But what you learned, in the end, will certainly not disappoint you. Once you have mastered the basic logic and function of DaVinci Resolve 17, it will make a qualitative change in your video.
Additional Reading:Best Free Davinci Resolve Alternative You Should Totally Try
FilmForth is on the top of our list of best free video editing software and it can serve as a perfect Davinci Resolve alternative for Windows 10 and Windows 11 PCs. FilmForth is completely-free, intuitive, incredibly easy to use, and it doesn’t export videos with watermarks, making it a perfect option for video editing beginners. According to FilmForth user reviews, FilmForth is just as complete as Davinci Resolve.
What’s more, FilmForth can be versatile as well, it offers a variety of video editing options including trimming videos, cropping videos, resizing videos, adding customizable text to videos, splitting videos, adding gifs/stickers/special effects to videos, detaching/changing/adjusting audio, adding transitions, reversing video, changing video playback speed, even creating YouTube intro with templates, and a lot more.
FilmForth is available from Microsoft store, hit the download button below to get it for free, and it will install on your computer in less than 2 minutes!

How to Edit Videos with FilmForth Free and Effortlessly
Step 1. Import Video into FilmForth
Editing video with FilmForth is super duper easy, first launch FilmForth from Windows start menu, hit the New Project button in the middle, and click ADD VIDEO/PHOTO CLIPS button to import your videos/photos.

Import the Video
Step 2. Edit Videos with FilmForth
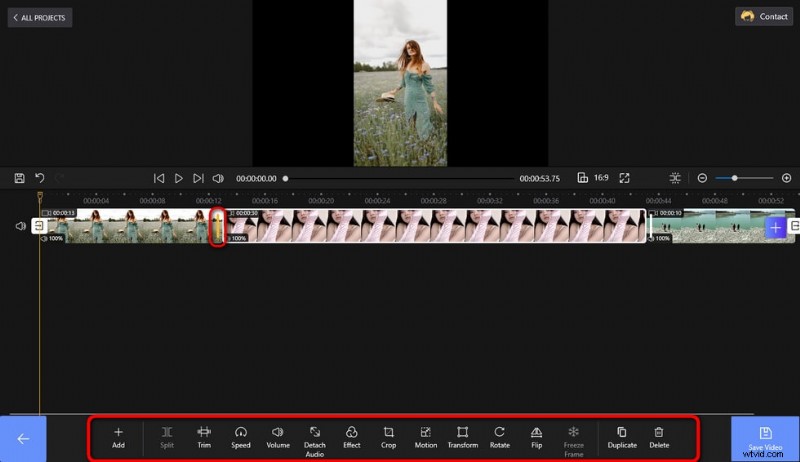
After videos are added to FilmForth, you can click to select a video clip in the timeline to edit it. There are clickable buttons in the timeline and the operation panel below for you to quick edit the video.

Edit Your Videos
Step 3. Export Videos from FilmForth
When you’re done editing, hit the Save video button from the lower right side to customize video parameters and export the video, simple as that! So don’t hesitate to give FilmForth a try!
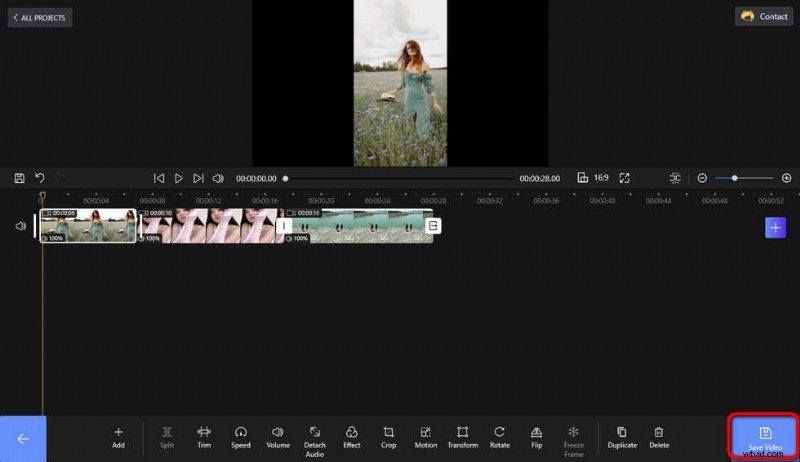
Video opslaan en exporteren
