Elke minuut wordt er meer dan 500 uur aan video naar YouTube geüpload. Het is echter slechts 10% van de meest bekeken YouTube-video's die 79% van alle weergaven genereert.
Dus hoe zorg je ervoor dat je alle vakjes aanvinkt om een video te maken die goed presteert?
We hebben al het voorbereidende werk gedaan en deze definitieve, stapsgewijze handleiding samengesteld over hoe je een goede video voor YouTube kunt maken, zodat je de tijd en moeite bespaart om alles zelf uit te zoeken.
We hebben alles besproken:van het definiëren van je YouTube-strategie en het selecteren van de juiste apparatuur tot het opnemen en bewerken van je video's waarvoor je eenvoudig InVideo's kunt gebruiken online video-editor . Je kunt meelezen of naar een sectie springen waarin je erg geïnteresseerd bent.
Laten we aan de slag gaan!
(1) Hoe je een YouTube-strategie maakt
(2) De juiste YouTube-apparatuur aanschaffen
(3) Hoe je goede YouTube-video's maakt op je telefoon
(4) Je opnamen plannen
(5) Je video opnemen
(6) Een YouTube-video bewerken
(7) Je video uploaden naar YouTube
(8) Optimaliseren voor YouTube SEO
(9) Je YouTube-video's promoten
(1) Hoe je een YouTube-strategie maakt

Het samenstellen van een effectieve YouTube-strategie omvat vier belangrijke pijlers:
(A) Identificeer uw publiek
Om de zaken op gang te brengen, ver voor jou record bereikt je wilt de volgende vragen kunnen beantwoorden:
- Voor wie wil ik mijn video's maken?
- Welke waarde wil ik toevoegen aan hun leven?
Voor beginnende makers van inhoud is dit een belangrijke stap om hun publiek te kunnen identificeren; voor merken is het absoluut cruciaal .
Als je een merk bent dat wil begrijpen hoe je een YouTube-video maakt, weet je waarschijnlijk al wie je doelgroep is; maar je moet ook weten wat specifiek hun aandacht trekt op YouTube, waar ze naar zoeken en wat voor waarde jouw inhoud voor hen kan opleveren.
Het helpt als je het opsplitst —
Creëer een persona op basis van de probleemstelling, leeftijd en locatie (en beroep, indien van toepassing). Dit zal u helpen uw publiek beter te begrijpen en u in staat te stellen inhoud te creëren die precies is waarnaar zij op zoek zijn.
Laten we bijvoorbeeld zeggen dat u een animator bent die tutorials maakt, voornamelijk voor hobbyisten en ontwerpstudenten in de VS, in de leeftijdsgroep van 15-30 jaar. Je kunt deze persona verder uitwerken in termen van waar de doelgroep naar op zoek zou kunnen zijn en dat is waar je met video-ideeën kunt komen.
(B) Vind de juiste zoekwoorden
Het idee is om relevante zoekwoorden te vinden met een aanzienlijk zoekvolume. De beste plaats om te beginnen is het platform waarop u met hen gaat communiceren:YouTube.
-
De automatische aanbevelingsengine van YouTube
De automatisch aanbevolen zoekbalk van YouTube vertelt je naar welke onderwerpen mensen in en rondom jouw onderwerp het meest zoeken, en welke video's daarvoor in aanmerking komen.
Wanneer u bijvoorbeeld ‘fotografie’ in het zoekvak typt, krijgt u de volgende populaire resultaten:
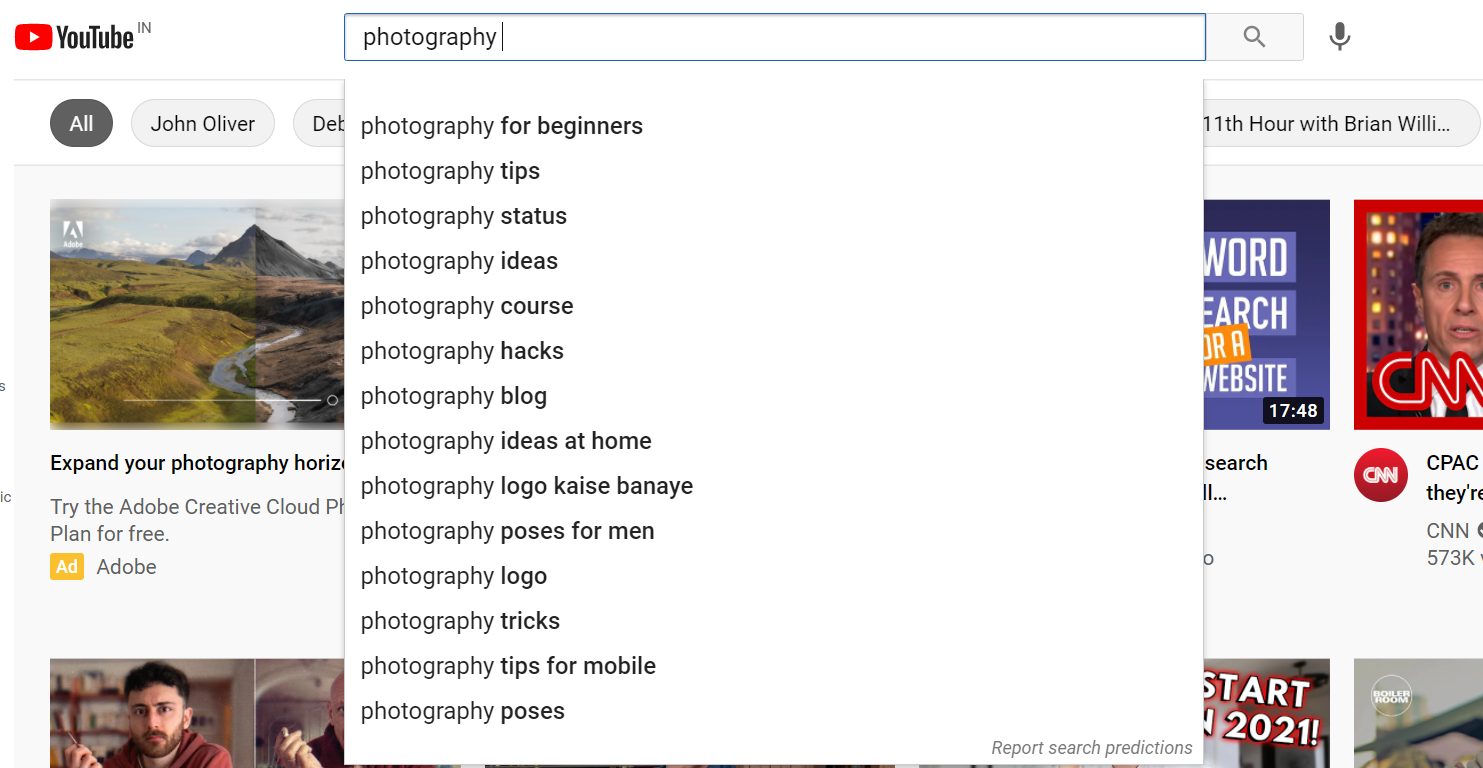
Naarmate u meer woorden aan uw zoekopdracht toevoegt, krijgt u steeds relevantere zoekintenties die u kunnen helpen video-ideeën af te leiden.
Je kunt een stap verder gaan door op een van de resultaten te klikken en de video's te bekijken die hiervoor zijn gerangschikt.
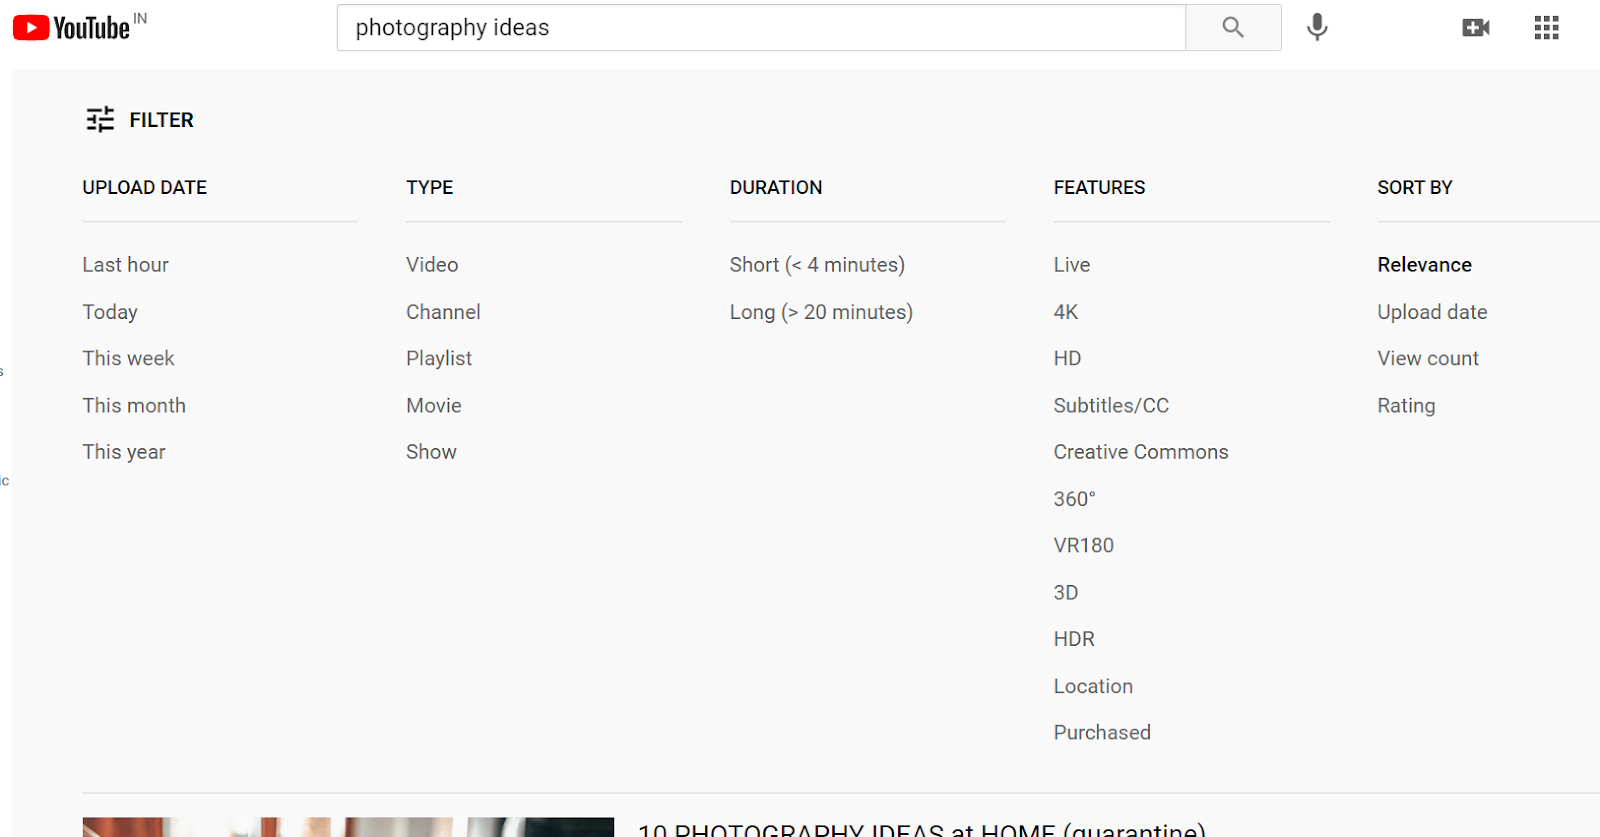
Je kunt ook filters gebruiken om de meest recent geplaatste video's te bekijken en deze te sorteren op type, duur, functies, aantal weergaven, beoordeling en duur.
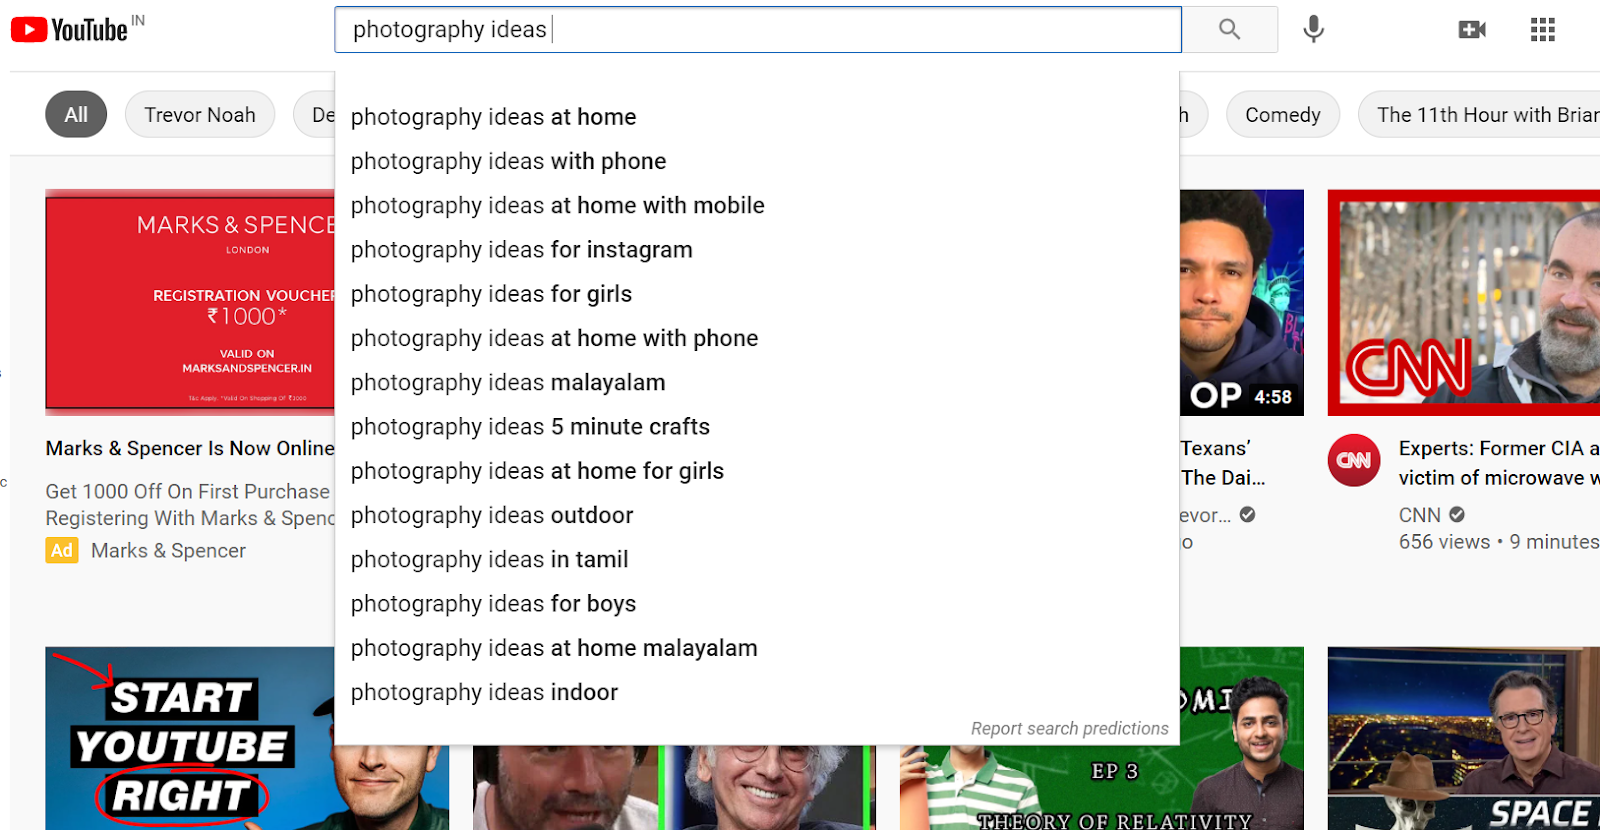
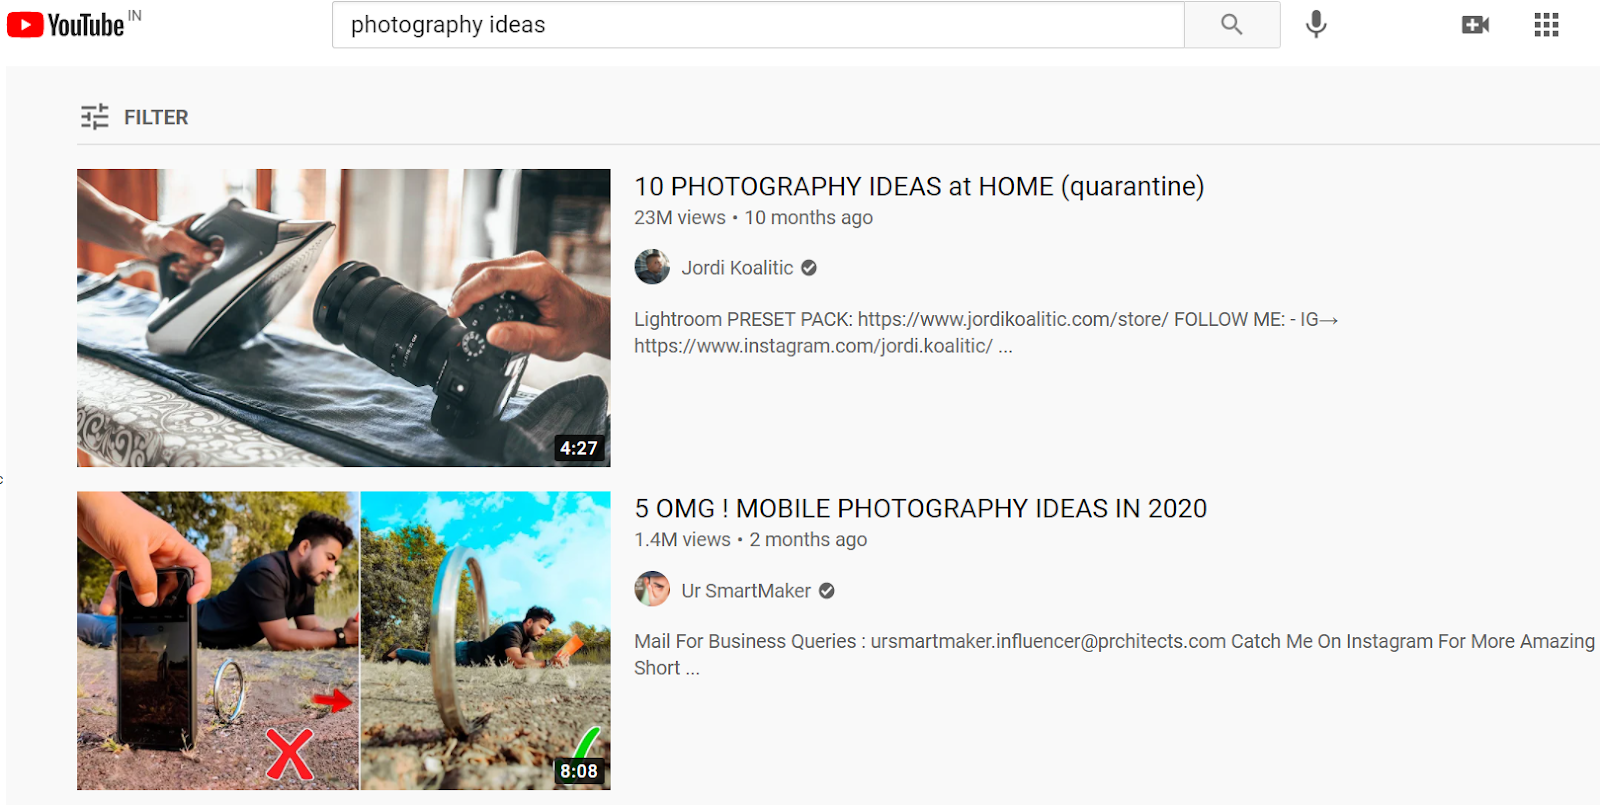
Je zult merken dat veel titels vergelijkbare woorden hebben, zoals ‘trending foto-ideeën’, ‘thuisfotografie’ en ‘fotohacks’. Dit zijn zoekwoorden en in het volgende deel gaan we dieper in op zoekwoordonderzoek, dus noteer het!
De beste video's vertellen je ook welk soort inhoudsformaat het beste werkt voor dat onderwerp, zoals listicles , handleidingen , enz.
Wat nog belangrijker is, is dat u de meest relevante video's voor uw zoekopdracht moet bekijken om eventuele lacunes in de inhoud op te sporen die u kunt opvullen in je video, maar daar komen we in het volgende gedeelte op terug.
Maak professionele YouTube-video's
Binnen enkele minuten met InVideo
Probeer gratis
-
Ahrefs Zoekwoordverkenner
Hulpprogramma's voor zoekwoordonderzoek zijn een geweldige manier om echt te onderzoeken waar mensen naar zoeken en om erachter te komen wat voor soort video's in de topresultaten verschijnen. Hoewel YouTube geen eigen zoekprogramma voor zoekwoorden heeft, kunnen websites van derden zoals Ahrefs dat wel doen laat u de beste zoekwoorden rond een specifiek onderwerp vinden.
De beste plaats om te beginnen is door het zoekwoord in te typen dat je uit de aanbevelingen van YouTube hebt gehaald, de voorkeur te wijzigen naar YouTube als platform en op Zoeken te klikken.
Stel bijvoorbeeld dat je een video wilt maken over hoe je een cake bakt zonder oven.
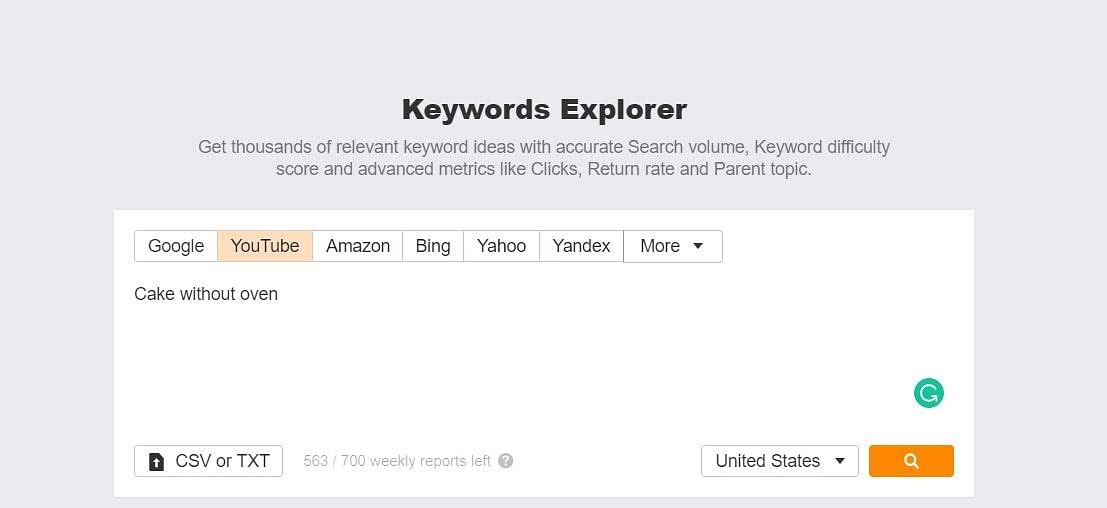
Ahrefs Zoekwoordverkenner geeft u het wereldwijde en landelijke zoekvolume voor uw zoekwoord en stelt enkele andere populaire zoekwoordideeën voor die u kunt analyseren voordat u zich op het uiteindelijke onderwerp voor uw video concentreert.
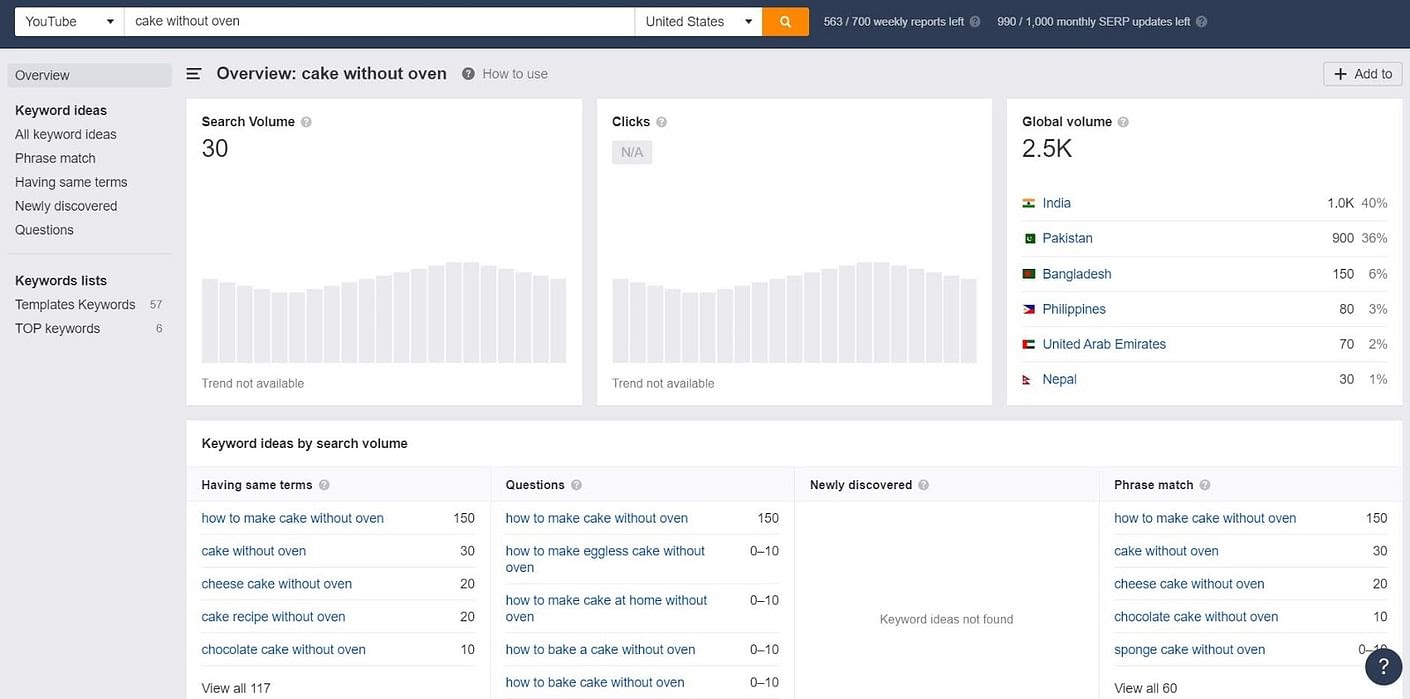
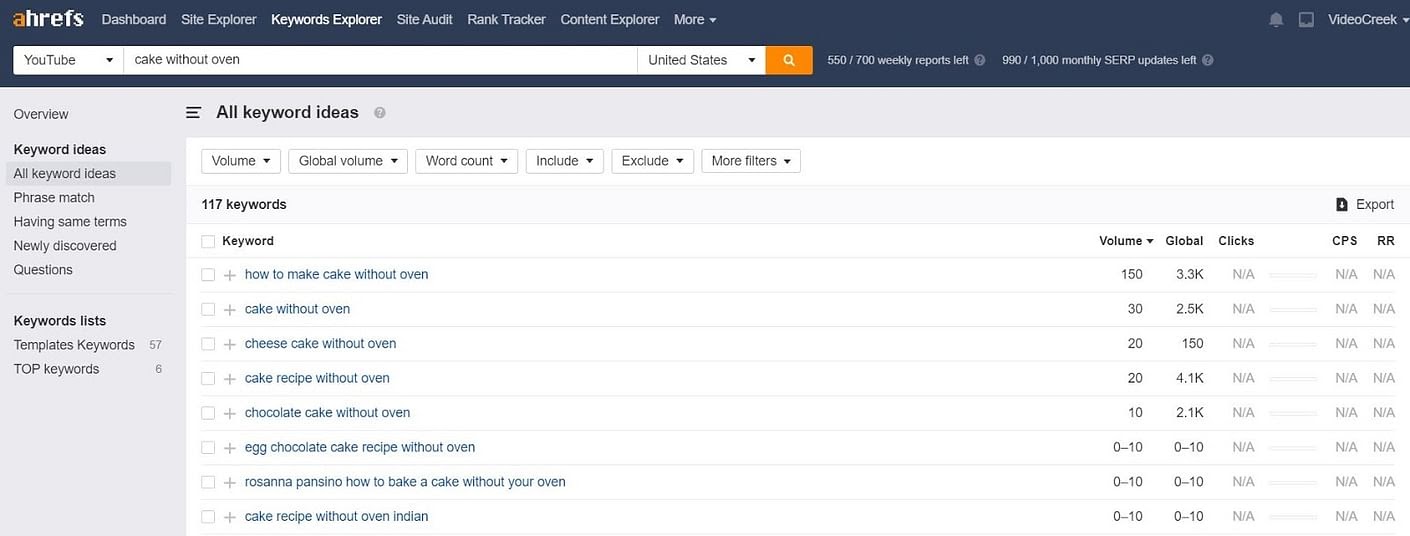
Er is meer:u kunt ook diep ingaan op honderden zoekwoordideeën rond uw belangrijkste zoekterm door naar 'Alle zoekwoordideeën' te gaan.
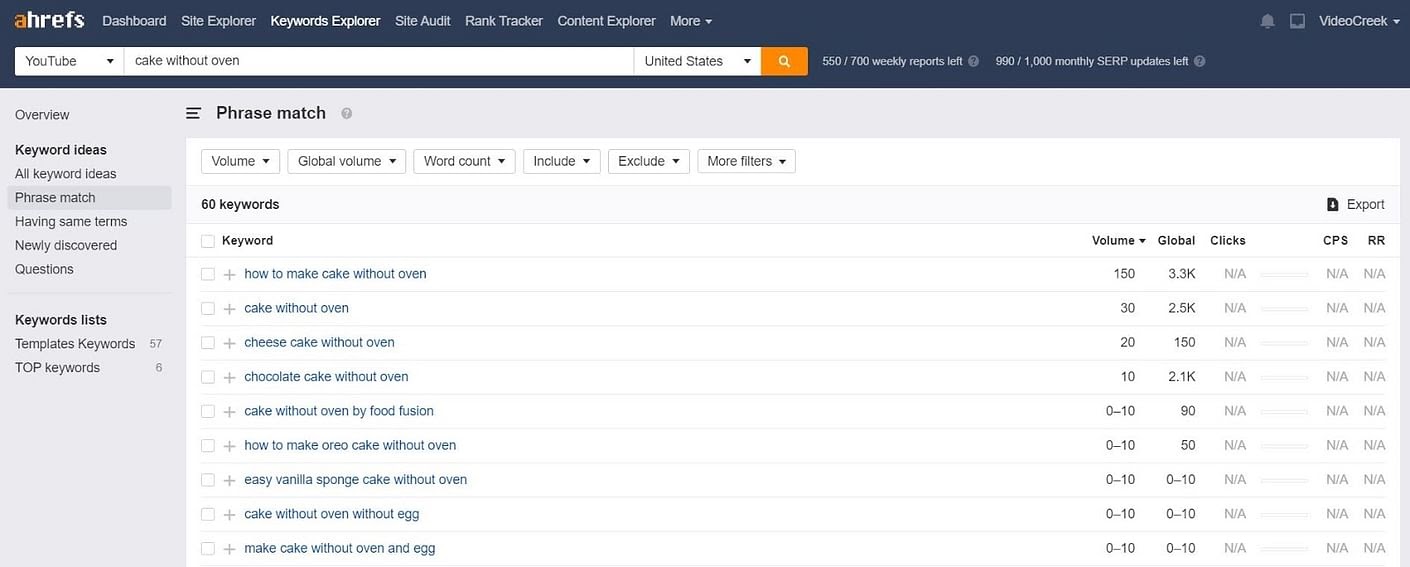
Als u specifieker aanbevelingen wilt voor zoekwoorden die standaard uw hoofdzoekterm bevatten, kunt u 'Phrase Match'/'Having Same Terms' gebruiken opties.
Gefeliciteerd! U heeft nu de trefwoorden gevonden die de bouwstenen van uw titel zullen vormen.
(C) Identificeer de zoekintentie
Als je wilt begrijpen hoe je een YouTube-video kunt maken die werkt, moet je de zoekintentie van je kijkers begrijpen: waarom een gebruiker zoekt naar een video op YouTube. Hier volgt een stapsgewijs overzicht:
Stap 1: Voordat u uw video maakt, voert u daadwerkelijk een zoekopdracht uit op YouTube naar de zoekwoorden waarvan u denkt dat deze relevant zijn voor uw aankomende video .
Stap 2: Bekijk, net zoals u deed om uw doelgroep te identificeren, de eerste drie tot vijf resultaten en analyseer hun inhoud goed.
Stap 3: Denk eens aan de bedoeling die YouTube probeert te verwezenlijken door deze video's met de hoogste ranking te vertonen. Behandelen alle video's de vraag vanuit dezelfde invalshoek? Zo niet, wat zijn dan de unieke vragen waarop YouTube antwoorden probeert te geven?
Als we bijvoorbeeld doorgaan met het voorbeeld van fotografie-ideeën van bovenaf —
Zijn mensen op zoek naar ideeën voor natuur- en natuurfotografie of naar ideeën die ze thuis kunnen verkennen? Uit de afbeelding hierboven blijkt duidelijk dat dit het laatste is.
Wanneer u dit proces doorloopt, kunt u veel te weten komen over waar uw potentiële publiek naar op zoek is, zoals uit de manier waarop uw concurrent zijn video's verpakt.
Nadat je de video's van je concurrenten hebt geanalyseerd, maak je een lijst van de onderwerpen die je wilt bespreken — deze kunnen ook dienen als uw titels wanneer u de video live opneemt.
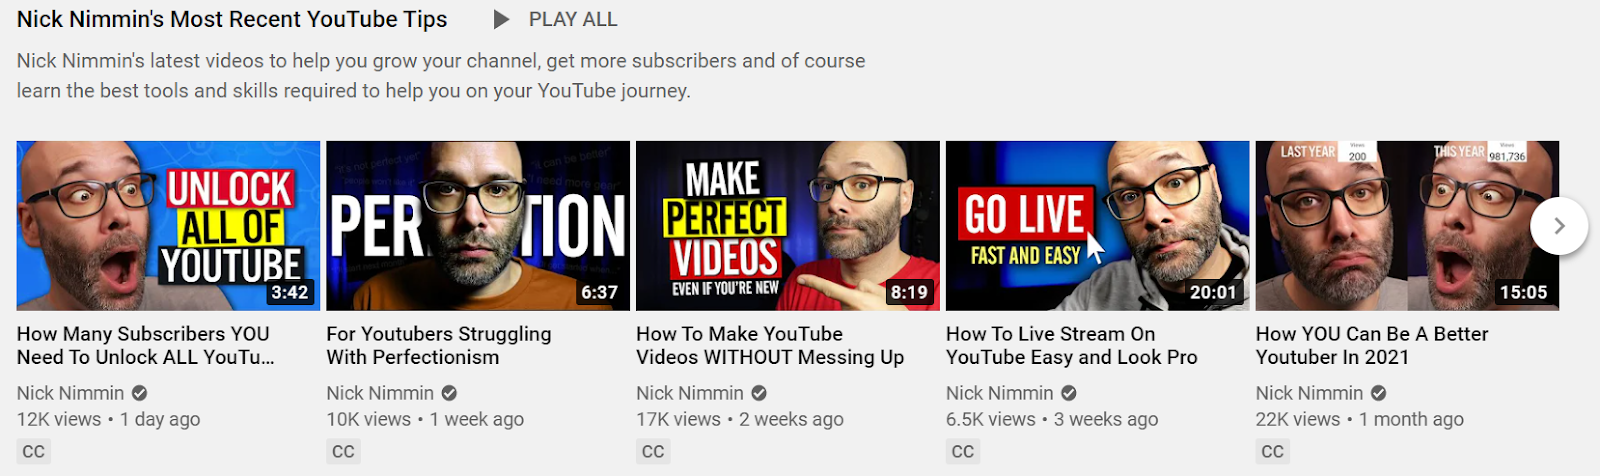
Sommige van de beste YouTubers, zoals Nick Nimmin, hebben hun titel al bepaald voordat ze zelfs maar begonnen met het scripten van de video! Dit is absoluut een van de cruciale stappen om zoekvriendelijke titels te maken en meer weergaven te krijgen.
Door dit te doen, zorg je ervoor dat je aan de zoekintentie (of -intenties) voldoet met een video die wordt bekeken, leuk gevonden en gedeeld!
(D) Ideeën
Regelmatig op de proppen komen met ideeën voor je YouTube-kanaal gedurende een langere periode kan een hele klus zijn. Het is eigenlijk meer een voortdurend proces.
We hebben een uitgebreide lijst met YouTube-video-ideeën samengesteld, die meer dan 22 categorieën omvat en waarnaar u ter inspiratie kunt verwijzen.
Voor beginners raden we aan dat de eenvoudigste manier om video's van hoge kwaliteit te maken, is door je publiek meer over jou en je verhaal te vertellen.
Stel jezelf voor, introduceer een serie video's of maak een 'Day in the life'-video door jezelf tijdens je dagelijkse routine te filmen in een video, zodat je publiek een kijkje in je leven kan nemen.
Hier zijn een paar ideeën om u op weg te helpen! En als u eenmaal uw idee heeft, kunt u er meer dan 5000 sjablonen op InVideo om je video tot leven te brengen.
Nu we de basis hebben gelegd voor het creëren van een YouTube-strategie, gaan we verder praten over apparatuur.
(2) De juiste YouTube-apparatuur aanschaffen
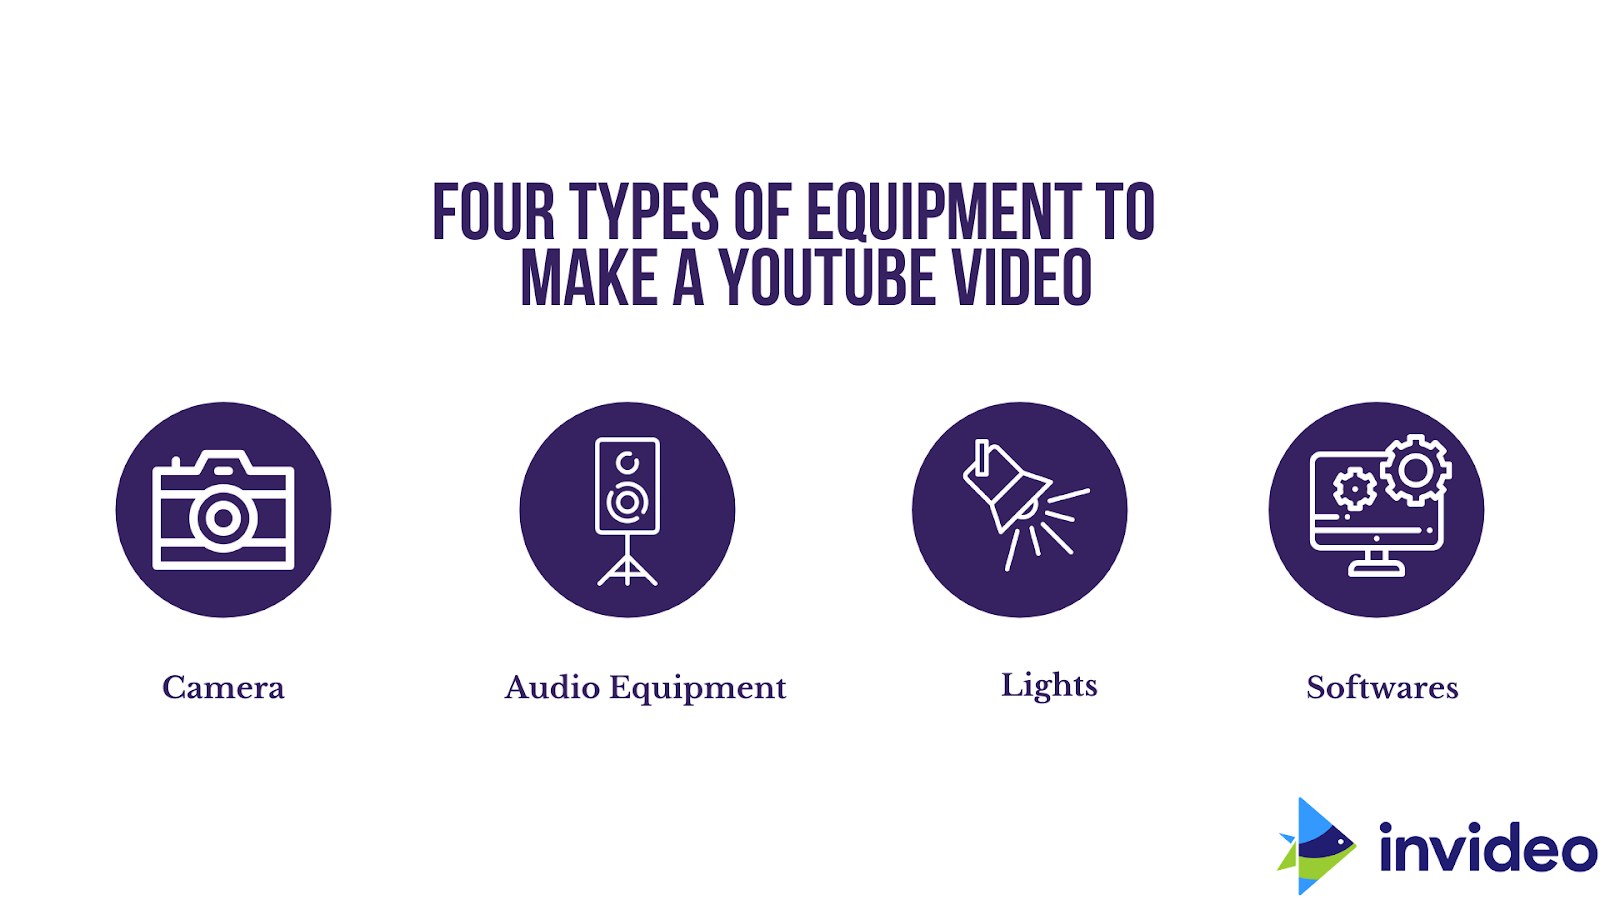
In grote lijnen zijn dit de verschillende soorten apparatuur die je nodig hebt om YouTube-video's te maken:
De echte vraag is:wat voor soort video probeer je te maken?
Hoe je de vier bovenstaande factoren benadert, hangt grotendeels af van het type video dat je opneemt.
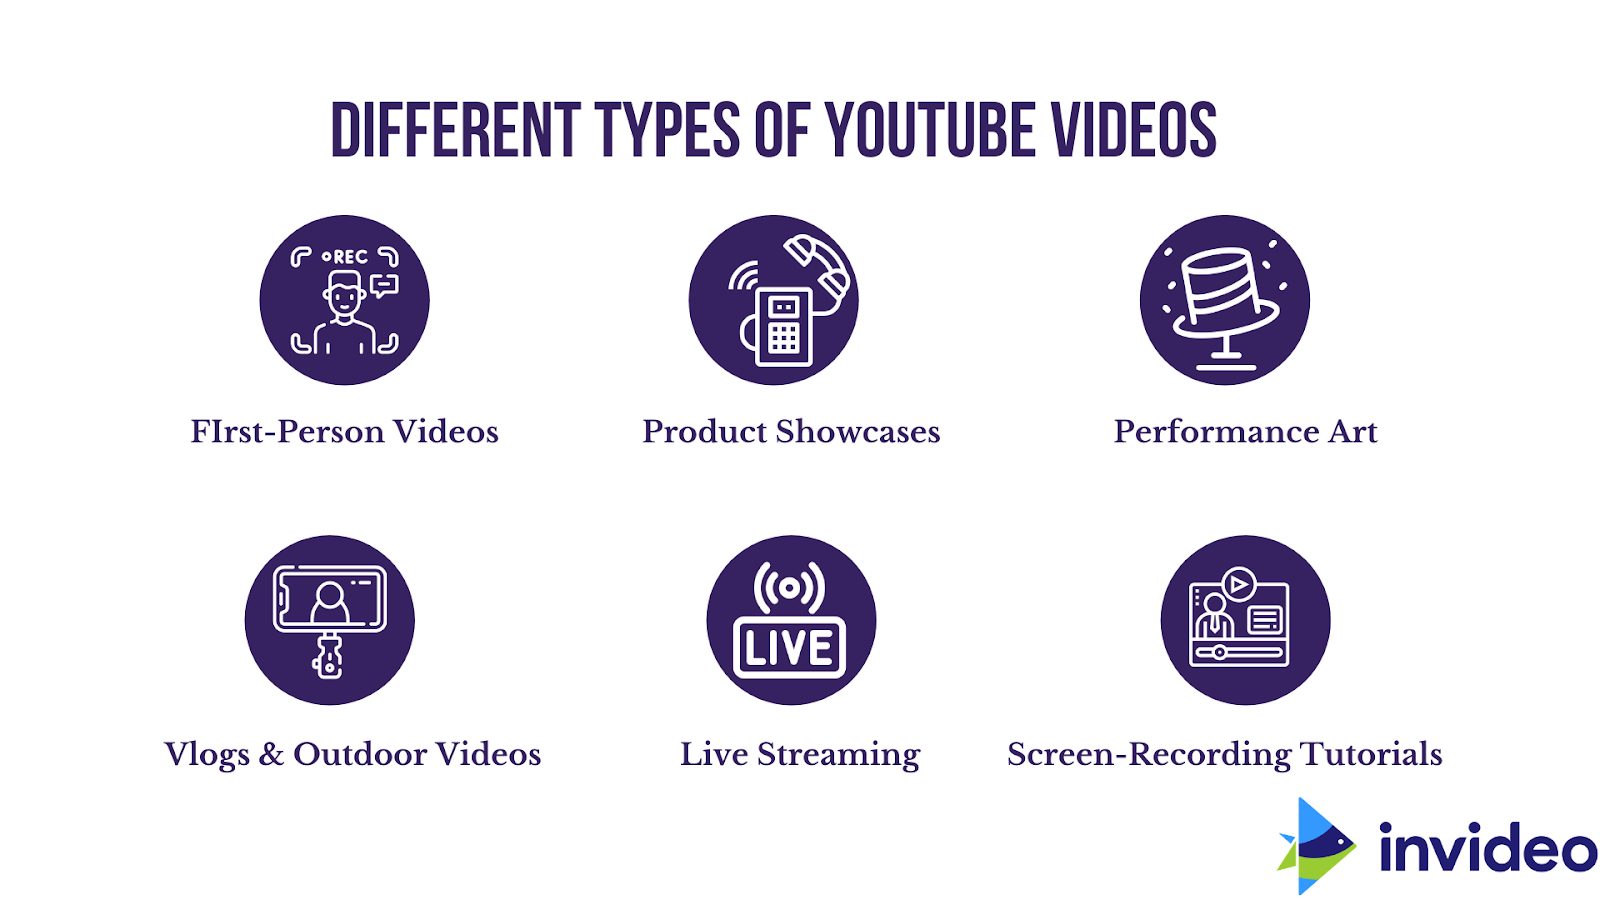
We willen je graag een voorsprong geven bij het maken van een YouTube-video, dus hier zijn de soorten YouTube-video's en onze aanbevelingen voor de uitrusting die het beste bij hen past :
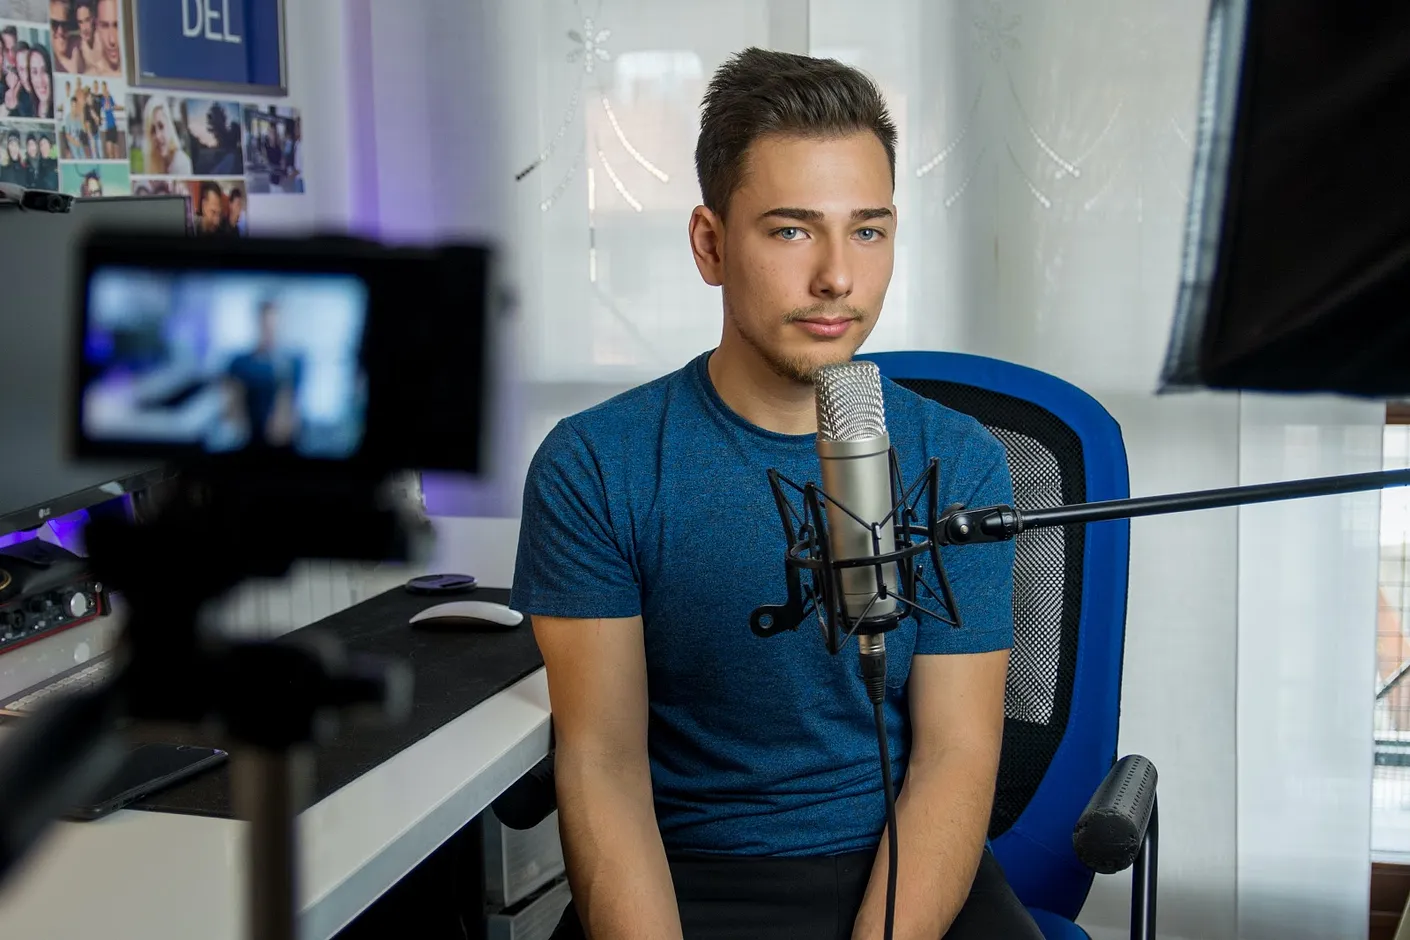
1. First-Person-video's
Deze zijn eenvoudig en spreken voor zich:u stelt de camera in en praat er gewoon rechtstreeks in; het is alsof je een één-op-één gesprek voert met je kijkers.
Hier vindt u alle uitrusting die u nodig heeft met onze aanbevolen beste koop voor elk uitrustingsstuk:
Camera
- Webcam (€ 89,99) — als je een pc hebt en je video's daar zelf wilt opnemen,
- Camcorder (€ 228), of,
- Smartphone ($ 181,50) — Je kunt een van deze twee opties gebruiken als je je instellingen wilt wijzigen of in je video's wilt bewegen.
Licht
Ringlichten zijn de beste optie om één persoon in de video te verlichten.
Audio
- Kies voor de Deity V Lav Lavalier Lapel Mic (€ 49,99) als je je video's opneemt vanaf je smartphone, of
- De blauwe sneeuwbalmicrofoon ($ 65,99) is een goede optie als je je video's rechtstreeks op je pc wilt opnemen.
Software
(a) InVideo is de beste keuze als u op zoek bent naar een gratis editor die volledig op internet beschikbaar is en boordevol gratis stockmateriaal en kant-en-klare sjablonen zit.
(b) Premier Pro is ideaal als u een ervaren editor bent en lange video's wilt maken.
(c) Be.live en Ecamm passen uitstekend als u op zoek bent naar livestream op Facebook, YouTube of andere sociale mediaplatforms.
(d) Camtasia is uitstekend geschikt voor schermopnamen.
2. Productpresentaties zoals het uitpakken van telefoons Video's
Voor productdemonstraties of recensies is de opzet nog steeds relatief eenvoudig, maar je wilt kiezen voor apparatuur die kan bewegen, zodat je tijdens het fotograferen verschillende hoeken kunt verkennen.
Hier vindt u alle uitrusting die u nodig heeft met onze aanbevolen beste koop voor elk uitrustingsstuk:
Camera
- DSLR (€ 1199) als je in hoge kwaliteit wilt fotograferen, of
- Camcorder (€ 228) of,
- Een smartphone ($259) – met een camera van minimaal 12 MP om mee te beginnen je video op te nemen.
Licht
LED-panelen (€ 24,99) zijn de meest budgetvriendelijke optie.
Audio
Je kunt het volgende gebruiken:
- Een reversmicrofoon zoals de RODE Go Compact Wireless (€ 199) of,
- Een podcastmicrofoon zoals de Maona USB Podcast Mic (€ 64,99).
Software
(a) InVideo voor het bewerken van video's (hiermee kunt u indien nodig ook stockfoto's en animaties toevoegen),
(b) Premiere Pro voor geavanceerde bewerking (voor het geval je lange video's maakt),
(c) Be.live en Ecamm zijn prima geschikt als je wilt livestreamen op Facebook, YouTube of andere sociale mediaplatforms.
3. Performancekunst
Voor deze specifieke categorie moet uw apparatuuropstelling draagbaar zijn, zodat u zich indien nodig met de artiest kunt verplaatsen.
Hier vindt u alle uitrusting die u nodig heeft met onze aanbevolen beste koop voor elk uitrustingsstuk:
Camera
- Maak opnamen met een smartphone (€ 259) die direct verkrijgbaar is, of
- Een professionele camera; dit past het beste en geeft levendigere kleuren.
Licht
- Als je wilt dat het licht je volgt terwijl je met het onderwerp meebeweegt, kun je een LED-lichtpaneel op de camera gebruiken ($ 24,99).
- Deze stoklamp van Godox ($239) kan worden gebruikt om kleuren of een filmisch gevoel aan de voorstelling toe te voegen.
Audio:
Wij raden u aan het volgende te gebruiken:
- Een shotgun-microfoon zoals de RODE-video ($ 229), samen met
- Een dode kat (€ 29,95) om het geluid duidelijk vast te leggen.
Ontworpen voor gebruik buitenshuis, bieden dode katten een extra beschermingslaag tegen windgeruis en andere geluiden.
Software:
- InVideo, als de video minder dan 15 minuten duurt en geen zware bewerking vereist.
- Premiere Pro voor supergedetailleerde bediening tijdens het bewerken van de video.
- Be.live en Ecamm zijn prima geschikt als je wilt livestreamen op Facebook, YouTube of andere sociale mediaplatforms.
4. Vlogs en buitenvideo's
Als het om deze categorie gaat, is het stabiele maar draagbare apparatuur waar het om draait.
Hier vindt u alle uitrusting die u nodig heeft met onze aanbevolen beste koop voor elk uitrustingsstuk:
Camera:
Je kunt vlogs en buitenvideo's maken op
- Je smartphone, of,
- Je kunt de Canon G7X Mark III (€ 749,99) gebruiken, ook wel de 'vloggerscamera' genoemd.
Licht
- Je zult er meestal voor kiezen om te fotograferen als er buiten goed natuurlijk licht is.
- Als je externe verlichting nodig hebt, is dit LED-paneel op de camera (€ 24,99) de oplossing.
Audio
U wilt een draagbare microfoonopstelling die gemakkelijk op uw camera past. Kies voor de RODE Go Compact Wireless (€ 199) om je audio op te nemen.
Software
- Gebruik InVideo voor het bewerken van vlogs van minder dan 15 minuten; het kan ook worden gebruikt om tekst over elkaar heen te leggen, beeldmateriaal toe te voegen en, indien nodig, animaties te maken.
- Premiere Pro is de beste keuze voor langere vlogs, omdat het zware bestanden zijn.
- Be.live en Ecamm zijn prima geschikt als je wilt livestreamen op Facebook, YouTube of andere sociale mediaplatforms.
- Camtasia voor schermopname.
Maak virale vlogs voor je kanaal
Zonder urenlang te hoeven redigeren
Ga nu aan de slag
5. Livestreaming
Voor livestreaming neemt u op vanaf uw bureau of kiest u ervoor om buiten live te gaan; dus nogmaals, je hebt stabiele maar draagbare apparatuur nodig.
Hier vindt u alle uitrusting die u nodig heeft met onze aanbevolen beste koop voor elk uitrustingsstuk:
Camera
- Voor livestreaming vanuit huis is de Logitech Brio-webcam ($ 194,99) de beste optie voor jou,
- Als u op reis bent, kunt u ook live gaan vanaf uw smartphone.
Licht:
- Je hebt een lamp nodig die op je bureau kan staan terwijl je comfortabel live gaat, zoals deze 18-inch ringlamp (€ 139) of,
- Iets dat met je meebeweegt, zoals een LED-paneel op de camera (€ 24,99).
Audio
- Onze beste aanbeveling voor je livestream is een podcastmicrofoon zoals de Maono USB Podcast-microfoon AU-A04 (€ 64,99)
- Als je buiten gaat wonen, kies dan voor de RODE GO compacte draadloze microfoon.
Software:
- Je kunt kiezen tussen StreamYard, vMix en Streamlabs OBS om live te gaan.
- Als je je smartphone gebruikt, kies dan voor Switcher Studio.
- Gebruik InVideo om de promoties voor je livestream te maken, zoals Instagram-verhaalposts om de aandacht op sociale media te verspreiden.
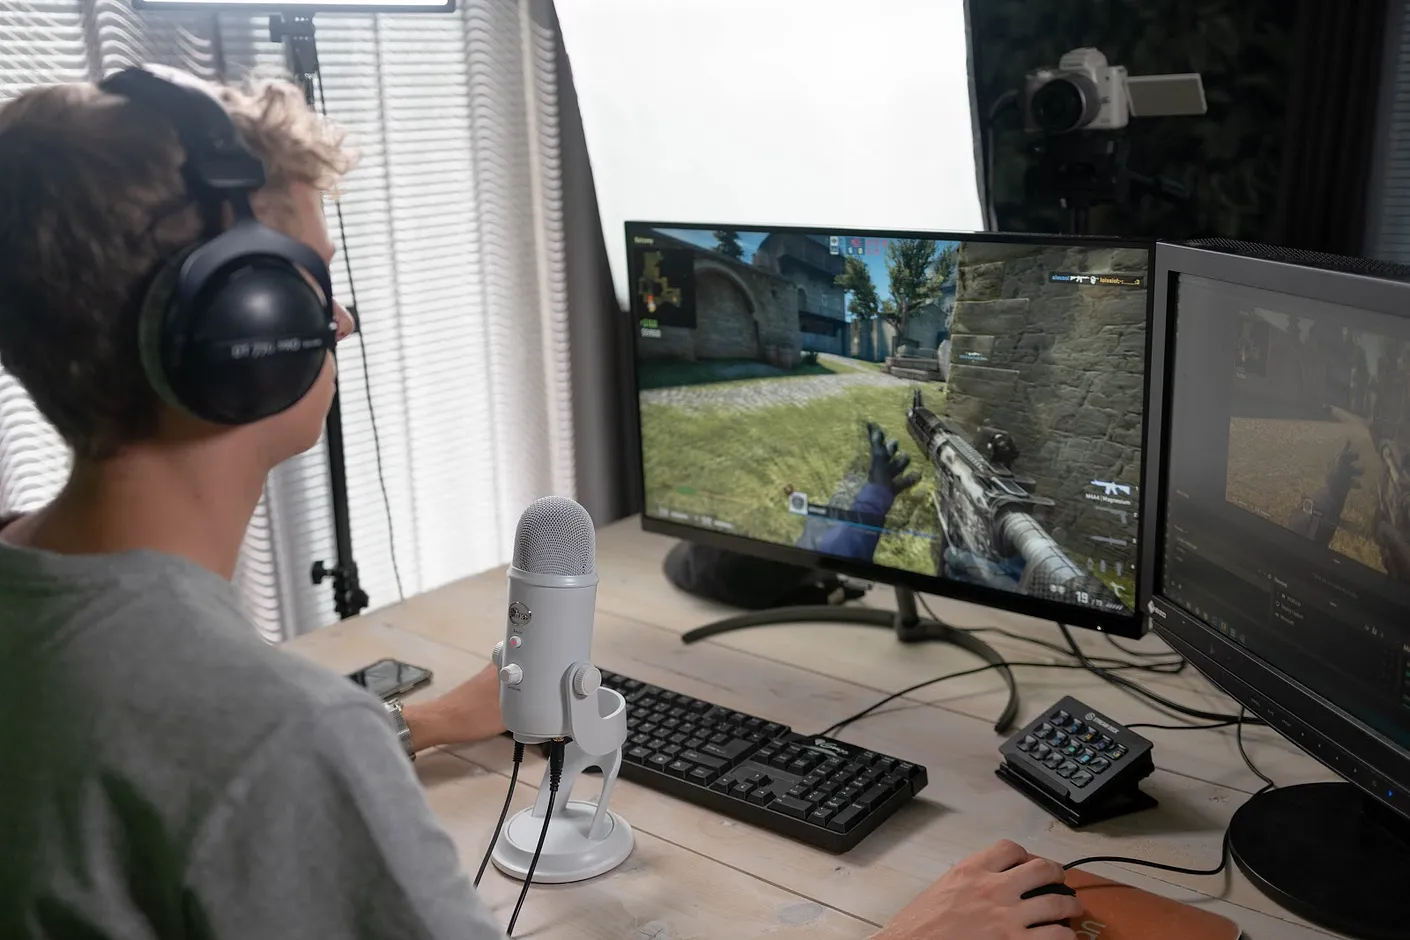
6. Tutorials voor schermopname
Je hebt een schermrecorder nodig die je publiek door een stapsgewijze tutorial en je denkproces leidt.
Hier vindt u alle uitrusting die u nodig heeft met onze aanbevolen beste koop voor elk uitrustingsstuk:
Camera
Gebruik een webcam (€ 94,95) of je smartphone (€ 250) om jezelf op te nemen.
Licht
Een eenvoudiger licht is voldoende.
Audio:
Kies voor een podcastmicrofoon of een lavaliermicrofoon.
Software:
- Je kunt kiezen tussen OBS, DU schermrecorder en Camtasia voor schermopname.
- Je kunt Premiere Pro gebruiken om je tutorial te bewerken.
We realiseren ons dat dit slechts een korte indruk is van het soort apparatuur dat je nodig hebt voor het maken van een YouTube-video.
Als je dieper wilt ingaan op alle apparatuuropties waaruit je kunt kiezen, kun je deze supergedetailleerde gids raadplegen over alles wat met YouTube-apparatuur te maken heeft.
(3) Hoe je goede YouTube-video's op je telefoon kunt maken
Ook al hebben we de exacte uitrusting gedeeld die je voor elk type video nodig hebt, als je net begint, kun je de apparatuur gebruiken die je al hebt, vooral als je niet vooraf in veel apparatuur wilt investeren. Veel YouTubers beginnen hun kanalen alleen met hun smartphones.
Daarom hebben we deze stapsgewijze handleiding samengesteld over hoe je een YouTube-video kunt maken met de telefoon die je al hebt, of dit nu een iPhone of een Android is.
Lees verder om erachter te komen hoe je een YouTube-video maakt zonder camera.
Welke apparatuur heb je nodig om goede YouTube-video's op je telefoon te maken?
Het punt is dus:je kunt gewoon beginnen door je telefoon op een vensterbank of boekenplank te leggen en je ingebouwde microfoon te gebruiken voor geluid.
Maar er zijn enkele basisuitrustingen die we aanbevelen en waarmee u de inhoud van uw smartphone naar een hoger niveau kunt tillen.
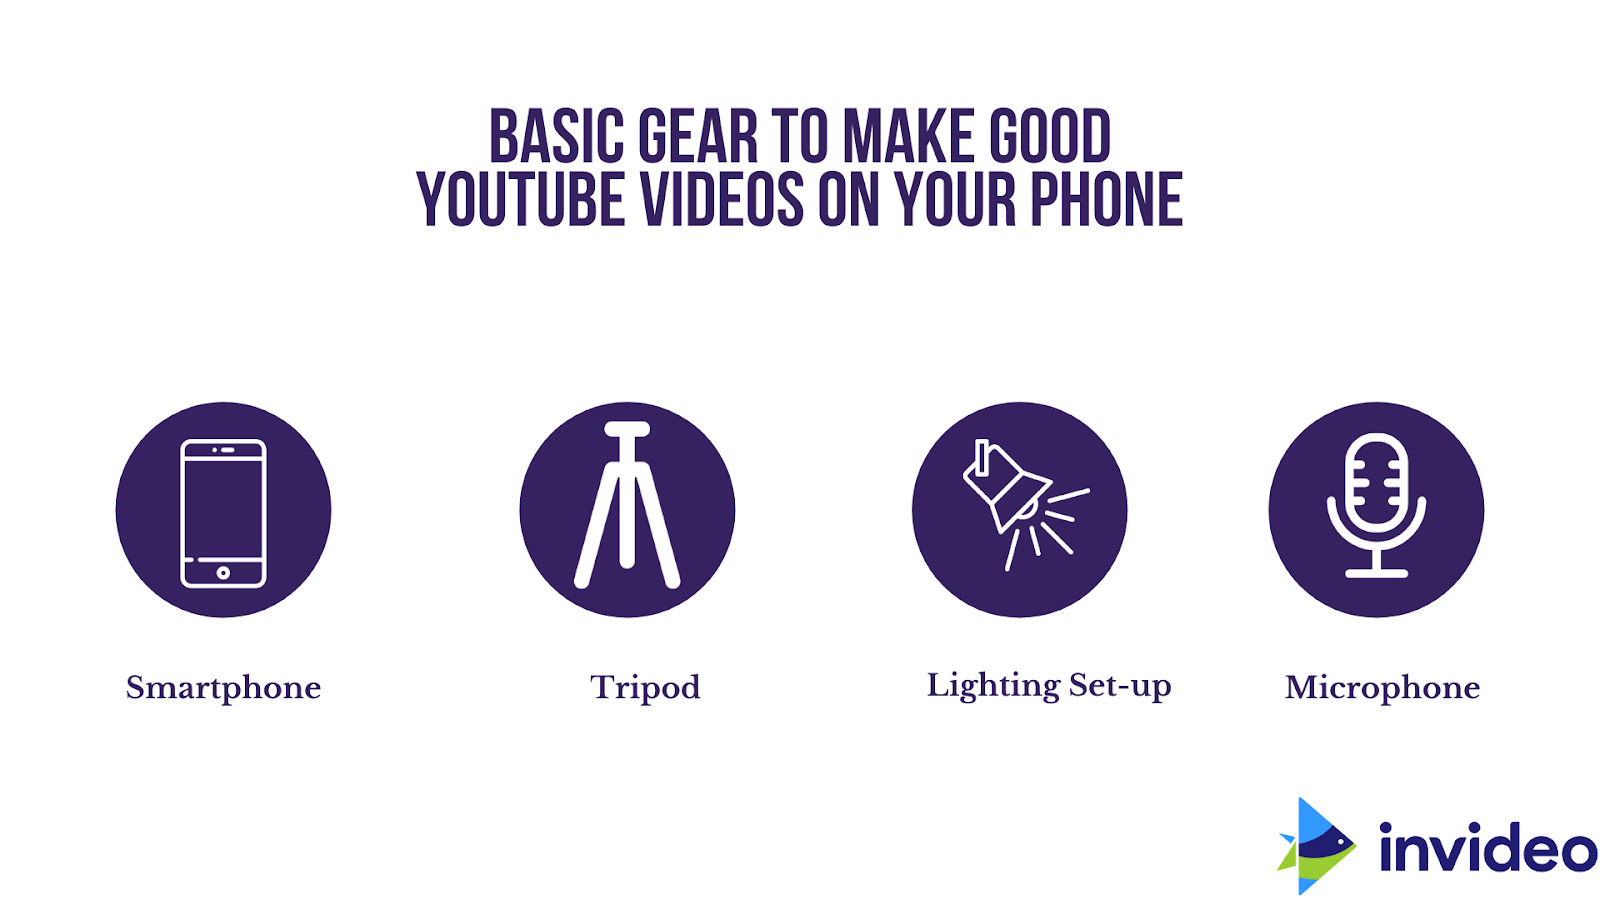
1. Smartphone
Je kunt beginnen met welke smartphone je ook gebruikt. De camera's van de meeste smartphones geven je een output van 1080p-beeldmateriaal; Als je in 4K kunt fotograferen, moet je daar zeker voor gaan.
Als je openstaat voor een upgrade van je telefoon, zijn dit wellicht de beste keuzes voor het maken van YouTube-video's van hoge kwaliteit:Sony Xperia 1 II (€ 1.198), Google Pixel 4 (€ 751) of de iPhone 12 Pro Max (€ 1.199).
2. Statief- en smartphonehouder
Hoe belangrijk het ook is dat je een goede smartphone hebt, het is net zo belangrijk om over de ondersteunende apparatuur te beschikken die je video een professionele uitstraling geeft.
Dit is waarom je een smartphonehouder en een statief nodig hebt om opnamen te maken met een smartphone:
- Ze zorgen voor stabiliteit
Handheld-video's zijn wankel en wiebelig, wat de gemakkelijkste manier is om uw kijkers af te schrikken en ze bij uw video weg te laten navigeren. Met een statief en een smartphonehouder zien je video's er stabieler, professioneler en scherper uit.
- Om jezelf te filmen
Als u een statief gebruikt, heeft u feitelijk uw handen vrij, zodat u uzelf op elke gewenste afstand van de camera kunt vastleggen. Je kunt zelfs een groepsfoto maken en er ook op staan!
Dit betekent ook dat je kunt communiceren met je omgeving en kunt experimenteren met creatieve opnames. Om foto's van jezelf te maken, moet je de timer instellen in de instellingen; sommige statieven worden zelfs geleverd met draadloze afstandsbedieningen waarmee je de sluiter op afstand kunt bedienen.
- Essentieel voor time-lapses
Wanneer u time-lapse-video's maakt, moet u dit altijd met een statief doen, omdat de camera dan gedurende langere tijd stabiel moet zijn.
Dit komt omdat time-lapses worden gemaakt door een reeks opnamen samen te bewerken die zijn vastgelegd na bepaalde intervallen van seconden, minuten of uren; deze worden vervolgens gecombineerd tot een korte videoclip. Voor de beste resultaten is het essentieel dat de opname de hele tijd stabiel blijft.
- Perfect voor landschapspanorama's
Een reeks foto's die aan elkaar worden geplakt om één lang beeld te creëren, zowel in de camera als tijdens het bewerken. Panoramische foto's worden vaak in landschapsmodus gemaakt.
Omdat u uw camera lange tijd omhoog zult houden en zult fotograferen, kunnen een statief en een smartphonehouder u helpen uw opnamen stabiel te houden en ervoor te zorgen dat de frames bij elkaar passen; op deze manier wordt het proces van het aan elkaar plakken van de opnamen ook eenvoudiger.
Kies voor het Ravelli APLT4 lichtgewicht aluminium statief, dat veel waar voor uw geld biedt. Hij wordt geleverd met een draagtas voor gemakkelijke draagbaarheid en een universele smartphonehouder, waardoor hij compatibel is met welke smartphone je ook hebt.
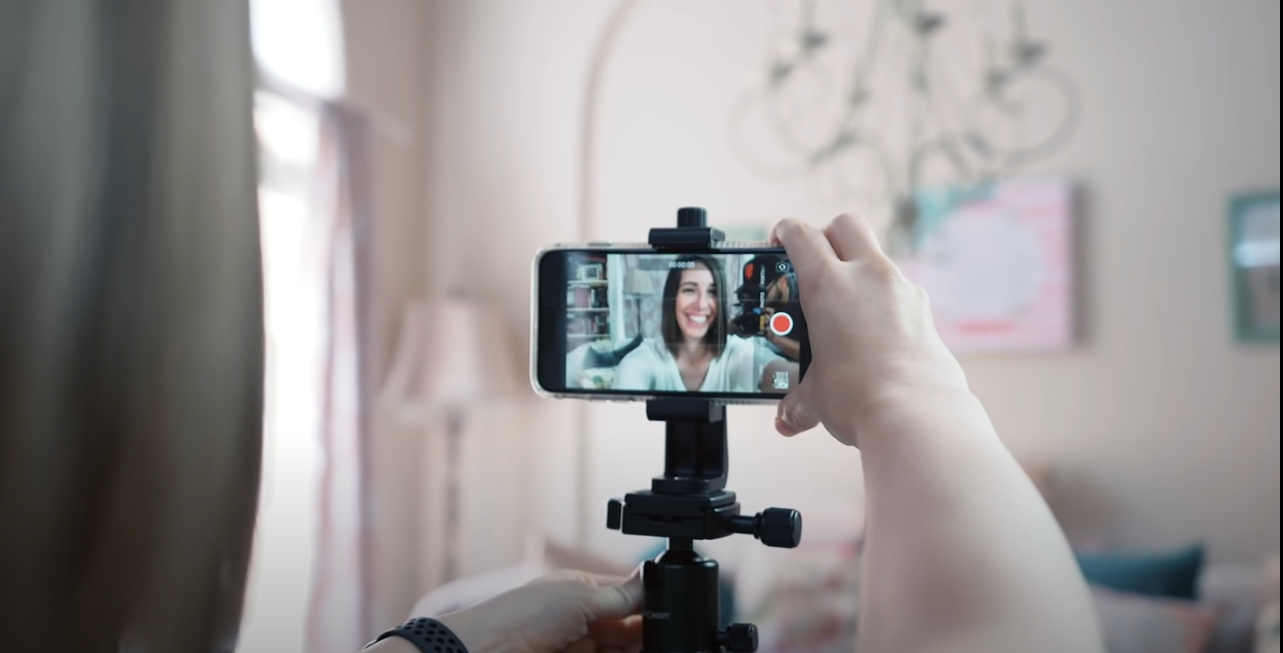
3. Microfoon en de compatibele telefoonadapter
Je hebt een adapter nodig waarmee je je microfoon op je smartphone kunt aansluiten; hier is een TRS-naar-TRRS-adapter die de oplossing zal bieden; bekijk de onderstaande video om te zien hoe dit werkt.
U kunt een lavaliermicrofoon gebruiken (een kleine microfoon die wordt gebruikt om handsfree te kunnen werken, meestal voorzien van kleine clips om aan een halsband, stropdas of andere kleding te bevestigen) en deze aan uw overhemd vastklemmen.
Wij adviseren de BOYA BY-M1 3,5 mm electret-condensatormicrofoon met 1/4″ adapter voor smartphones, iPhone DSLR-camera's, pc, die iets minder dan $ 20 kost! Deze betaalbare optie zorgt ervoor dat u uw stem duidelijk vastlegt en dat het geluid goed klinkt, terwijl de microfoon zelf onopvallend blijft en handsfree is; perfect voor het maken van video's op je telefoon.
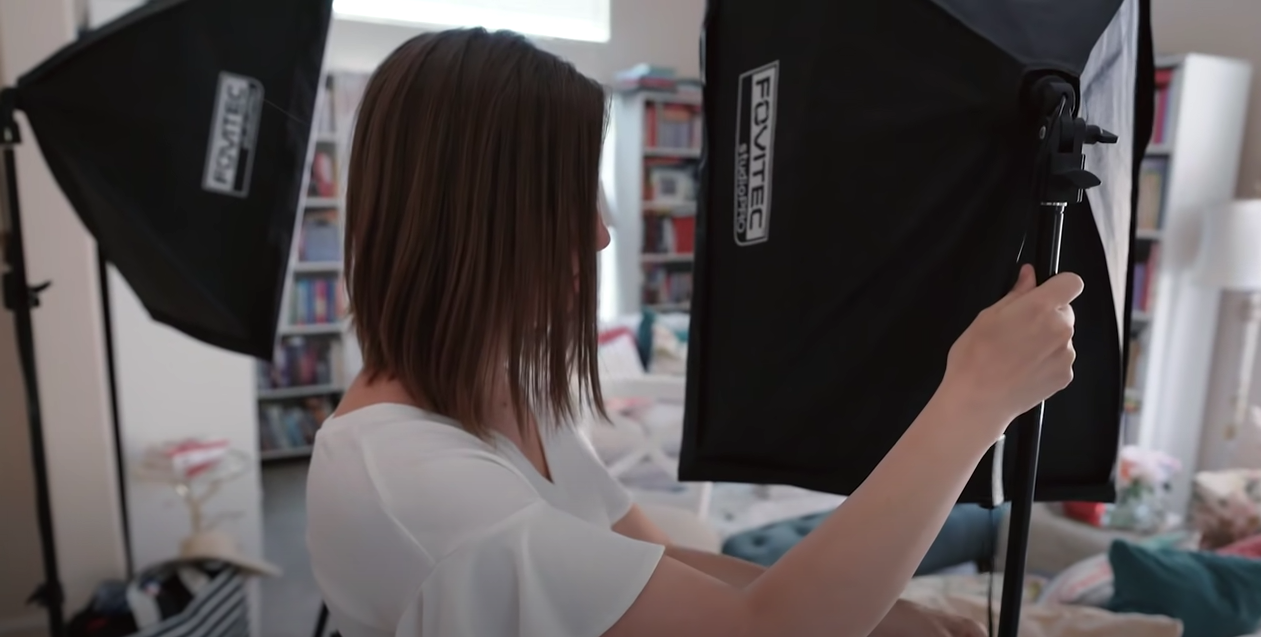
4. Verlichtingsset
We raden u aan om de Fovitec 2-lichts 1000W fluorescerende studioverlichtingsset, softboxen van 20 x 20 inch, met lampen en lichtstatieven voor portretfotografie en videoproductie te gebruiken voor $ 99,95 .
Dit is een verlichtingsset die eenvoudig te leren is voor alle vaardigheidsniveaus; hij is ook veelzijdig, omdat je verschillende looks kunt creëren door simpelweg de posities van de twee lampen te veranderen.
Deze kosten allemaal (behalve de smartphone) minder dan $ 150 en zijn optioneel.
Nu je alles onder de knie hebt, kun je eenvoudig deze stappen volgen om YouTube-video's op je telefoon te maken:
Stap 1:Vind de mooiste camerahoek
Ten eerste:voordat je je opname vergrendelt en je uitrusting instelt, zet je je telefoon in de selfie-modus en krijg je een idee van de kamer.
Loop rond en kijk hoe de achtergrond eruit ziet met jou in het frame.
Bron afbeelding:Think Media
Hoe ver wil je dat het statief en de telefooncamera van je verwijderd zijn? Is de achtergrond te druk naar jouw smaak?
Zorg ervoor dat je dit soort vragen beantwoordt om de perfecte opname voor je YouTube-video vast te stellen.
Stap 2:Stel uw videoapparatuur en accessoires in
Deze spreekt voor zich.
Je zult een beetje met je apparatuur willen spelen en uitzoeken wat voor jou het beste werkt, qua geluid en verlichting.
Monteer je telefoon en pas de hoek en hoogte aan.
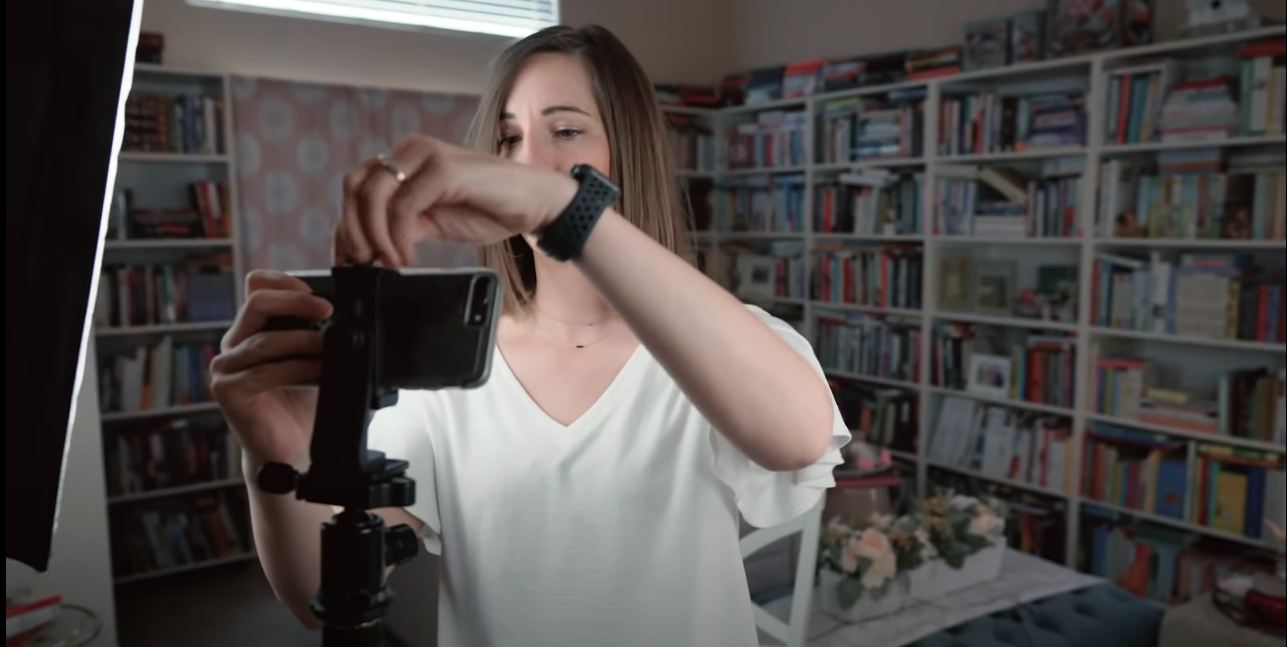
Stel uw verlichtingsset in.
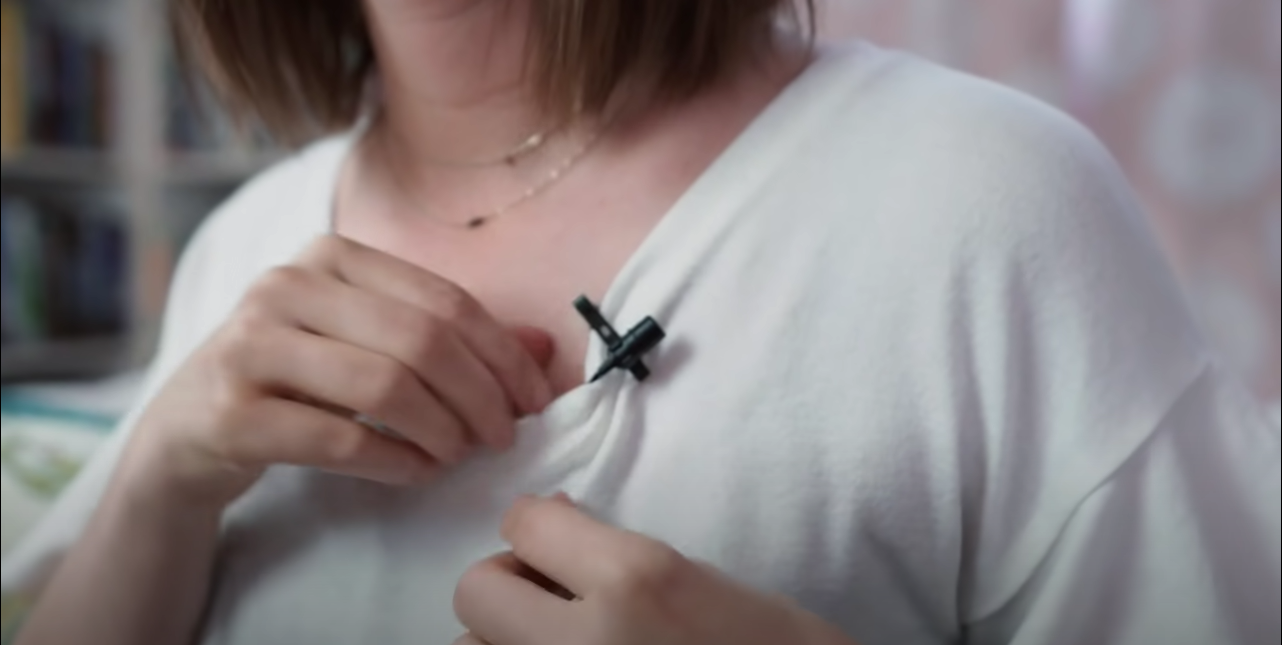
Sluit de adapter aan op uw telefoon, zodat u de microfoon erop kunt aansluiten:
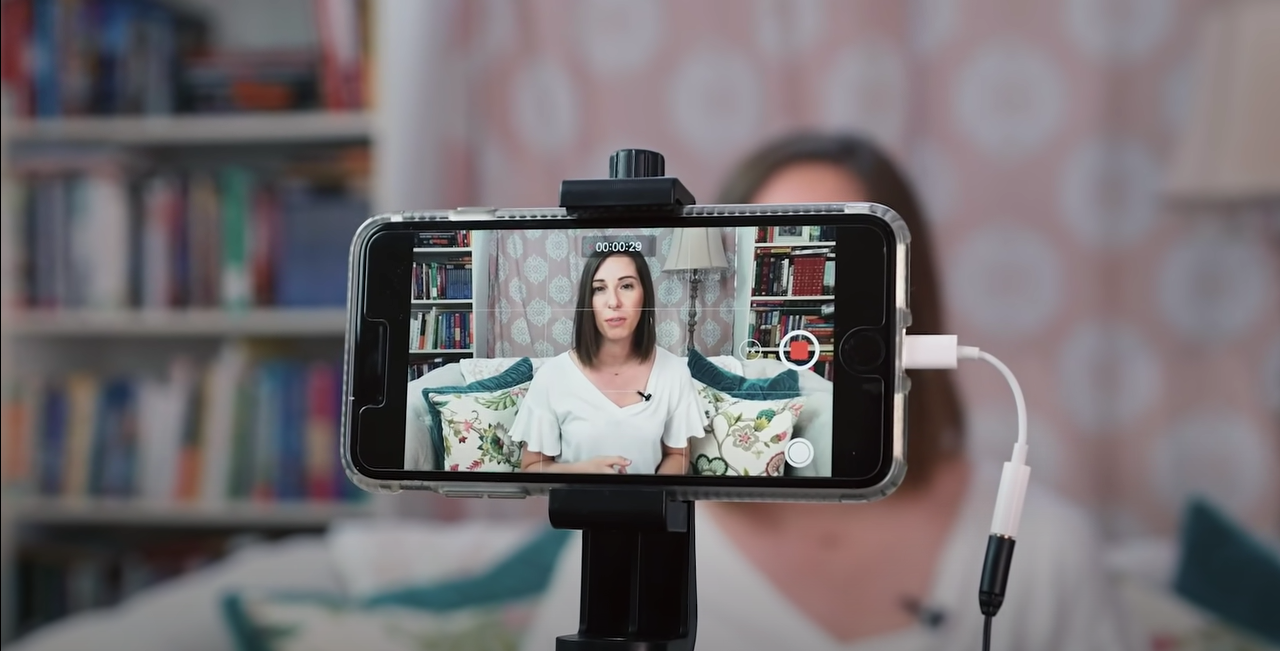
En klem de lavaliermicrofoon vast:
Klaar voor de volgende stap?
Stap 3:Zet je slag vast
Zodra je een idee hebt gekregen van de kamer en de gewenste achtergrond, raden we je aan de telefoon weer uit de selfie-modus te zetten en te fotograferen met de normale camera , omdat de normale camera in de meeste telefoons een uitvoer van superieure kwaliteit geeft in vergelijking met de selfiecamera.
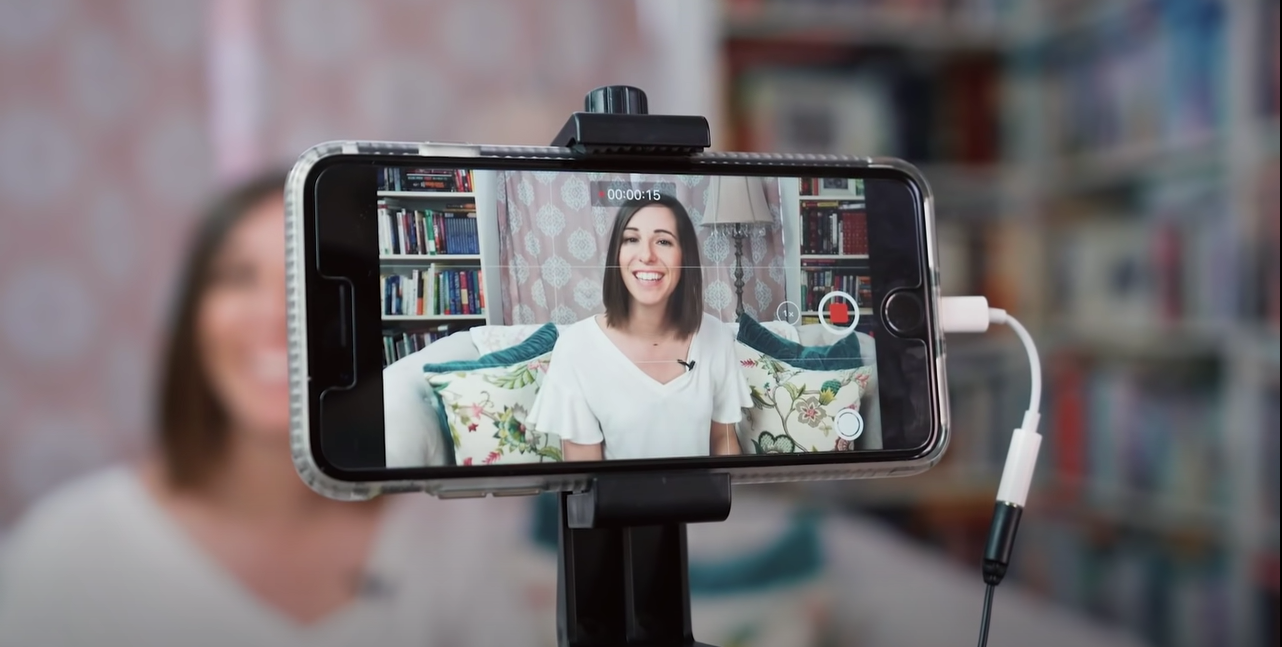
We weten dat dit je misschien alarmeert, want je kunt jezelf niet zien! Maar doe een proefopname; ga zitten en neem op dat u iets zegt. Op deze manier kunt u uw audio opnemen en de helderheid ervan controleren en ervoor zorgen dat uw achtergrond esthetisch is zoals u dat wilt.
Krachttip: Als je er toch voor kiest om de selfiecamera te gebruiken, vermijd dan deze veelgemaakte fout:doe je best om in de cameralens te kijken tijdens het fotograferen , niet tegen jezelf.
Zo maak je oogcontact met de kijker.
Stap 4:Selecteer de video-instellingen op uw smartphone voordat u begint met opnemen
De meeste camera's op telefoons hebben de mogelijkheid om 1080p van hoge kwaliteit te gebruiken, wat geweldig is, maar als je 4K kunt, kies dan 4K.
Nu bent u er helemaal klaar voor om uw inhoud te leveren!
Stap 5:Lever uw inhoud aan
Jouw moment om te schitteren is hier! Gefeliciteerd! Je weet nu alles wat je nodig hebt om een YouTube-video op je telefoon te maken.
(4) Je opnames plannen
Er gaat veel zorgvuldige planning gepaard met het plannen van een shoot om een succesvolle YouTube-video te maken. Lang voordat de camera begint te rollen, moet je eerst een aantal basisprincipes plannen. 
Zo plan je je shoots:
(A) Scripting en storyboarding
Een script zorgt ervoor dat u uw boodschap correct en geordend overbrengt, zodat u deze later gemakkelijker kunt bewerken. Het betekent ook dat u niet alles hoeft te onthouden wat u te zeggen heeft, en toch uw boodschap efficiënt kunt overbrengen.
Hier is een populair videoframework dat je kunt gebruiken:de H.I.C.C. formule .

De afkorting staat voor:
- Haak
Hoe trek en houd je de aandacht van een kijker?
Hier zijn enkele tips en formaten die u kunt gebruiken om het goed in te kaderen:
-Een samenvatting van wat ze zullen leren
-Een pakkende kop
-Een opvallend visueel beeld
-Een teaser
- Introductie
Introduceer het onderwerp; houd het kort en inzichtelijk.
- Inhoud
Dit is het eigenlijke onderwerp van je video, waar je dieper ingaat op de inhoud van je inhoud.
- Oproep tot actie
Stel je kijkers voor dat ze met je communiceren via likes, reacties, abonnementen of een andere video bekijken/je volgen op sociale media
Laten we bijvoorbeeld de goed gesegmenteerde video van Ethan Chlebowski nemen over ‘How to Make Proper Hoagie Rolls at Home’. Hij gebruikt scherp de HICC-formule om zijn proces uit te leggen.
In de haak , Ethan betrekt de kijkers onmiddellijk door het voltooide recept te laten zien en wijst erop dat er heel weinig online inhoud aan gerelateerd is.
In de inleiding deel, hij stelt zichzelf voor, legt uit wat hij maakt en benadrukt dat hij betere manieren om te koken met de kijkers gaat delen.
Inhoud — in dit deel legt hij alle ingrediënten uit, vermeldt de speciale ingrediënten en hun merken, technieken, en gaat dieper in op het recept zelf.
Helemaal aan het einde van de video staan call-to-actions kijkers vragen zich te abonneren, zijn website en het Instagram-account te bekijken.
Hoe effectief de HICC-formule is, kunnen we precies zien, in dit voorbeeld hebben we geschetst.
Een storyboard daarentegen is niets anders dan een combinatie van het script en de bijbehorende beelden voor elke scène. Hier is een eenvoudige storyboard-sjabloon die we hebben samengesteld en die u kunt gebruiken.
(B) De juiste locatie vinden
Tenzij je in een studio filmt, wil je dit van tevoren uitzoeken.
Verken een paar locaties en ga op verkenning met je team. Zoek uit of je toestemming nodig hebt om te fotograferen en of er bepaalde uren zijn waarop de plek niet toegankelijk is.
Zorg ervoor dat u de reis- en transportkosten van de uitrusting meetelt en houd rekening met de kans op onvoorspelbaar weer.
Krachttip: Ongeacht of je in een studio of op locatie fotografeert, bezoek de locatie op de dag vóór de shoot om een gevoel van de ruimte te krijgen.
Op deze manier kunt u zelfs enkele testopnames maken met betrekking tot uw geplande frames of belichting.
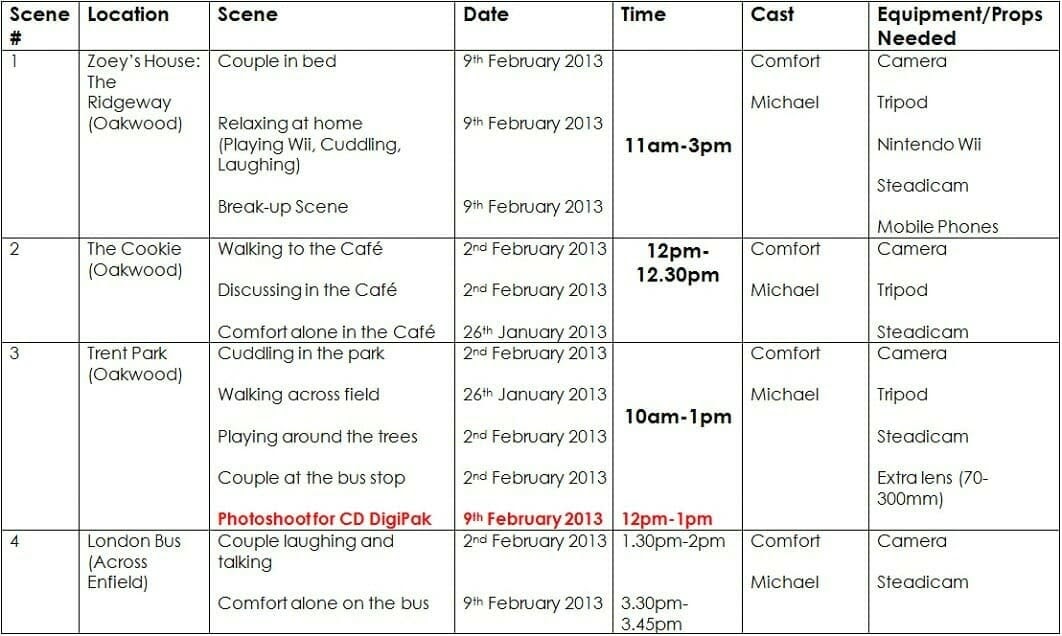
(C) Maak een shotlist en een productieschema
Welke scènes film je en op welk tijdstip?
Een shotlist is een uitsplitsing van elke scène per shot; het bevat specifieke details van elke opname en is een essentiële stap in de pre-productieplanning, vooral als er veel variabelen zijn.
Een basisshotlijst zou het volgende moeten bevatten:
- Scènenummer
- Shotnummer
- Locatie (binnen of buiten)
- Beschrijving van de opname
- Camerahoek, kadrering en camerabeweging
- Actie/dialoog
- Onderwerpen/acteurs in de scène
- Rekwisieten nodig
- Beschrijving van de opname en extra opmerkingen
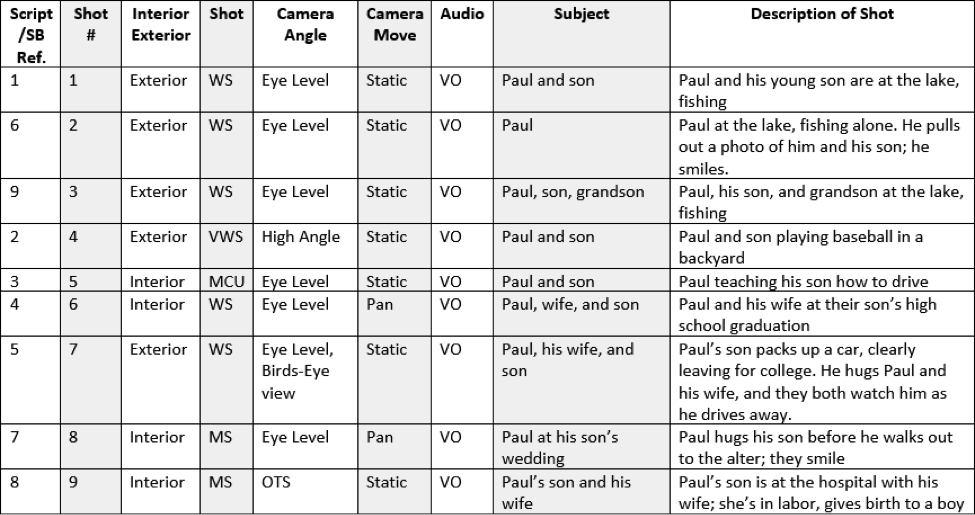
Hier is een Shot List-sjabloon kunt downloaden en gebruiken voor uw eigen video.
Nu je andere basiszaken gepland zijn, moet je je productie- of opnameschema plannen. Dit is een cruciaal hulpmiddel bij het beheren van de verwachtingen van uw cast en crew met betrekking tot de benodigde tijd.
Uw videoproductieschema moet het volgende bevatten:
- Locatie
- Scène/opname
- Uitrusting
- Mensen nodig
- Contactgegevens
- Datum en tijd
Dit document moet regelmatig worden bijgewerkt en gedeeld met het hele team. Hier is een voorbeeld van een productieschema:
Bron: Valoso
Hier vindt u een sjabloon voor een productieschema dat u kunt downloaden en gebruiken voor uw eigen video.
(5) Je video opnemen
Nu we de pre-productiefase hebben besproken, is het tijd om laat de camera draaien . Hier zijn een paar tips waar u rekening mee moet houden als u begint met fotograferen:
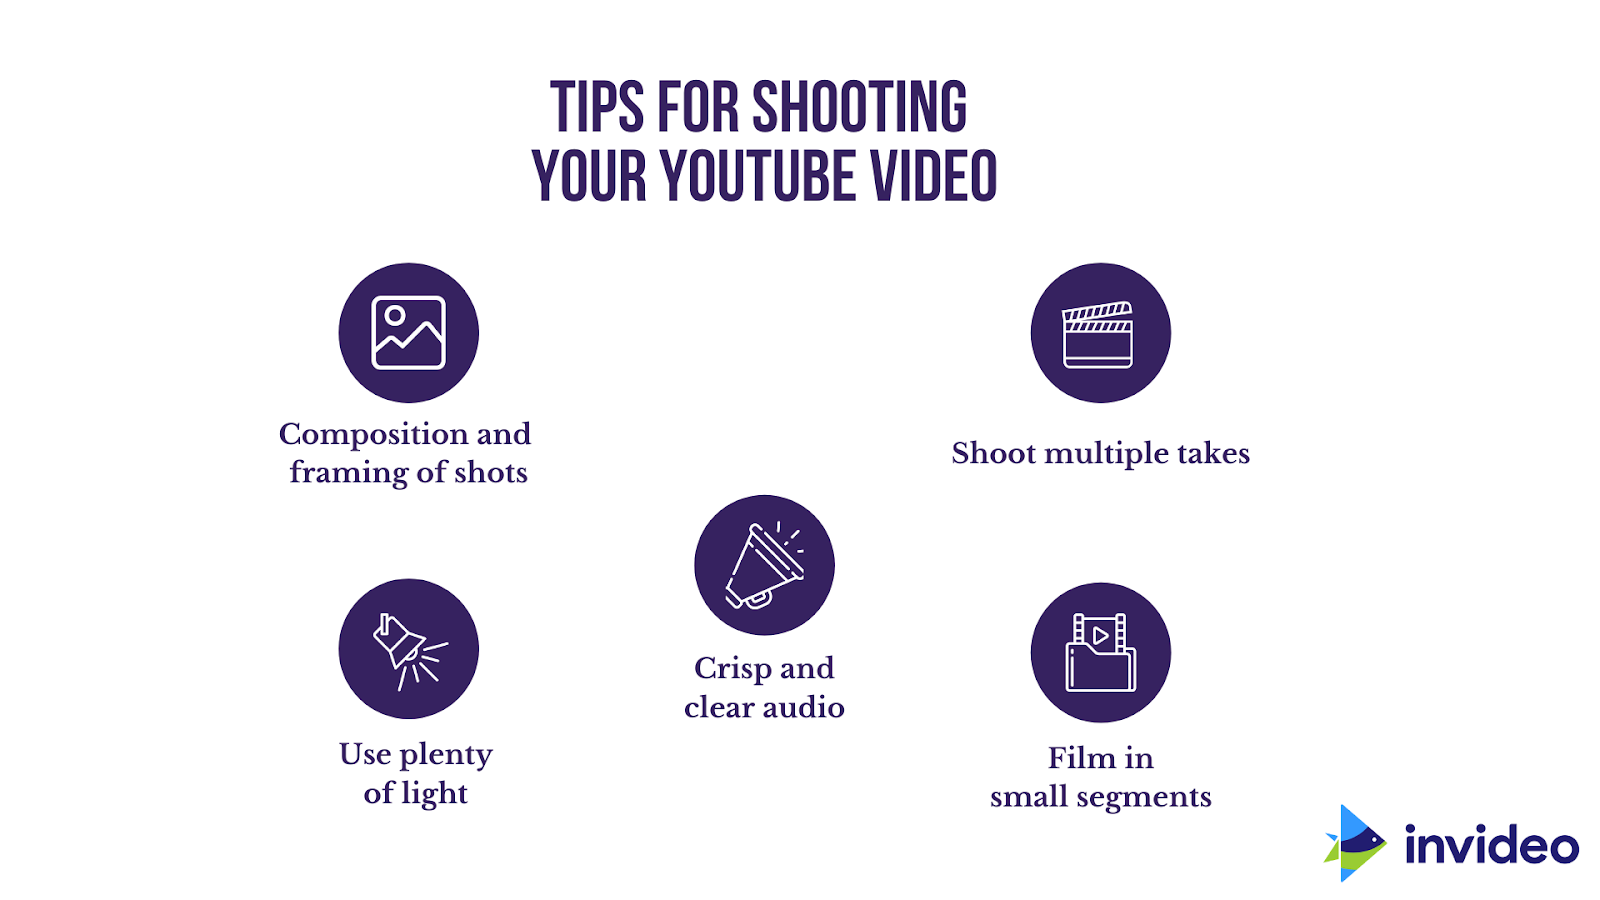
(A) Composition and Framing of Shots
How you compose your frame is a massive part of how you tell your story! The frame composition combines all the elements of the shots, including its lighting, actions, and dialogue, to portray the story and evoke emotion.
The three main types of shots used in YouTube videos are:
- Wide-angle shots — these add context to the shot by emphasising on the location or background of the video.
- Medium shots —these are great for connecting one part of your footage to another.
- Close-up shots — these are useful for emphasising certain elements you want to highlight and clearly communicate a point
Here’s a video that will take you through the basic camera angles:
We’ve put together a few tips to best film these shots from expert filmmakers. Here’s what they suggest:
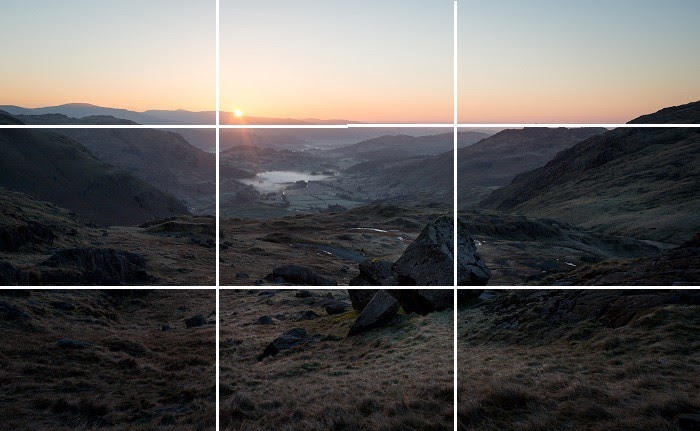
- Use the Rule of Thirds
This means dividing your frame into thirds both vertically and horizontally and putting your subject on one of the intersections. This helps balance your image for an interesting composition.
- Create Depth in the Frame
Set the focus off-center in the shot, and away from the background. This will create depth in the frame.
Using different lens focuses and positioning objects at different lengths from the camera will make the scene look bigger and make for a more interesting frame.
- Observe the Location
This is something that you should ideally start doing in the pre-production phase when you go location scouting. By observing the location carefully and pinpointing what you want to highlight, you ensure your shot has sound aesthetics which are in line with your content.
(B) Plenty of Light
Even if your video is great in every other way, if your lighting is too dark, too bright, or looks amateurish, it’s going to put viewers off; so don’t depend on just “fixing it in post”.
Lighting makes a big difference to the quality of your YouTube video, so prioritise your planning lighting during pre-production and executing it properly when you’re filming.
Here’s a breakdown of the types of lighting, their respective sources, advantages, and disadvantages:
Type of Lighting
Source
Voordelen
Nadelen
Natural Lighting
Outdoors (the sky, the sun, or the moon) and can be used with diffusers and reflectors
- Abundant
- Gratis
- Time constraints
- Cannot be controlled
Artificial Lighting
Usually indoors (Direct lighting from electric bulbs)
- Can replicate natural l ight
- Can be controlled
- Is more expensive
- Needs transportation
Power tip: Regardless of where you’re shooting, make sure that your primary light source is even and consistent.
If you are using natural lighting —
- Try and film in the morning or evening, when the light is flattering, and not as harsh as it is midday.
- You can use diffusers and reflectors to soften the lighting and shadows.
- If you do have to shoot midday, try and choose a day when it is cloudy or find an area with shade.
If you are using artificial lighting —
- Avoid ‘spotlighting’ your subject in direct pools of light. Avoid overhead lighting as well as it causes unflattering shadows.
- Using little or no shadows is best for marketing videos, and it creates a more open and approachable vibe.
- Below, you’ll find a few techniques which can be used to achieve specific effects. For marketing videos , we suggest you go with the far-right option .
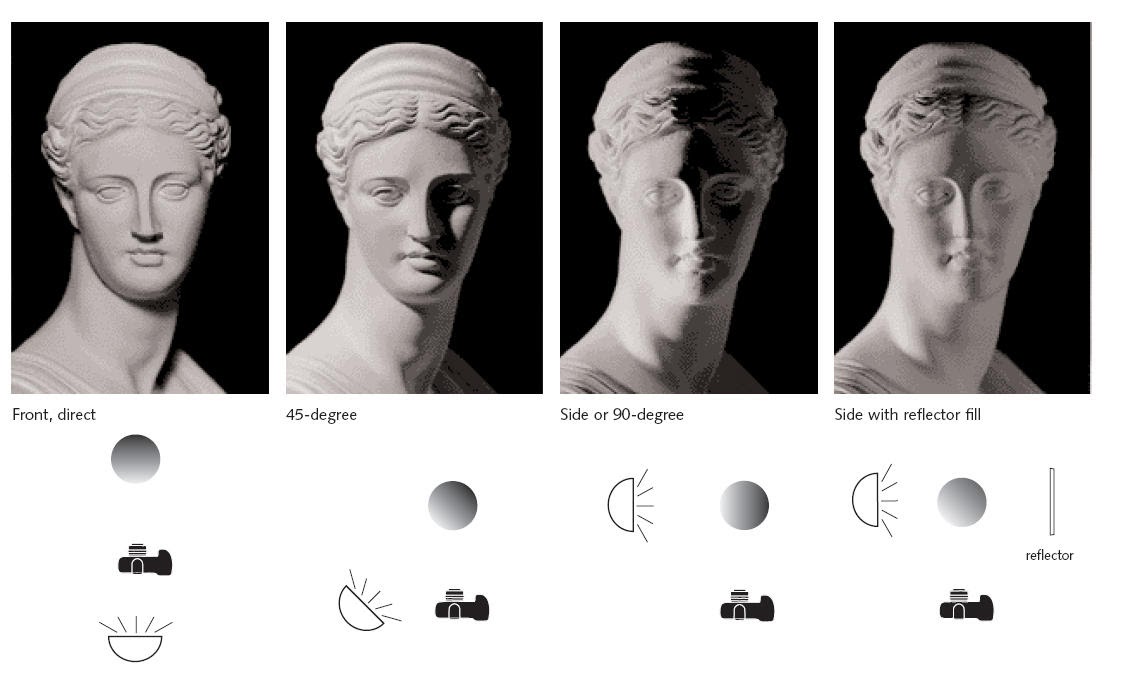
Source: Wordstream
- Here’s a YouTube Creator Academy video on effective lighting for a high-quality video:
(C) Crisp and Clear Audio
One of the easiest ways to lose viewers by having them hit the ‘back’ button? Low-quality audio.
Again, don’t depend on fixing everything in post-production; here are some pre-emptive steps you can take for crisp and clear audio output that can take your video to the next level:
Avoid Using your Camera Mic
Make Sure You Invest in a Good Microphone
We understand that YouTubers you are just starting out might not be able to invest a lot in equipment right away.
So we’ve done the legwork here, and put together a few budget options:
(i) The Fifine condenser K669B USB microphone at under $40 . We suggest you pair this mic mount with it for stability.
(ii) The SGC-598 Photography Interview Shotgun MIC Microphone for Nikon Canon DSLR Camera for under $40 .
(iii) The compact and easy-to-use Blue Yeti USB Microphone for under $150 .
(iv) The handy and portable Zoom H1n Digital Recorder for under $150.
-
Check the Acoustics of the Shoot Location
Before the camera starts rolling, check the acoustics of the location. Check if there is an echo; and if there is, try and shoot somewhere else. Be aware of any background noise that your microphone might be picking up, too.
A lot of audio issues can indeed be fixed in post-production, but they can be difficult to get rid of completely.
So make sure you bear the acoustics of your location in mind when you’re scouting for places, regardless of whether they are indoors or outdoors. It will save a lot of time and effort later.
-
Position your Audio Equipment Properly
Make sure you put your microphone as close to the subject as possible so that your audio is crisp and clear. Consider using a pop filter to get rid of crackles and blips on the recording.
(D) Film in Small Segments
Segmenting your script into smaller takes will make your job much easier both while shooting, as well as during editing. It also lends a certain level of flexibility to post-production with easy-to-use clips.
-
Shoot Multiple Takes
Even the best of filmmakers mess up sometimes, so make sure you take multiple takes of each scene to give yourself more shot options in the editing process. Even if your first take seems to have gone perfectly, get another one, just in case.
-
Shoot from a Variety of Angles
Try and get shots from a variety of angles so you can choose the shots you think work best in the post-production phase.
-
Shoot B-roll Footage
B Roll or background footage is a great way to make your video more interesting and add a variety of visuals. If you plan when you’re going to use B rolls in advance, you’ll be doing yourself a favour by saving a lot of time later on.
(6) How To Edit A YouTube Video
If you’re looking to create videos of up to 15 mins, the easiest option at your disposal is InVideo — a one-stop shop for video creators. It comes with:
– 4000+ pre-built templates that you can readily use or you can start with a blank canvas.
– An in-built media library of 8M+ royalty-free video clips, images, and music from premium sources like iStock and Shutterstock.
– A super intuitive and easy to use video editor that’ll allow you to edit your videos in mins even if you’ve never edited a video before
– 24*7 live chat support so you can always ask for help
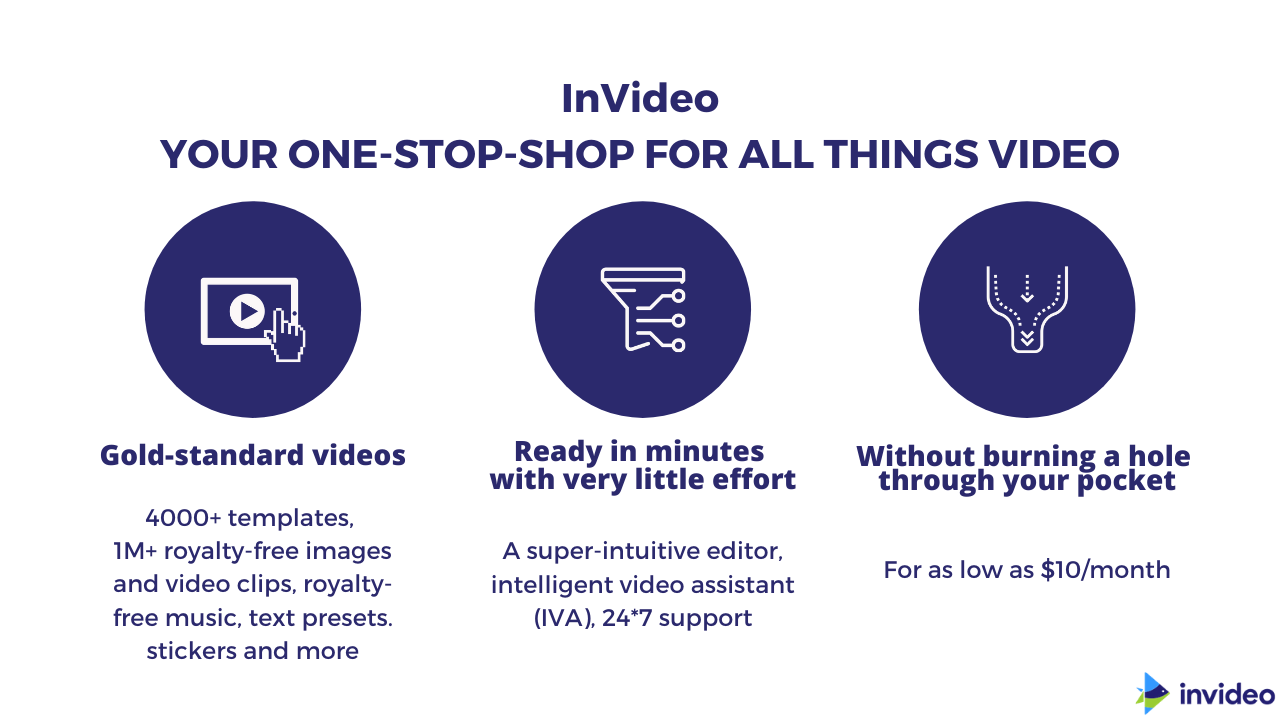
The best part — it’s completely free for you to start with and you can create as many videos as you’d like with your own brand logo/watermark and export them in 720p. And If you’d like to get your videos out in 1080p, as well as get access to the premium media library, it’ll just set you back by $20/month or $120/year.
Edit your YouTube videos like a pro
Use InVideo’s customizable templates
Create now
If you want to know more about how to use InVideo and get started today, check out this tutorial.
If you are looking to create videos that are longer such as vlogs, you’d be much better off using a traditional editor like Adobe Premiere Pro. Here’s a tutorial that’ll help you get started on the basics of Premiere Pro.
(7) Uploading Your Video to YouTube
You can either upload a YouTube video from your web browser on your desktop/laptop, or from the YouTube app on your Android/iOS device.
You can follow the simple steps in this article to get upload your video and running on YouTube.
(8) Optimis ing for YouTube SEO
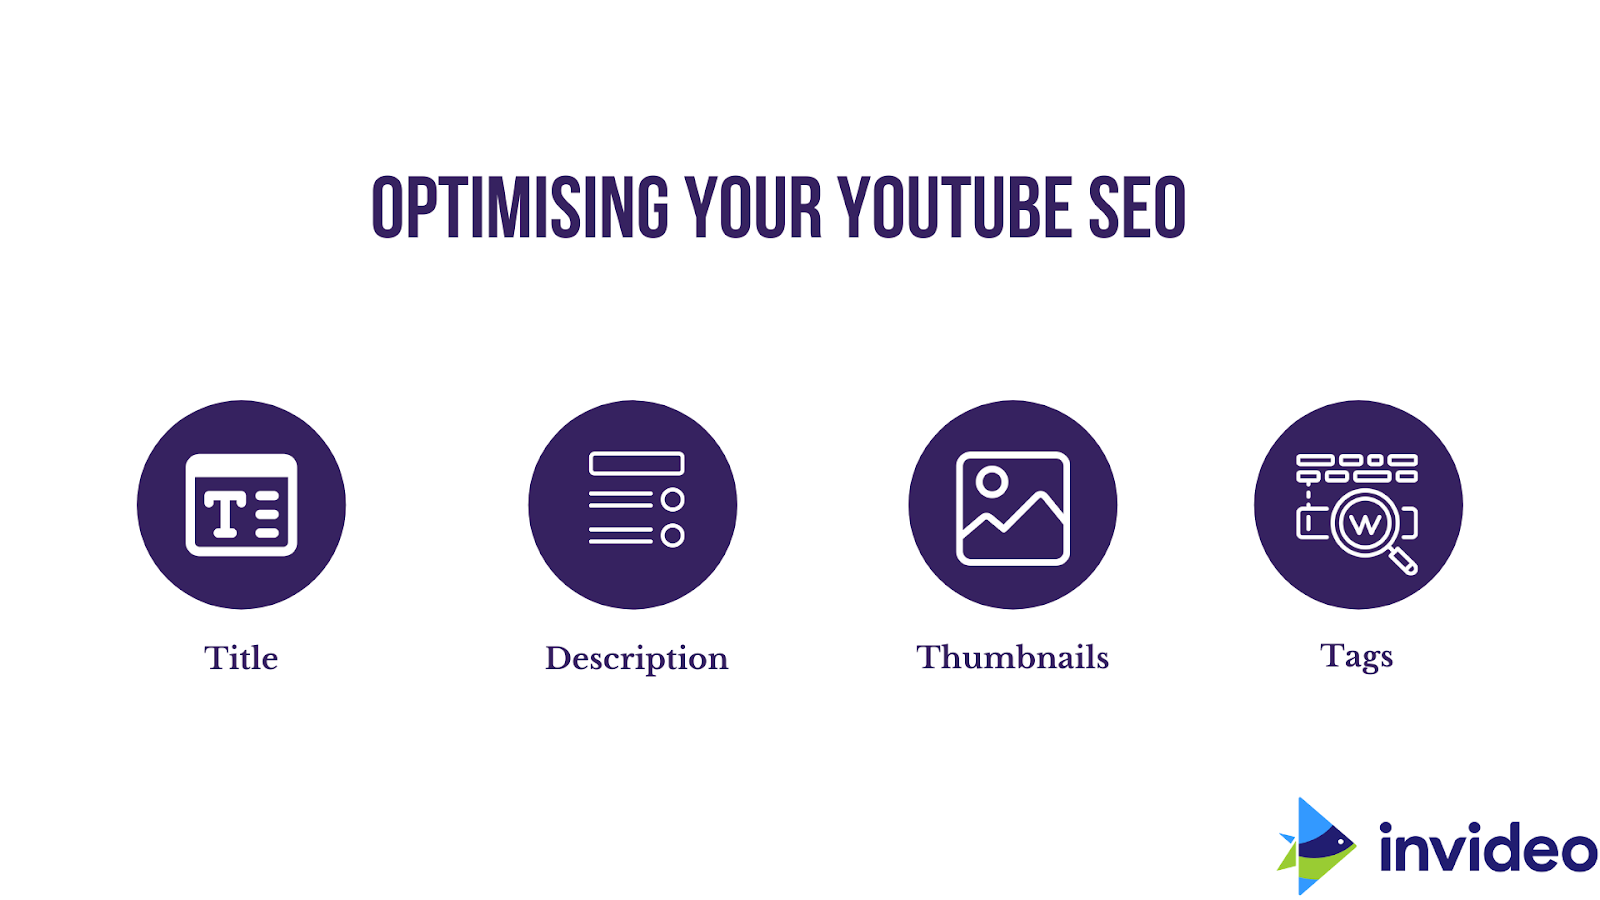
Here are the best YouTube SEO practices that you can follow to work with the YouTube algorithm and generate more views and subscribers for your channel:
( A) Title
Here are a few steps to craft searchable and clickable video titles, according to YouTube:
SEO Tip 1: Keep your titles under 60 characters
YouTube suggests that you keep your titles concise and that you front-load the most important information. Titles of a certain character limit also ensure that your title isn’t cut off.
Why is this a benchmark practice? A title that’s truncated or cut off would lead to your intended audience simply scrolling past the video after just reading the part of the title that’s visible on their feed.
Power tip: If there’s absolutely no way to shorten your titles to anything less than 70 characters, ensure that the most interesting or compelling part of your title fits in the bit that’s visible; the part that is shortened should be essentially harmless to your SEO appeal.
You’ll see what we mean in the video below:
You would ideally still go for this video since the compelling aspect of the video (i.e the genres of music that are included) is made amply clear to the user.
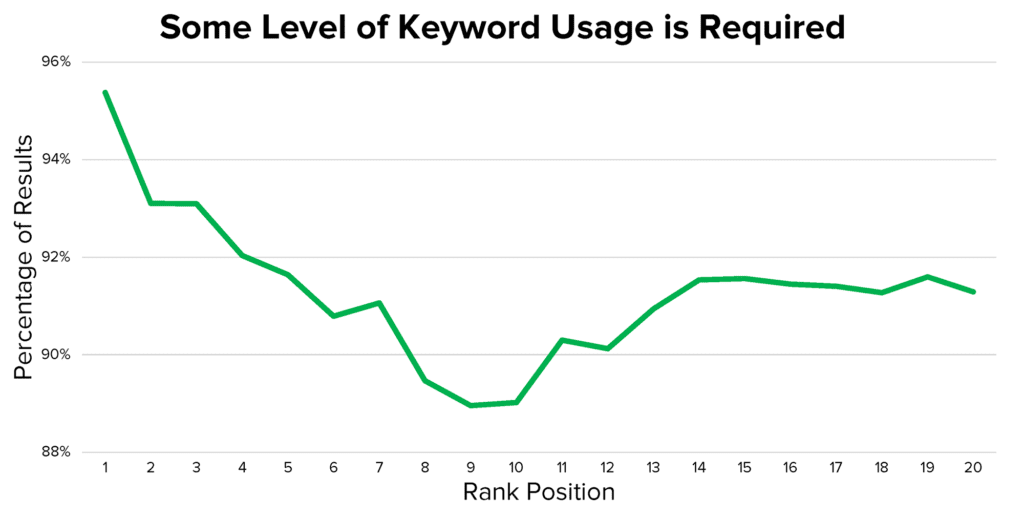
SEO Tip 2: Use your keyword in the title
YouTube’s advice to do with keywords is to use the most relevant search terms in your titles and descriptions— provided they’re accurate.
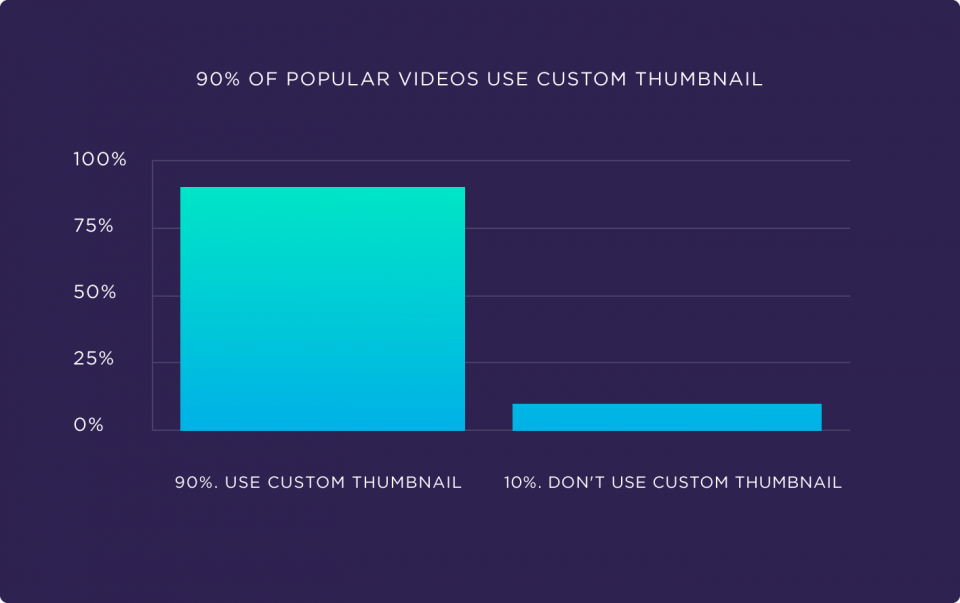
Briggsby’s study confirms the benefit of having your target keyword in your title; it found that more than 90% of top-ranking videos at least partially include a target keyword in their title.
SEO Tip 3:Write catchy titles that highlight a benefit
If you were to create a tutorial on origami, a keyword-rich title might be, “how to fold paper for dummies.” But that’s boring, isn’t it?
There are better approaches you could take that evoke curiosity:
- How to make origami with recycled paper
- How to make origami birds with high speeds
- My 6‑year-old niece teaches you how to make an origami bird
The point is that titles that directly offer the viewers the benefits that they can get from watching the video are more likely to stand out in a competitive landscape.
SEO Tip 4:Create a thumbnail that complements your title
Thumbnails are usually the first thing the viewer looks at before clicking through to a video. If you ask us, this is the hardest bit to get right consistently.
More on this coming up shortly in the next few subsections, but this is a great opportunity to get creative.
You can use your imagination and speak power to the truth. Here’s a thumbnail from a video, “How long does it take to rank on Google:”

And if you’re stuck, try and get ideas from Google images or stock photos. A search on Adobe Stock for the word, “system,” shows these photos.
SEO Tip 5:Use Title Ideas That Work
There are certain tried-and-tested key title styles which you can use as a content creator that can help your video go viral.
Some of the most-used title styles are:
- The ‘Vs.’ Title
A comparison of two or more products, ideas, etc. Some examples of this type of video include:iPhone 11 Vs. iPhone 12, Canon Vs. Sony and Trump’s immigration policy Vs. Biden’s immigration policy.
- ‘How to’ Titles
Almost 65% of people on Youtube last year used it to search for solutions. The ‘How to’ titles can be used for any of the videos that helps people find solutions — such as ‘how to change a tyre’ and ‘how to make cream cheese’.
- Mistakes Title Formula
‘Mistakes to avoid’ videos are among the most popular on Youtube; examples include ‘5 mistakes people make while tying a tie’, ‘5 mistakes to avoid while changing a tyre’, and ‘Mistakes to avoid while making cream cheese’.
The most successful YouTube content creators use a combination of the most popular title formulae to ensure that their videos continue to get views and appear in searches long after they have been uploaded.
( B) Description
Now that you have your title for the video, let us explore some of the best practices around crafting your YouTube video descriptions.
-
Find related keywords
You can do this via TubeBuddy’s Chrome extension. Zo gaat het:
-
Use a keyword research tool
You can use an external tool like Ahrefs as well. Zo gaat het:
Coming up next — we have thumbnails!
(C) Thumbnail
Think of thumbnails as your digital billboard for your video — they are the first thing viewers will notice and need to convey key information about the video to get more views on YouTube.
Let’s cut to the fundamentals of optimising your video thumbnails to increase YouTube views:
- Specifications:1280 x 720 pixels
- Aspect Ratio:16:9 ratio
- Format:.JPG, .GIF, .BMP, or .PNG.
- Size:Under 2MB limit
Here are a few best practices you can follow to grow your YouTube channel :
Consider increasing the brightness, saturation, and contrast of the image to make it stand out amongst other thumbnails, and make sure you zoom in and out of it to make sure it looks good in all sizes.
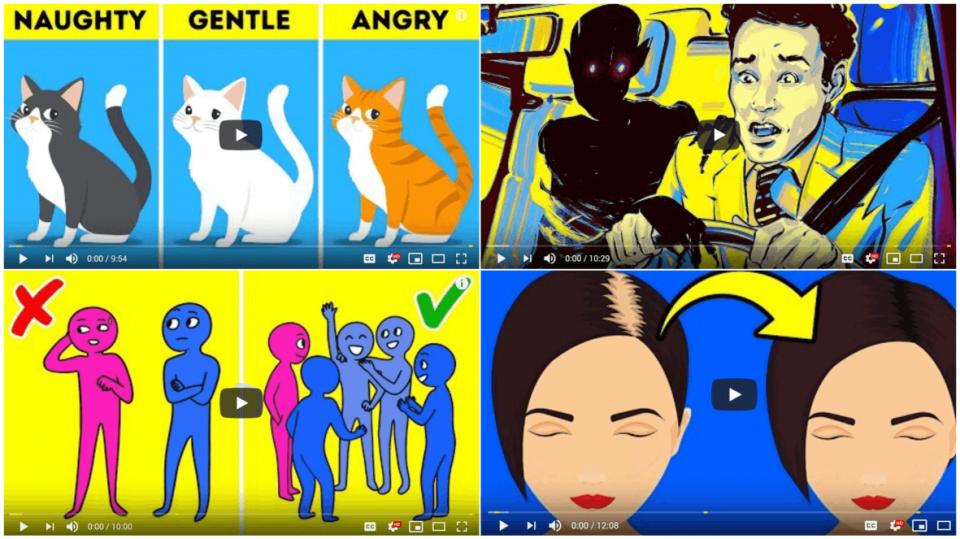
Coming to the colours you can use to make your thumbnail pop…
BOGY thumbnails use these colours:
- Blue
- Orange
- Green
- Yellow
As you know, YouTube’s colours are red, black, and white. So what happens when you use the same three colours in your video thumbnails?
You got it:they blend right in! Notice how your eye just glides over the image?
On the other hand, when you use BOGY colours:
It’s easy to see why viewers or potential viewers would be more likely to click on these, right?
Here’s another example:
The Bright Side Channel — which boasts on 30 million subscribers — mostly uses blue, orange, yellow, and purple in their thumbnails.
Of course, you can use red, black, and white occasionally; just make sure BOGY thumbnails dominate your feed for the most part!
Thumbnails that clearly show people’s faces receive a higher click-through rate on average than those that do not.
Try to feature a human face in your thumbnails, and make sure they are big enough and clear enough to convey a story or emotion.
This brings us to the 3E’s —
Eyes
Make sure you are making eye contact with the camera/ By making that virtual eye contact with your audience, you’ll be best placed to catch their eye and get their attention.
Emotions
For someone scrolling through a feed, something that shows or even evokes emotion is the one that makes them stop scrolling.

Your expressions need to be loud, the other visuals should be kept simple with minimum content on the thumbnail (not more than 2-3 words, ideally).
Excitement
If you look excited in your thumbnail, it’s more likely that you will evoke excitement in your viewer!
Don’t be afraid to get whacky with your expressions — in fact, it’s an inside joke that that’s exactly what successful YouTubers do to stand out.
If you’re using a font for the text, make sure it’s clear and easy to read, even from afar . It’s also worth checking whether the style of the font matches with the query you’re trying to address in the video.
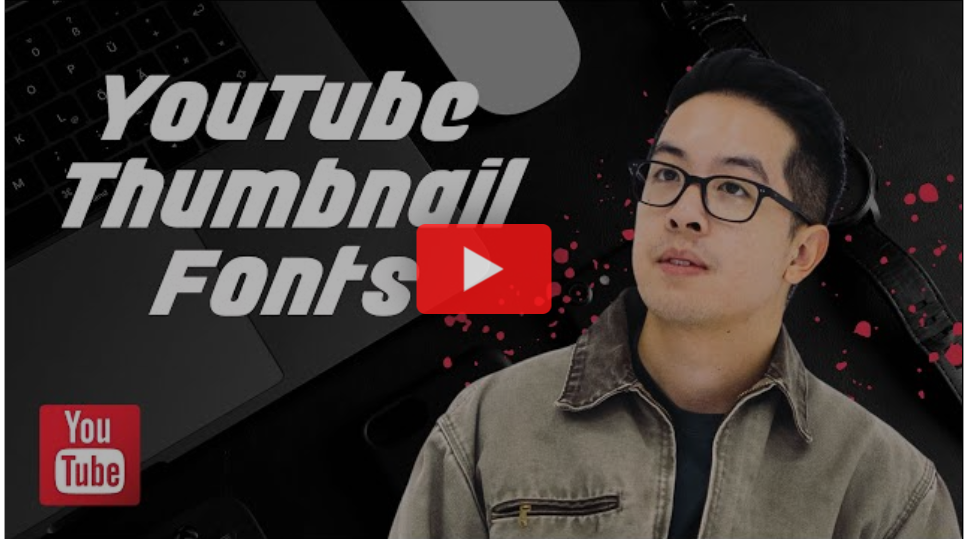
You can use Snappa to access a library of YouTube fonts for free and create great thumbnails with pre-designed templates!
Try not to put more than 2-3 words in the thumbnail — this content should function as the perfect teaser to draw the audience in.
Power tip — address the community that is your target audience. For example, if you’re making it for new mothers, use ‘new moms’ in the text in the thumbnail. Nick Nimmin, for instance, oftens refers to his viewer as ‘YouTubers’ — it’s a smart way to both identify and reach out to your audience.
Lastly, remember to keep it simple and don’t stress about it too much!
To create quick and easy thumbnails without using complicated applications like photoshop, you can use the thumbnail generator on TubeBuddy or VidiQ. Their thumbnail generators let you choose a still from the video or upload an image, to which you can add text, your logo, and other images.
(D) Tag s
The only thing that is left now for us to cover to do with optimisation is adding relevant tags which include keywords to your video while uploading . Tags let people discover your content on YouTube; they are the best way to let search engines know what your content provides, so it can match it to the viewer’s expectations.
While YouTube does not have its keyword search tool, there are many third-party tools like VIDIQ, TubeBuddy, Ahrefs Keyword Explorer that can help you identify the right tags and keywords for your video. You can also make a note of relevant tags that you come across while searching for keywords to add to your title.
You can use the same keywords you found out for the description as tags.
Gefeliciteerd! You have now learnt how to make a YouTube video as well as how to upload and optimise it. It’s now time to put the word out about it.
(9) Promot ing Your YouTube Videos
After having optimised the title, thumbnail, and description to boost views for your video, you need to amplify your video’s discoverability .
Here are ten ways to promote your videos outside the platform:
(A) Add Transcripts Or Closed Captions
YouTube does have an option to generate automatic captions but they are not generally very accurate. However, you can upload your own transcript.
Here’s how to add subtitles to YouTube videos:
Remember we mentioned YouTube Studio is a great way to generate traffic?
YouTube SEO gurus often advise that closed captions work best for boosting your video’s SEO rankings and traffic as they are crawlable by search engines. They also help make your videos more accessible,
(B) Add Cards
YouTube cards are interactive elements that you can place during or at the end of your YouTube video. These cards appear as a notification on the top right-hand corner of the screen while your video is streaming.
You can place these cards to appear at any given point in time during the video. When your audience clicks on the card, it will expand on the video’s right-hand side to showcase links to other videos, webpages, or playlists.
The card will disappear after a few seconds if the user does not click on it. These interactive cards work on both computers and mobile devices and are used to redirect your viewer to other content on your channel or an associated channel, call out to subscribe, or even conduct a poll. You can have up to 5 cards per video and there are a variety of card types like merchandise, fundraising, video, etc.
Check out this article to find out the exact steps you can follow to add YouTube cards for your videos.
(C) Add An End Screen
End screens are used to direct viewers to more content on your channel by placing a clickable card at the end of your videos (usually the last 5-10 seconds). This not only increases your channel’s watch-time but is also known to be a great way to cash in on new subscribers.
End screens can be viewed on both the desktop and mobile and you can add up to four elements. You can direct viewers to another relevant video, a playlist, an associated channel, and even call out for a subscription to your channel.
We’ve done you a solid and put together all the guidelines for making a YouTube end screen right here:
Parameter
Guideline
Length
25 Seconds
Screen Dimension
1280 x 720
End Screen Length
5 – 20 Seconds
Subscribe Button Dimension
294 x 294
Video/Playlist Space
615 x 345
Link Square
294 x 294
Elements Per Screen
4 Elements
Here’s an article that is a one-stop-shop for all things to do with YouTube end screens.
(D) Create Playlists
A playlist is a set of videos that are organised by topic or theme and show up in the videos section of YouTube. It makes it easier for businesses to club relevant content together for easy consumption and it also makes it easier for viewers to find the right content for them on new channels.
Playlists are also a great way to increase watch-time because when you click on the playlist, it will automatically play the consecutive videos on the list. They also rank for SEO if you use the right keywords.
For example, if you made a video about speed reading. When tagged alone, this will only show up as a result of its keyword. However, if it is clubbed in a playlist called ‘Productivity Hacks’ it will rank for multiple keywords and will give YouTube a better understanding of your video.
You can follow these steps to create a playlist:
- Find a video you want in the playlist.
- Under the video, click Save .
- Select a playlist such as Watch later, or a playlist you’ve already created, or click Create a new playlist .
- If you create a playlist, enter a playlist name.
- Use the drop-down box to select your playlist’s privacy setting. If it’s private, only you can view the playlist.
- Klik op Maken .
(E) Encourage Conversations In The Comments Sections
What is a better way to show YouTube that your audience is engaged than having them connect with you in the comments section?
If viewers are responding to the video with likes and comments, YouTube is more likely to promote it.
Here’s a simple trick to increase engagement and keep the conversation going. When you receive a comment saying “great stuff. Really helpful!”, don’t reply with a simple, conversation-killing thank you. Instead, engage in a conversation with the viewer. You can ask him what was the most useful insight he got from the video or if he would like to recommend a topic for the next video; this keeps the conversation going and increases engagement and ranking.
Pinned Comments are another way to interact with your viewer. You can redirect them to another video on your channel or ask them a question to drive engagement.
(F) Redirect Traffic From Other Channels
YouTube will prioritise content that gets views from other channels onto its channel. When it sees traffic coming from your social media pages, website, or other channels on the internet, it adds credibility to the video and increases engagement.
Here’s how you can redirect traffic from other channels to YouTube:
Step 1:Create Backlinks
In simple terms, backlinks are just links from a page on one website to another. If another website links to your video, then you have a backlink from them.
Backlinking can add to the credibility and value of your content in three ways:
- Rankings — The more links your videos have, the more likely they are to rank in search engines for relevant search queries.
- Discoverability — Since search engines find new content by revisiting pages to check for new links — especially the popular ones — they might discover your content faster if you get backlinks from popular pages.
To increase backlinks and add to your amplifying efforts, make sure you post on multiple platforms which can include your website, blog, Reddit, Quora, and even guest posting on other blogs that your video can add value to. The more backlinks you are able to create, the better your SEO for YouTube
Step 2:Promote On Social Media
You can leverage your community on social media as well as find many existing communities on social media sites like Facebook groups, Reddit, Twitter, and Instagram that match your interests. When people feel a sense of belonging, they engage with the content more; this results in getting more views on YouTube.
The reason YouTube rewards traffic from social media is simple — because you are bringing people from other social media platforms to YouTube.
Take time to interact with other members of the community, and make sure you write a simple 2-line description of why the fellow members might find that video interesting.
We understand that not everyone has 100K+ followers on Facebook or a verified Instagram, but there are ways to promote your YouTube videos even if you don’t have an audience yet.
(G) How to Promote Your YouTube Videos If You Don’t Have An Audience Yet
Step 1:Leverage communities on Quora and Reddit
Het proces is eenvoudig. Find a pre-existing thread where someone has asked a question or started a discussion most relevant to your video. Type in the best answer you can give and then link your YouTube video at the end to support your answer.
Step 2:Collaborate and interact with other YouTubers
Collaborating with other channels and creators regardless of the channel size can really be useful for putting yourself out there. If your content is on five other channels, that’s five other channels’ viewership that’s going to watch your content.
All you have to do is take that first step to reach out to other YouTubers that you want to collaborate with.
It’s also no secret that influencer marketing has been blowing up in recent times. The audiences that these influencers, with a large following, have are exposed to a brand’s content the minute they share them, making it possible for that content to even go viral — a content creator’s dream come true!
Just one share by the right influencer can change the game and generate a lot of views — Unamo Social Media is a great place to identify influencers within your sphere of interest and reach out to them to promote your YouTube content.
You can also pitch ideas to a brand, influencers, or a business that manufacturers ancillary products and create content with them to reach out to a larger audience.
Step 3:Pay for YouTube Ads
If you want to reach more people on YouTube, you can pay for it with YouTube ads. YouTube ads let you target keywords, interest and you can create custom audiences too.
Before you launch your ad campaign, it’s important to define the audience you want to reach. You have four main spheres of targeting options:
- Who. Try choosing specific or niche audiences based on demographics, language, and interests. For example, you could target 18-34-year-old female “cooking enthusiasts” who subscribe to food channels and watch culinary videos.
- What. It can help to select from topics that are most relevant to your channel. You can use contextual targeting to reach viewers searching for specific content. Or choose the video or channel on which you want your ads to be shown.
- Where. Define the location of your audience—country, region, city, or postal code. You can even define a custom location by radius or place of interest.
- When. Decide how often your ads are shown and on which devices. If you have a limited budget, you can pace the delivery of your ads throughout the day.
You should set up search ads based on your main keyword with the intent to get the paid viewers to subscribe to your channel. Your new subscribers will be notified every time you put up content, without having you pay for it again.
(H) Leverage YouTube’s Analytics
Nothing like creating relevant and high-quality content for your audience to make your YouTube channel grow faster.
To do this, it is essential to pay attention to YouTube’s analytics and identify what content resonates with your audience. The insights you can draw from studying the watch-time, CTRs, how many followers you gained per video, etc. can help you understand what kind of content works, and what doesn’t.
You can also go through the comments of your YouTube video where you will get insights into the need-gaps of your audience and how you can create content that brings them value and helps them.
Read our guide to understand YouTube metrics for beginners.
(I) Use the Right Tools to Create Valuable Content
As a content creator and YouTuber, you need to be in the know about tools so you can stay at the top of your game.
There are many third-party tools that have cropped up to help creators manoeuvre day-to-day tasks like creating thumbnails, finding keywords, and studying analytics. We’ve listed down some of the best tools we know of that are used by popular creators in the industry to help you get started today.
Youtube Essentials — The Complete Toolkit
(J) Repurpose Your YouTube Videos and Promote Them Across Social Media Channels
Get this:A single 10 minute YouTube video can produce at least 3 snackable videos, a promo, and a blog post, which can help you catch eyeballs across platforms and redirect them to the main video.
Most social media platforms let you share videos and some of them like Instagram and Twitter are now also becoming hotspots for viewing this form of content. You can also embed your video on your websites and drive traffic from online communities.
Many content creators aren’t aware of how to go about this process. What if we told you that — in just a matter of minutes — you could repurpose your YouTube video to create snackable videos and promos, without burning a hole in your pocket?
Use InVideo, the online video editing tool that is slowly becoming a favorite amongst marketers, to repurpose your YouTube video into clickable and easy-to-consume content for social media.
Zo gaat het:
-
Create Promos
Create a teaser or a sneak peek into your YouTube video that can be shared on social media as well as on your YouTube channel to create a buzz about an upcoming release.
Use this template to create your own video
-
Create Snackable Videos
Create simple and engaging snackable videos that are not only easy to consume — but also gives the viewer quick and actionable insights. You can also use these videos to pique the audience’s interest and redirect to watch the full video on YouTube.
Use this template to create your own video
-
Create Quote Videos
Choose an interesting quote from the video and turn it into an interactive video to share with your audience.
Use this template for your video
Conclusion
You’re all set to plan for, shoot and edit a high-quality YouTube video! Plus now you have all the actionable insights and information you need to promote it, as well.
We’d love to help you with your questions, so drop them in the comments below. Also, if you did find this guide helpful, please feel free to share them with your friends who are also looking to create YouTube videos.
-
Hoe u uw Facebook-videostrategie in 2021 vormgeeft [op basis van de analyse van 4M-berichten]
-
Hoe u uw sociale media-inhoud van tevoren kunt plannen
-
Hoe u uw video kunt laten opvallen op Facebook
-
9 manieren om door gebruikers gegenereerde video-inhoud aan te moedigen
-
Hoe contentmakers verschillen van influencers
-
9 manieren om door gebruikers gegenereerde video-inhoud aan te moedigen
-
Video gebruiken in uw marketingautomatisering
-
Top 10 meest voorkomende videofouten om te vermijden
-
Hoe u uw SaaS-marketing in 2022 kunt versterken met behulp van video (met voorbeelden!)
-
Aankondiging van het State of Video Report 2021