Het genereren van inkomsten met content en het opbouwen van volgers behoren tot de ontelbare dingen waar een contentmarketeer van droomt. Maar wat als uw video's niet zo nuttig zijn om de aandacht te trekken? Zou je je geluk de schuld geven of zou je in plaats daarvan de moeite nemen om de basisprincipes van het maken van video's te leren?
Als je wilt voortbouwen op de basisprincipes van het maken van video's, ben je hier aan het juiste adres. In dit artikel leer je hoe je niet alleen gratis online een video maakt, maar ook hoe je video's maakt die je doelgroep aanspreken alsof ze aan de andere kant van het bureau zitten.
Laten we dus snel aan de slag gaan.
Hoe maak je gratis een video online
Het maken van een video is relatief eenvoudig met Typito en duurt eigenlijk maar een paar minuten.
Stap 1:Aanmelden en een videoproject maken
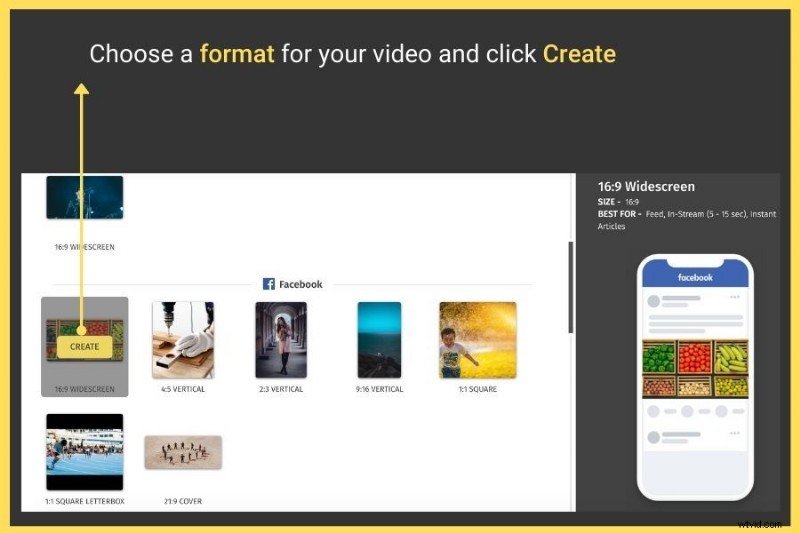
- Als u geen van de getoonde vooraf gedefinieerde indelingen wilt gebruiken en liever uw eigen indeling wilt maken, klikt u op de knop Aangepaste indeling maken bovenaan.
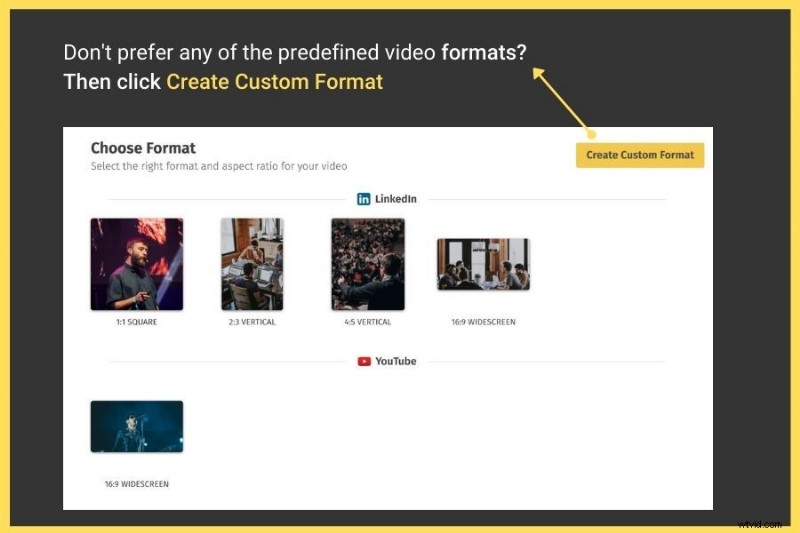
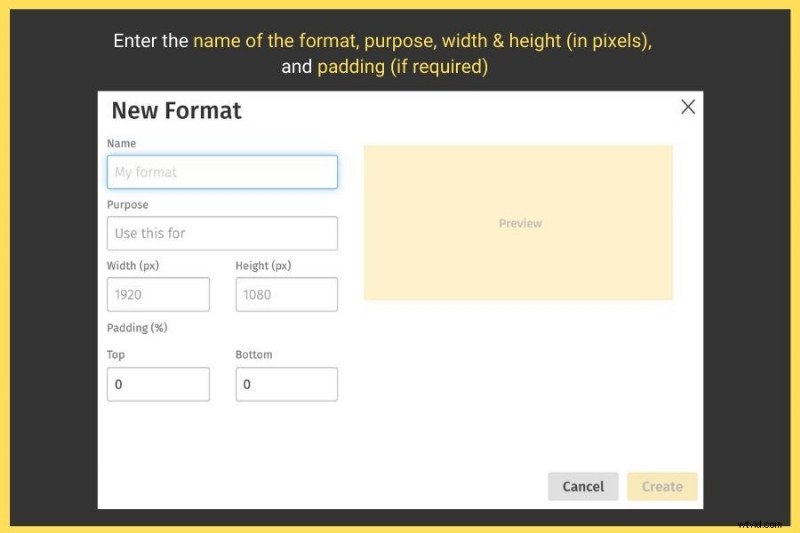
- Je ziet een pop-up waarin je de naam, het doel, de breedte en hoogte (in pixels) en opvulling (in %) van het videoformaat kunt invoeren. Nadat u alle gegevens heeft ingevoerd, klikt u op Maken .
Stap 2:Upload de video vanaf je computer of kies uit de stock mediabibliotheek
Welk videoformaat je ook kiest (of het nu YouTube, Linkedin, Instagram, Twitter, Facebook of Custom is), je wordt doorgestuurd naar een pagina met 2 opties om een video te importeren:
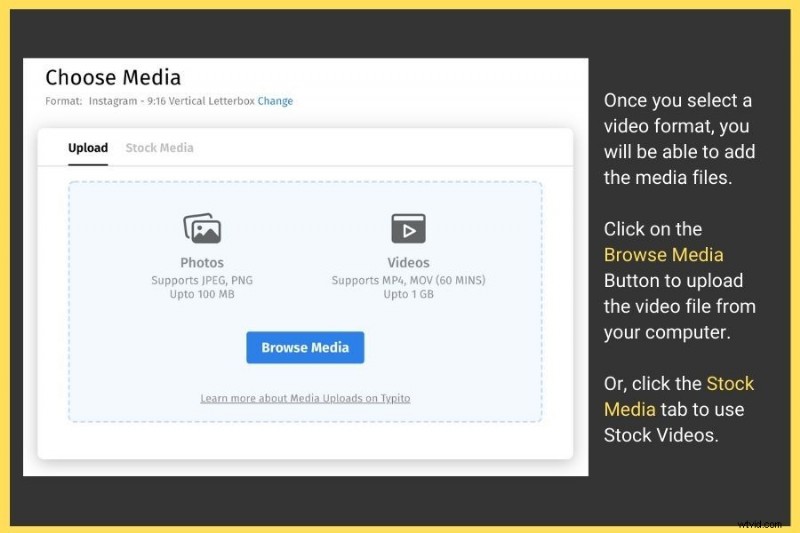
Pro-tip: U kunt hier twee dingen doen:
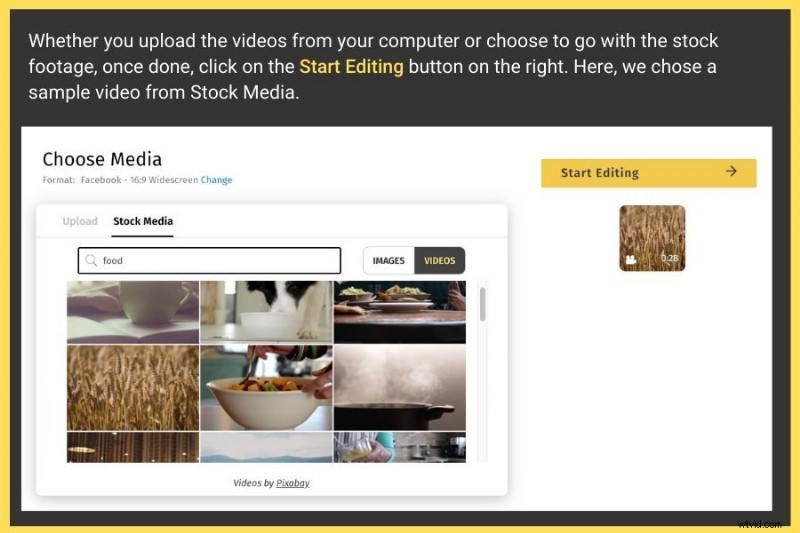
Op basis van de grootte van de geüploade video duurt het importproces enkele seconden tot minuten. Zodra dat is voltooid, klikt u op Beginnen met bewerken knop van rechts.
Stap 3:bewerk de video om er een professionele touch aan te geven
Je wordt doorgestuurd naar het gebruiksvriendelijke dashboard van Typito met het geüploade beeldmateriaal in hetzelfde formaat (of dezelfde afmetingen) dat je hebt gekozen.
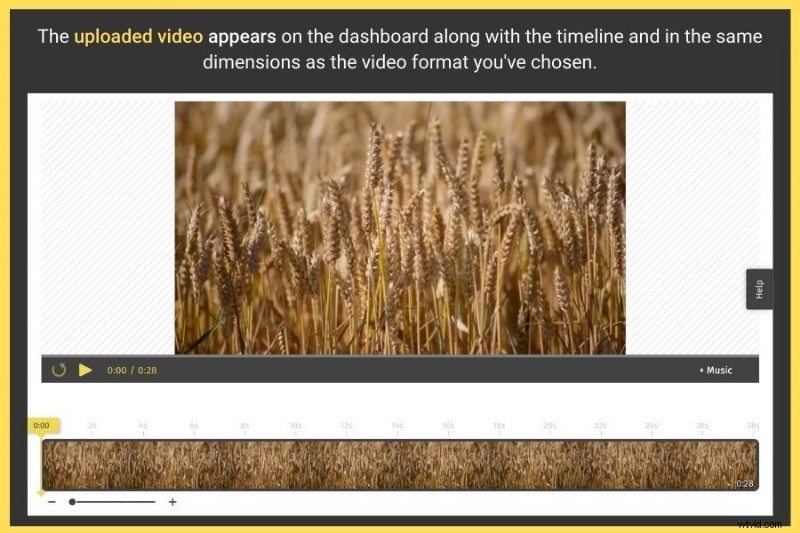
In het linkerdeelvenster ziet u 5 tabbladen waarmee u de essentiële elementen kunt toevoegen om een boeiende video te maken.
Hier is een korte blik op wat elk van deze elementen kan doen om je video te verbeteren.
1. Tekst toevoegen aan je video
Met deze optie is het toevoegen van tekst aan je video vrij eenvoudig. Dit is wat u moet doen:
De "tekst"-functie bevat ook enkele andere subcategorieën zoals:
Door eenmaal op een van deze tekstsjablonen te klikken, kunt u deze aan uw videowerkruimte aan de rechterkant toevoegen. U kunt het vervolgens slepen en plaatsen waar u maar wilt.
2. Afbeelding toevoegen aan uw video
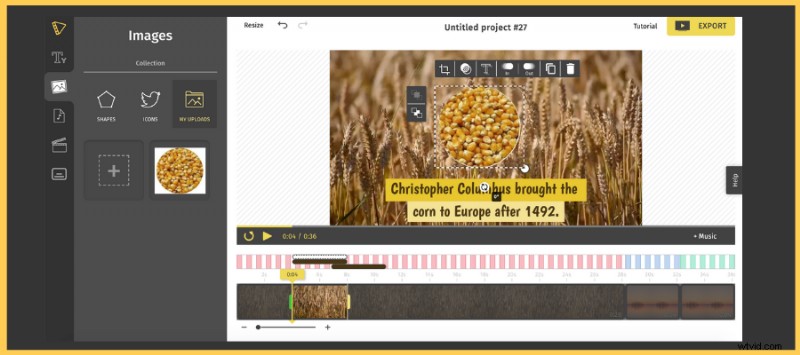
Het kan voorkomen dat u een paar afbeeldingen, vormen of pictogrammen in het midden van uw clip moet toevoegen voor meer context of gewoon een afbeelding van uw logo op uw video wilt plaatsen.
Hier ziet u hoe u eenvoudig een beeldoverlay, vormen of pictogrammen aan uw video kunt toevoegen:
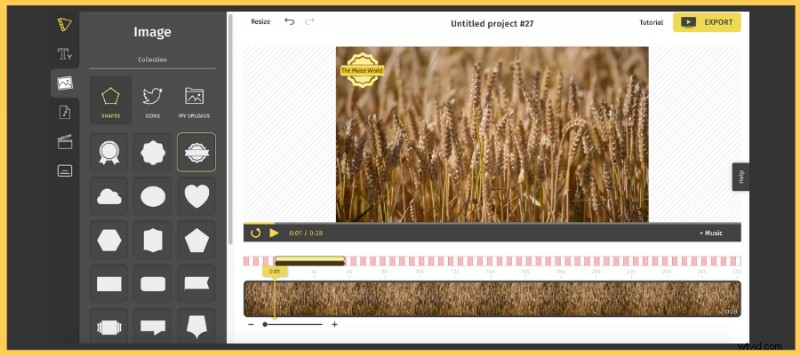
- Mijn uploads: Hiermee kun je je eigen logo's of pictogrammen uploaden die je in je video wilt gebruiken.
Klik eenmaal op een sjabloon om deze aan je video aan de rechterkant toe te voegen.
Muziek speelt een sleutelrol bij het vergroten van de betrokkenheid bij je video's. Dit geldt met name als je een video maakt zonder tekst, bijschriften of boeiende beelden.
3. Audio toevoegen aan uw video
Van het maken van een goede intro tot het toevoegen van tracks op basis van de stemming of het aanpassen van het volume van de achtergrondmuziek, het kan allemaal met slechts één klik.
Zo kun je audio aan je video toevoegen:
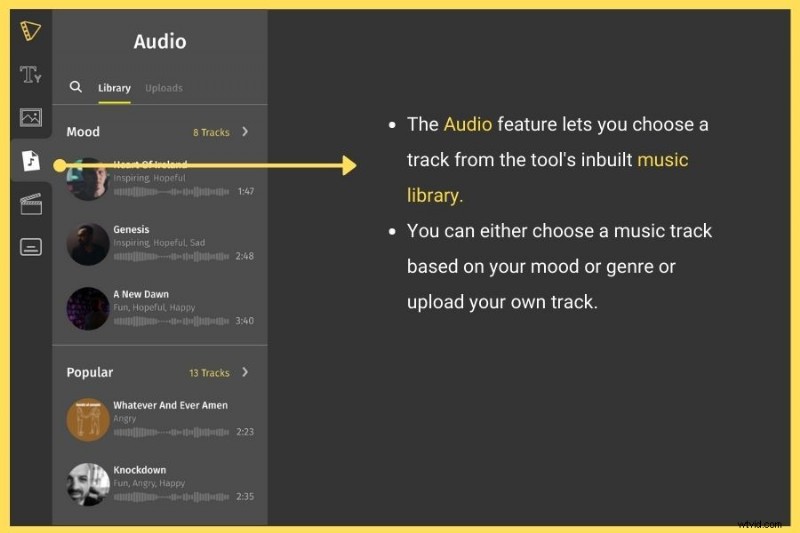
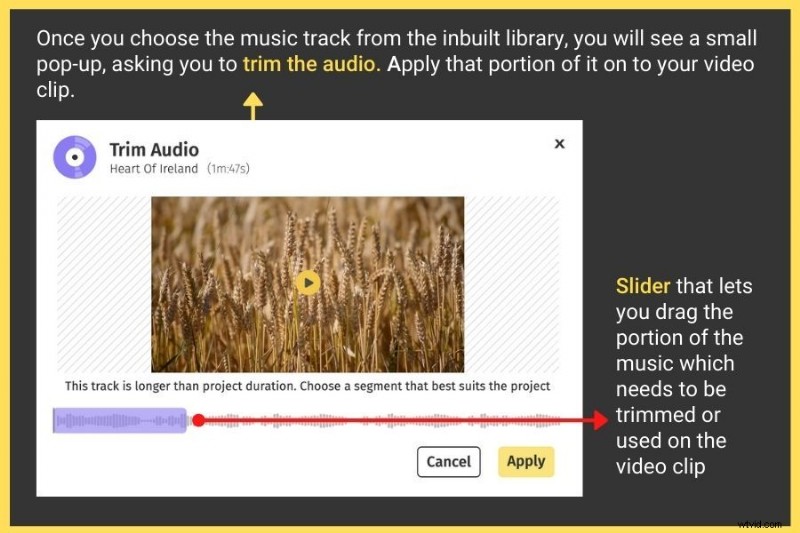
- Het maakt niet uit hoe je de muziek toevoegt, op het moment dat je het toepast, krijg je meteen een pop-up met een optie om de audio bij te snijden met behulp van een sleepbare schuifregelaar. Hiermee kun je een specifiek deel van de audio gebruiken voor de video.
- Nadat je de muziek aan de video hebt toegevoegd, heb je de mogelijkheid om het volume van zowel de achtergrond als de muziek op elk gewenst moment te wijzigen.
5. Afbeeldingen toevoegen aan uw video
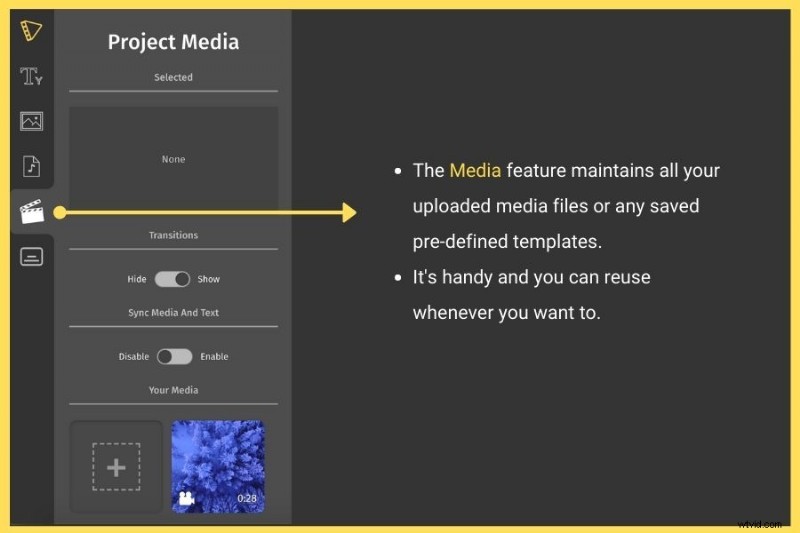
De media sectie kunt u afbeeldingen of meer videoclips uploaden en deze samenvoegen om een video te maken, zoals een diavoorstelling of afbeeldingsclips met enkele overgangseffecten of videocompilaties.
6. Onderschriften toevoegen aan uw video
Ondertiteling is een geweldige manier om uw video's toegankelijker en boeiender te maken. Hierdoor kunnen slechthorenden en d/dove personen niet alleen uw video-inhoud bekijken en ervan genieten, maar het zorgt er ook voor dat ze de informatie gemakkelijker onthouden. More than that, it’s also great for people who prefer watching videos in sound-sensitive environments.
With Typito, adding captions is easy and straightforward. Here’s what you need to do:
Step 4:Export the video and download
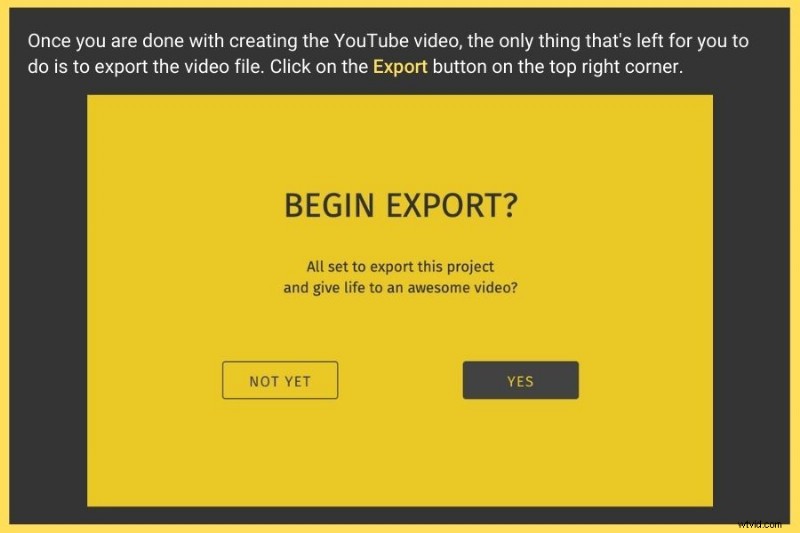
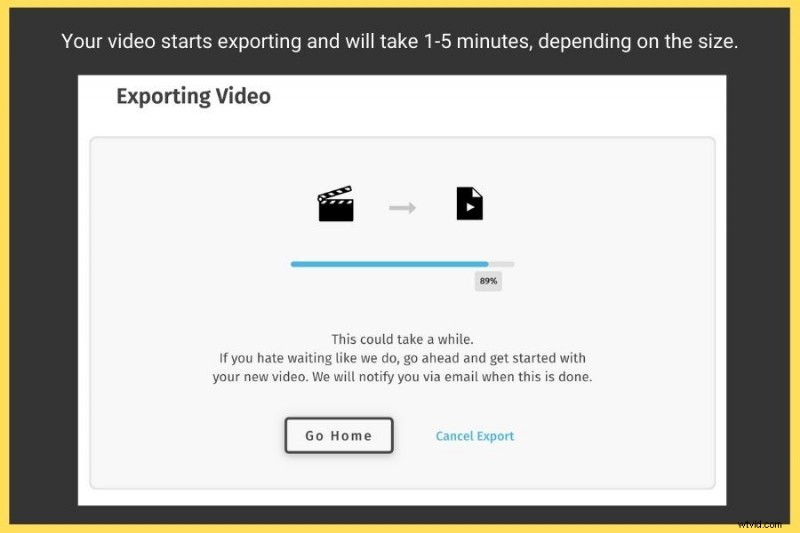
After you have played around with all the features and perfected your video, you just have to download it. To do this, follow these steps:

- Your video begins to export. This takes from a few seconds to minutes, based on your video size.
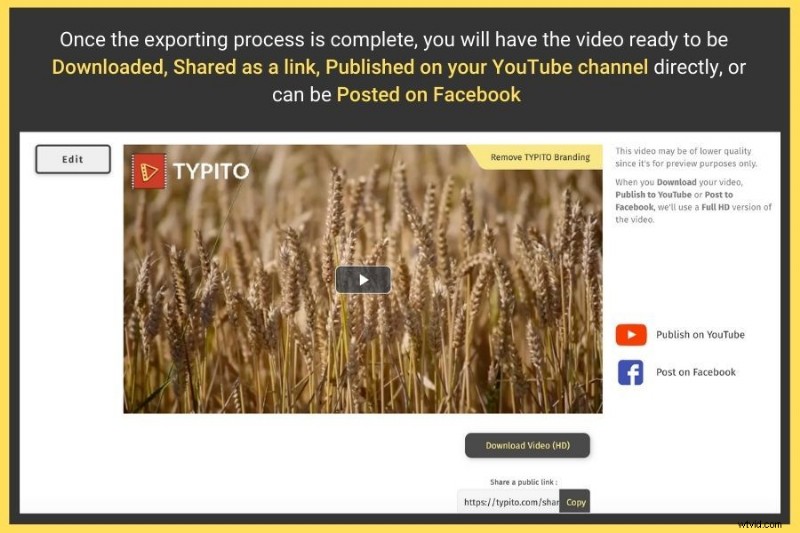
- Once that’s complete, your created video is ready to be:
- Downloaded in HD format and saved to your local drive
- Published to your YouTube channel directly
- Shared on Facebook
Now that you have learned how to make a video online for free, learn a few more essential video-making tips before you start making one.
Tips to Keep in Mind While Making a Video
If you’re nervous about making your first video, you aren’t alone. Most aspiring vloggers and videographers face the same hurdle after starting a YouTube channel or video project. Most of them can’t seem to understand how to make riveting video content with a modern vibe.
If you’re among the aspiring stars and cinematographers, here’s a chance you wouldn’t want to miss because in this blog you’ll learn the tips to keep in mind while making a video. So stick around till the end as we walk through the essentials that you’ll need even before getting started.
A lot of preparation goes into pre-production to get each shot right so that you don’t have to take the same path twice. My approach in this blog is to break down the process into smaller bits so that you can pause and practice each technique as you scroll.
Not to sound preachy, but you don’t have to spend a whole lot of money to become a professional video maker. At least, your first video needn’t be shot on a high-end camera, even a mobile phone makes a great tool to get the video professionally shot and edited with an easy-to use video editing tool like Typito.
Legends Make Videos and Not Clickbait
Congratulations on taking baby steps to launch your video project. The next stage is getting smaller things sorted. That includes brushing basics and keeping tools handy to start and finish the project within a stipulated time.
So without ado, let’s begin with tips that nobody talks about.
1. Light Brings Videos to Life
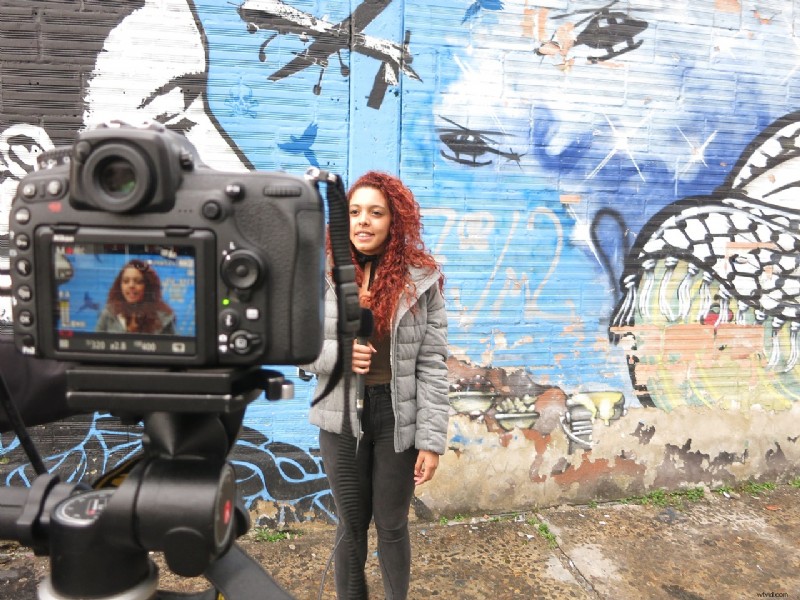
In cinematography, light shapes mood. It adds production value and makes the video richer and expressive. A soft light hitting the face brings the focus onto an object or character in your video while a bright dispersed light is more straightforward and general.
A misplaced light source clashes with the quality of the production and makes the video seem budget-strained. Natural light is strangely appealing in videos so shooting during the early hours and evening adds drama to scene composition.
At all costs, avoid shooting in piercing bright midday light to avoid dealing with unflattering shadows. It’s every video editor’s nightmare. While shooting indoors, experiment with symmetrical lights to illuminate the face and add intensity to the scene.
If you’re shooting marketing videos always leave the face well-lit for a positive vibe. If you’re taking the pro steps, it’s worth trying the lighting triangle to let the light flow around the features of your subject to create a pleasing composition.
2. Use Background to Compose Scenes

The background in a video is just as important as the foreground. If you are planning to compose a professional shot, choose the background wisely, and remove all distractions from the scene. Use a solid backdrop like heavy drapes and decorative paper to fill the void.
The most important thing is to make sure to place actors away from the backdrop to avoid inadvertent shadow casts. If you can’t make do with props available at home, rent a studio to use as a filming set.
When shooting at unfamiliar sets, be aware of reflective surfaces and window panes that reflect equipment or behind the scene crew. Moreover, placing actors near windows where outdoor light enters can cause unnecessary silhouettes.
3. Pick a Video Editor to Improve Quality

So you’ve got the production completed, what’s next? Raw footage is not a presentable material on its own. It must go through post-production where editors transform the footage by adding flavors like SFX, VFX, and also editing away unnecessary bits to arrive at a final version.
Even if you’re a beginner, make sure to use simple editing tools to make your footage appealing. These can take your video processing to whole new heights.
Some of the simpler features that you can exploit from free editing tools are text inclusion, cropping, scene transitions, and modifying aspect ratios. Some mid-tier versions also support filters, overlays, as well as stock audio and video.
4. Don’t Overdo the Edits

When you try the editor for the first time, be prepared to feel overwhelmed by its features. Only pick effects that increase the production quality and discard the rest.
In most scenarios, your footage may not need one or any effect at all. It’s always better to avoid going overboard with edits.
However, a few things are mandatory - Like using noise cancellation to remove background noise, adjusting brightness, cutting unwanted pauses, adding cool transitions, and BGM.
5. Use Audio to Make an Impact

Have you ever had to click a YouTube video and then immediately close it because of bad audio? It’s wired into humans to reject unappealing content, especially the audio.
Most people are patient enough to watch videos that may not be HD or if videos appear slightly grainy. But distorted audio is enough to make them pay no heed. So before making your first video, make sure you have set aside a small budget for an external microphone.
If you aren’t short-strapped, it won’t hurt to spend a little more on an HD microphone. After recording the audio from an outdoor location, edit away distractions like birds, wind noise, and traffic to call the viewer’s attention to a particular activity.
6. Use Image Stabilization

One important thing to remember in video-making is to record visuals without making viewers feel dizzy or seasick. Unless it’s part of the script, jerky videos will have people cursing you for not using a stable platform.
If you have shaky hands or aren’t set up to shoot hand-held, it’s best to set down the camera on an immovable surface (or use a gimbal or tripod if you have money to spare). Your skill will be put through paces when panning the camera. The smoother you do it, the more professional it seems.
However, if you can’t pan without ruining the production quality, consider changing perspective by cutting shots and making transitions.
If you still have shaky scenes in your master footage, use a video editing tool with image stabilization to fix the flaw. It’s mostly a one-click operation so it isn’t an exhausting effort. Alternatively, you could shoot using a video camera with built-in image stabilization.
7. Use Rule of Thirds to Compose Shots

If you insist on taking a professional approach, go with the rule of thirds to achieve pleasing footage.
According to this technique, the subject is placed along with the intersecting points on the grid lines. That is where the camera sensor captures the best details. It also adds a cinematic effect to the shot than having the subject stand in the dead center.
However, the rule of thirds isn’t always a textbook approach. It’s only a creative step to achieve unconventional results. If you’re a budding video maker, this is one of many important skills that’ll come in handy when regular shots start to seem unsuited.
8. Your Phone is a Great Video Making Tool

Thanks to Apple and its iPhone series, mobile photography exploded into a fad that people still follow. It’s a new genre where you don’t even have to own a DSLR to capture visuals. Instead, professional shots are conceived using just a mobile phone.
With manufacturers cramming more megapixels they can to phone sensors, it’s gotten better for end-users. Although not a replacement for pro SLRs, it does unarguably well compared to entry-level and mid-range SLRs. But be mindful of caveats if you’re going with mobile videography.
Shoot using the main camera because that’s where the sensor is bigger. Most selfie cameras on high-end mobile phones don’t fare as much as the main rear camera.
Shoot in the landscape to achieve the 35mm effect. It captures more details that improve video production quality on a larger screen. If possible use the overlay grid to maintain the level.
9. Create a Production Plan Before the Shoot

Above everything else, it’s important to meticulously prepare a plan beforehand to avoid last-minute changes. Impromptu shoots are great for a family occasion where moments weigh more than precision.
But if you’re stepping into the world of professional cinematography or if you want to make a career out of film-making, the complete schedule must be well-coordinated to avoid expenses from adding up due to disruptions.
Plan your production in stages and make sure to note progress, meeting deadlines, and time management. If you need a leg up in setting a basic production timeline, here’s what you need.
Start with production goals. Prepare questions like what you want to convey through your script and who will watch it and how your video will speak to viewers.
Whether shots will seem like a first-person/third-person perspective or a different one that isn’t tried before matters in production. You’ll be confronted with more questions as you get started and build momentum.
Once your goals are set, begin with scriptwriting and storyboarding. Most first-time video makers rush scriptwriting and stop abruptly when they’ve wandered off from the focus. It’s a learning experience, so don’t hesitate to revise portions till you’re satisfied with the way your script sounds when read out loud.
Here, being concise is the key to keep the audience riveted. Don’t prolong narrative portions unless it has any production value.
With the attention span of a goldfish, most content consumers would want excitement when the button is punched. They tend to become impatient when the plot slows down before getting to the interesting bits.
Conclusion
If making a video has been your life-long passion, get started now and use these tips to sharpen individual bits of production to make you make your video praise-worthy. I am sure, doing so will help you become a great filmmaker in the days ahead.
Most newbie filmmakers go through a vicious cycle of reworking their approach till it’s polished to perfection. Don’t forget to emulate the methods of rule-breakers because there is no single right path in video-making.
Modern video makers are constantly exploiting props and stage elements in bizarre ways to make shots shimmer. They do so, by deliberately deviating from traditions to get their work nominated for outstanding elements.
Someday, you could become an innovative filmmaker with a signature style that your movies will be associated with. So work persistently, and learn from mistakes to perfect your shots.
